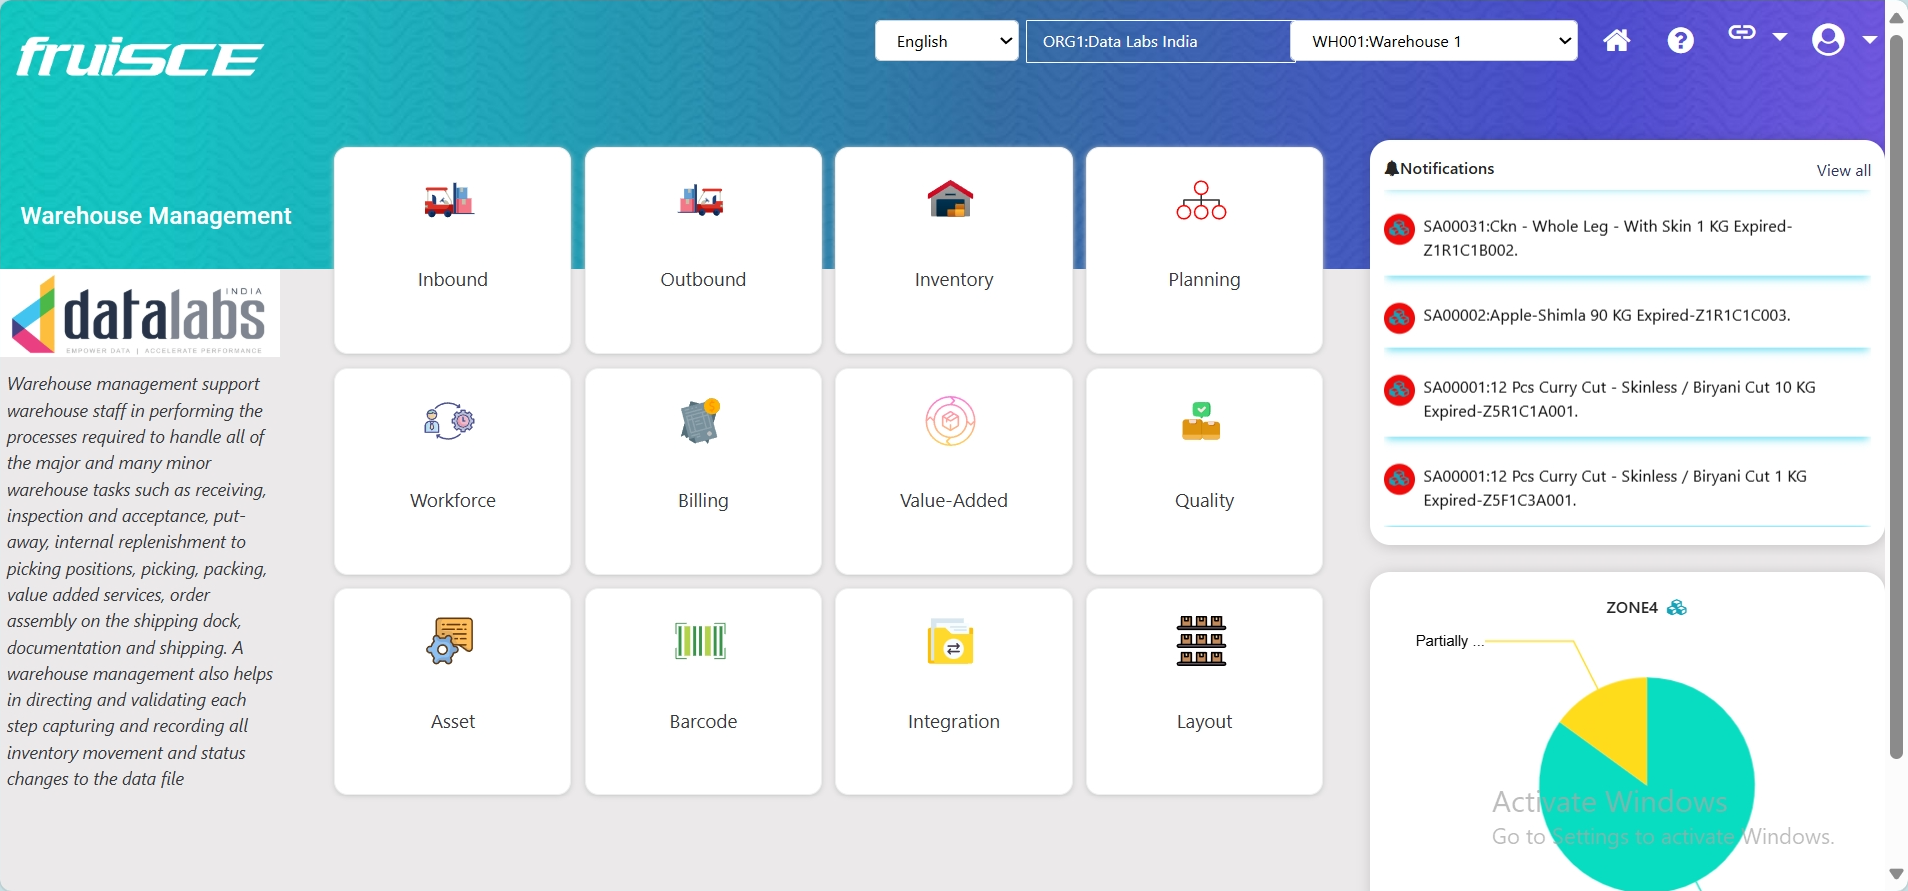
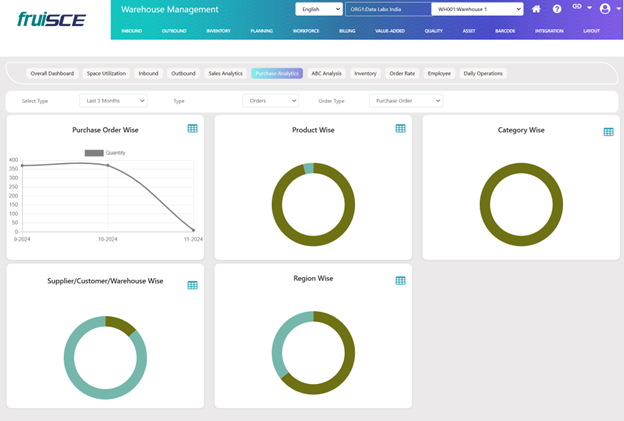
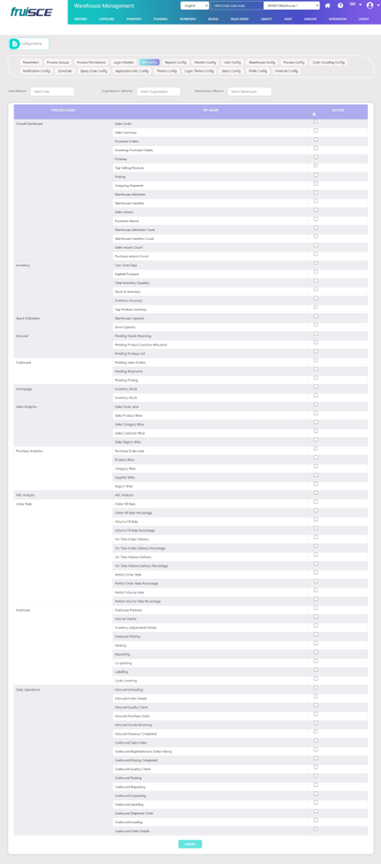
Right side of the screen has Notifications and Quick Analytics.
Header of the screen contains Help icon, user details along with reset password option
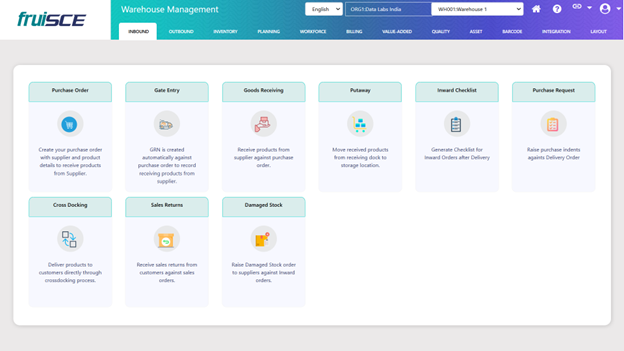
Sub Menu
By selecting menu from home page, it navigates to respective submenu screen.
Select the submenu to navigate to the respective screen.
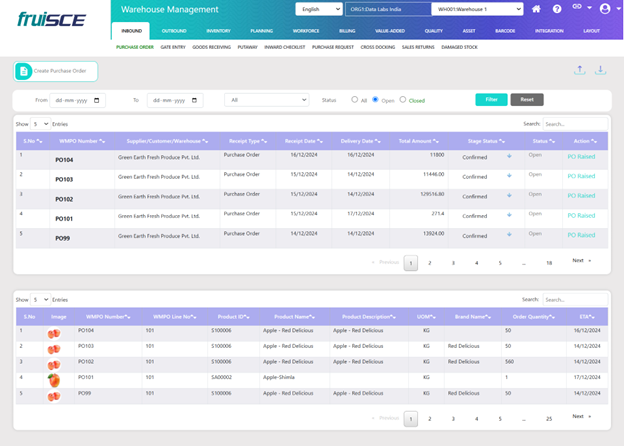
Find Request
List of purchase orders are displayed with order details in first table and product details in second table
When Order is saved, Action column shows edit option for editing the order
Clicking on edit option navigates to create purchase order screen to edit or confirm purchase order
When the order is confirmed it displays as "PO Raised"
Status of order is displayed as "Open" when created, changes to "Closed" after closing order
Orders can be filtered by:
Receipt date using date filter
Order status (Open/Closed/All) using dropdown
Search option for specific data
"Create purchase order" option available for creating new purchase orders
Purchase Order
A Purchase Order (PO) is a key document used in the procurement process of a business to request goods or services from a supplier. In the context of a Warehouse Management System (WMS), a PO plays a crucial role in managing and tracking inventory, ensuring accurate stock levels, and streamlining the overall supply chain process.
In a WMS, the Purchase Order represents the formal request made by a warehouse or company to a supplier, indicating the type, quantity, and agreed price of products or materials that are required. It also defines the specific terms and conditions, such as delivery schedules, payment terms, and other critical details related to the transaction.
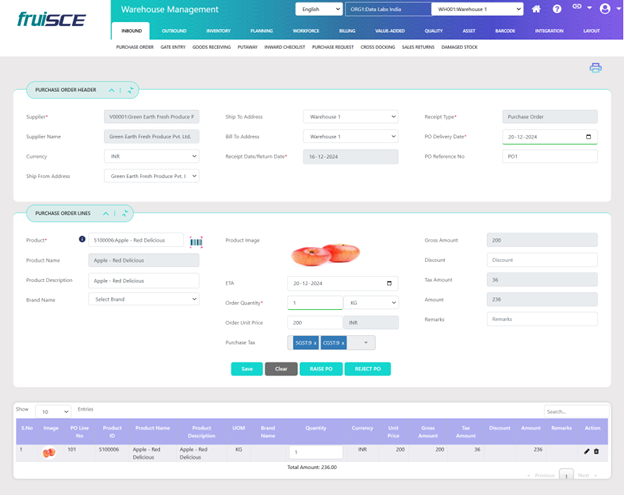
Request Creation
Here is the meaning of the field for the Description along with Navigation for the fields
Order Number:
Description: A unique auto-generated number assigned to the Purchase Order.
Navigation: After confirming the purchase order, the system automatically generates the Order Number (e.g., 1000001, 1000002).
Supplier ID:
Description: Unique identifier for the supplier of the product.
Navigation: The user selects the supplier from a dropdown list populated from the Supplier Master.
Supplier Name:
Description: Name of the supplier corresponding to the Supplier ID.
Navigation: Automatically displayed based on the selected Supplier ID.
Currency:
Description: The currency used for the transaction.
Navigation: The user selects the currency (e.g., INR, DOLLAR) from a dropdown list, populated from the Parameters.
Ship From Address:
Description: The address from which the goods are shipped (the supplier's address).
Navigation: The user selects the ship-from address from the dropdown list based on the Supplier Master.
Ship To Address:
Description: The address where goods are to be shipped (warehouse address).
Navigation: The user selects the shipping address from the Warehouse Master Default Saved Address dropdown. This can be edited if needed.
Bill To Address:
Description: The address where the invoice/bill will be sent.
Navigation: The user selects the billing address from the Warehouse Master Default Saved Address dropdown. This can be edited if needed.
Receipt Date/Return Date:
Description: The date when the goods are received or returned.
Navigation: The current date is displayed by default, and the user can edit it as required.
Receipt Type:
Description: Specifies the type of receipt used to differentiate transfer orders.
Navigation: This field is invisible until the PO is saved, after which the receipt type is displayed in the Goods Receipt section.
PO Delivery Date:
Description: The expected delivery date for the Purchase Order (PO).
Navigation: The user selects the PO Delivery Date from the calendar.
PO Reference No:
Description: Reference number associated with the purchase order for tracking.
Navigation: The user enters the reference number manually in a text field.
Purchase Order Lines Section
WMPO Line Number:
Description: Unique line number assigned to each item in the Purchase Order.
Navigation: Automatically generated for each product line. The numbers are 3-digit (e.g., 001, 002).
Product ID:
Description: Unique identifier for the product.
Navigation: The user selects the product from the dropdown list populated from the Product Master.
Product Name:
Description: Name of the product.
Navigation: Automatically displayed based on the selected Product ID.
Product Description:
Description: A description of the product.
Navigation: The user manually enters the product description in a text field (e.g., "100-500 grams").
Brand Name:
Description: The brand name of the product.
Navigation: The user selects the brand name from the dropdown list populated from the Parameters.
ETA (Expected Time of Arrival):
Description: The expected date when the product will arrive.
Navigation: The user selects the ETA from the calendar.
Order Quantity:
Description: The quantity of the product ordered.
Navigation: The user enters the quantity manually in a text field (e.g., "100").
Units:
Description: The unit of measurement for the product.
Navigation: The user selects the unit from a dropdown list (e.g., PCS, BOX), which is populated from the Parameters.
Order Unit Price:
Description: The price per unit of the product.
Navigation: The unit price is automatically calculated based on the product's conversion factor and purchase price from the Parameters.
Purchase Tax:
Description: Tax applicable on the product.
Navigation: The tax value is automatically populated from either the Product Master or the Tax Master, depending on the Ship To Address state.
Gross Amount:
Description: The total value of the order before discounts and taxes.
Navigation: The system calculates the gross amount using the formula: Gross Amount = Order Quantity * Order Unit Price.
Discount:
Description: Discount percentage applicable to the order.
Navigation: The user enters the discount percentage manually in a text field.
Tax Amount:
Description: Total tax applied to the order.
Navigation: The system calculates the tax amount using the formula: Tax Amount = Gross Amount * Tax Percentage.
Amount:
Description: The total amount for the product line after applying the discount and tax.
Navigation: The system calculates the amount using the formula: Amount = (Gross Amount - Discount) + Tax Amount.
Remarks:
Description: Additional comments or instructions for the order.
Navigation: The user enters remarks if required in this text field.
Total Amount:
Description: The total amount for all the purchase order lines combined.
Navigation: The system calculates the total amount by summing up the Amount values from all PO lines.
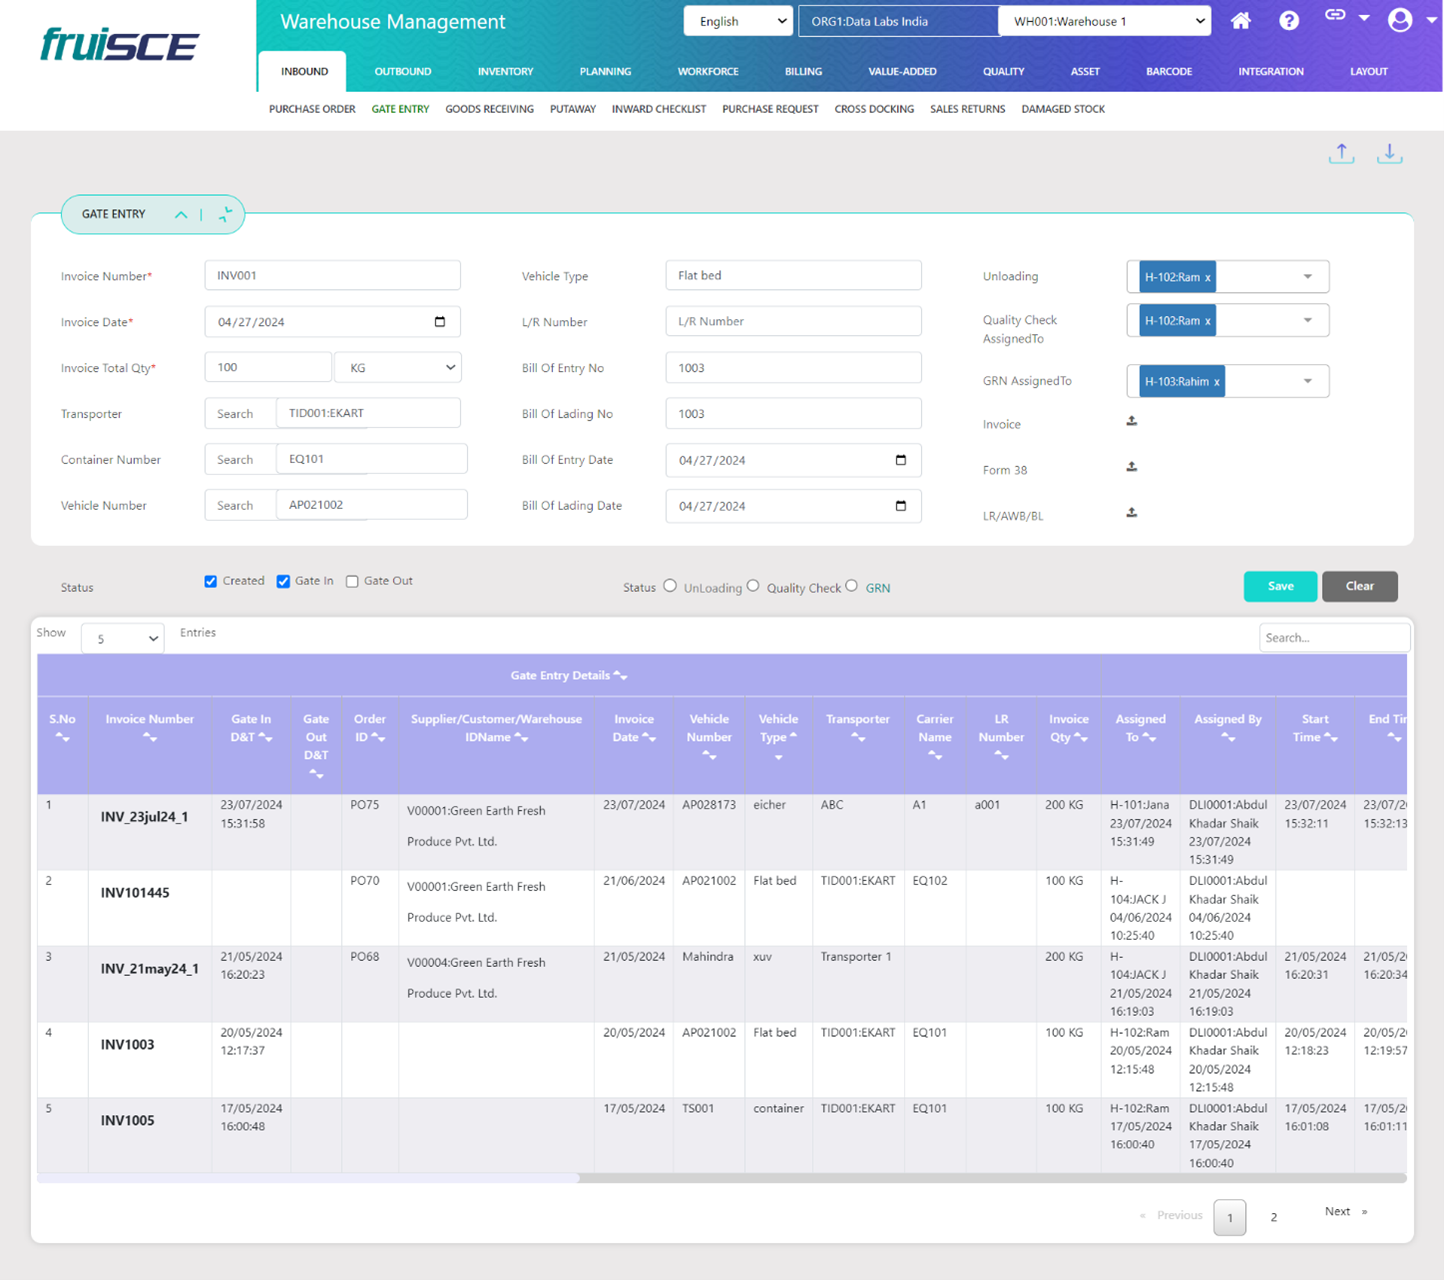
Inbound gate entry
Inbound Gate Entry is a critical process in Warehouse Management Systems that initiates the receiving workflow for goods arriving at the warehouse.
This step ensures that all incoming shipments are recorded, verified, and tracked right from the point of entry, enabling efficient inventory management and accurate documentation.
Here is the meaning of the field for the Description along with Navigation for the fields
Invoice Number
Description: A unique identifier for the supplier invoice.
Navigation: Input field in the Invoice Details section. Manually enter the invoice number provided by the supplier.
Invoice Date
Description: The date mentioned on the supplier invoice.
Navigation: Selectable calendar in the Invoice Details section. Click to open the calendar and pick a date.
Invoice Total Quantity
Description: Total quantity of items on the invoice.
Navigation: Numeric input field under Invoice Details. Enter the total quantity manually.
Invoice Total Quantity UOM
Description: Unit of Measure (UOM) for the total quantity.
Navigation: Dropdown menu in Invoice Details. Select from pre-configured options based on system parameters.
Transporter
Description: The transporter responsible for delivering the goods.
Navigation: Dropdown/input field under Transport Details. Select from the transporter master or manually input if not listed.
Container
Description: The container used for transporting the goods.
Navigation: Dropdown/input field under Transport Details. Choose from the container master or enter manually if unavailable.
Vehicle
Description: The vehicle used for transporting goods.
Navigation: Dropdown/input field in Transport Details. Select from the vehicle master or input manually if not pre-configured.
Vehicle Type
Description: Type of the vehicle (e.g., flatbed, lorry).
Navigation: Auto-filled or manual entry in Transport Details. Automatically fills when a known vehicle is selected, else input manually.
LR Number
Description: Lorry Receipt (LR) number associated with the shipment.
Navigation: Input field in Transport Details. Manually enter the LR number.
Bill of Entry Number
Description: The unique identifier for the customs bill of entry.
Navigation: Input field under Customs Details. Manually enter the number.
Bill of Lading Number
Description: Identifier for the Bill of Lading document.
Navigation: Input field in Customs Details. Enter manually.
Bill of Entry Date
Description: Date of the customs bill of entry.
Navigation: Calendar selector in Customs Details. Choose the date manually.
Gate Entry ID
Description: System-generated unique identifier for the gate entry.
Navigation: Auto-generated in Gate Entry Details. No user action required.
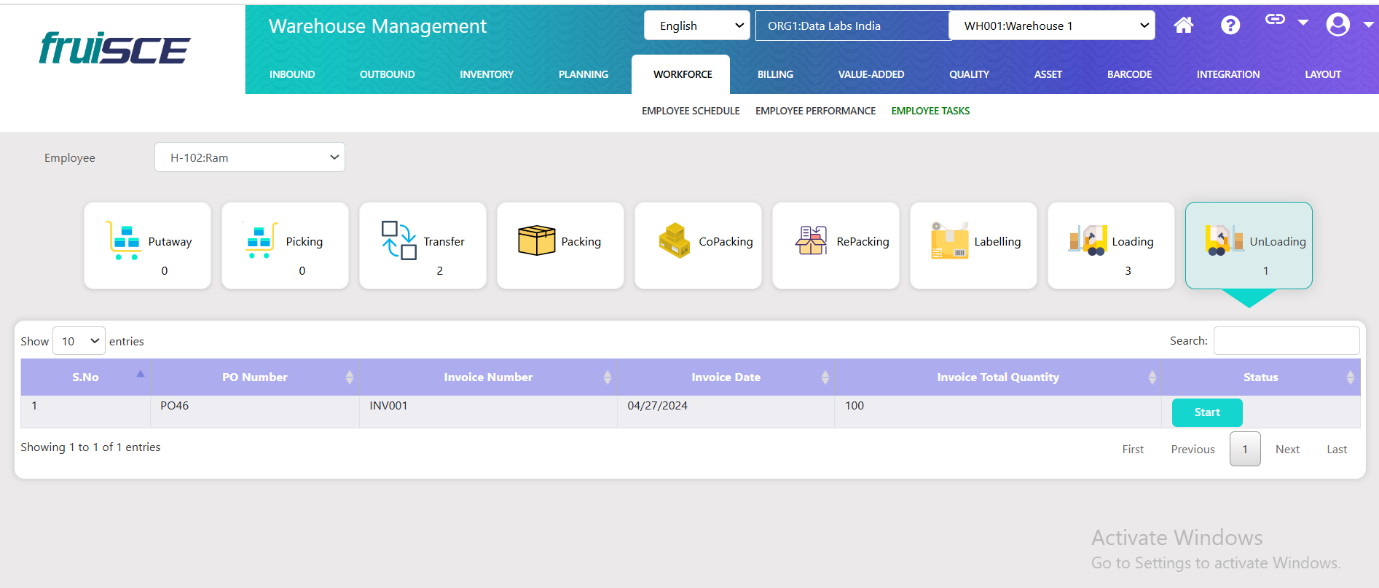
Unloading
Description: Assigned executive for unloading tasks.
Navigation: Dropdown menu in Task Assignment. Select from the executive master list.
Quality Check Assigned To
Description: Executive responsible for quality checks.
Navigation: Dropdown menu in Task Assignment. Choose from the executive master.
Navigation: Dropdown menu in Task Assignment. Select from the executive master.
Invoice
Description: A digital copy of the supplier invoice.
Navigation: File upload field in Attachments. Upload manually from the local system.
Form 38
Description: Upload Form 38 or equivalent document.
Navigation: File upload field in Attachments. Browse and upload manually.
LA/AWB/BL
Description: Upload Letter of Authorization, Airway Bill, or Bill of Lading.
Navigation: File upload field in Attachments. Manually upload from the local system.
Order Number
Description: Associated purchase or production order number.
Navigation: Dropdown in Order Details. Select the relevant order from the list.
Status and Workflow Fields
Here is the meaning of the field for the Description along with Navigation for the fields
Unloading Planned Completion Date
Description: Target date for unloading completion.
Navigation: Calendar selector in Status Updates. Pick the planned date.
Unloading Start
Description: Start the unloading task.
Navigation: Click the Start button in Status Updates. Updates unloading status automatically.
Unloading Complete
Description: Mark unloading as completed.
Navigation: Click the Complete button in Status Updates. Updates status to complete.
Quality Check Planned Completion Date
Description: Planned date for quality check completion.
Navigation: Calendar selector in Status Updates. Select a date.
Quality Check Start
Description: Begin quality check process.
Navigation: Click the Start button in Status Updates. Updates the status automatically.
Quality Check Complete
Description: Finalize the quality check task.
Navigation: Click the Complete button in Status Updates. Updates quality check completion status.
GRN Planned Completion Date
Description: Target date for GRN process completion.
Navigation: Calendar selector in Status Updates. Pick the planned completion date.
GRN Start
Description: Initiate the GRN process.
Navigation: Click the Start button in Status Updates. Updates GRN status.
GRN Complete
Description: Mark GRN as completed.
Navigation: Click the Complete button in Status Updates. Updates status to complete.
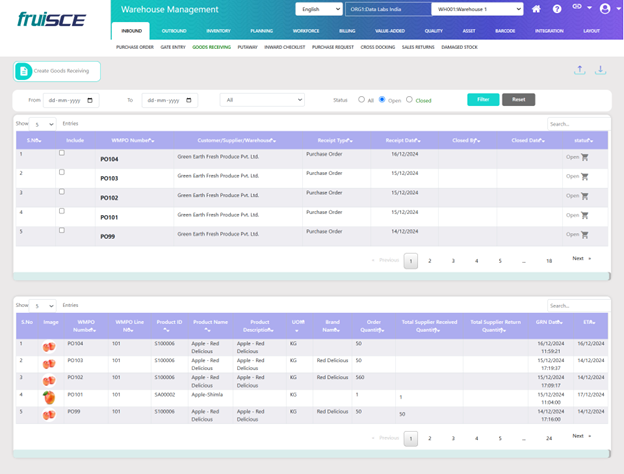
Maintain Goods Receiving
List of Goods receiving orders are displayed with order details in first table and product details in second table.
When Order is saved Action column in table shows edit option for editing the order, by Clicking on edit option it navigates to goods receiving screen to edit or generate putaway
When the order is generated putaway it displays as Putaway generated.
Status of order is displayed as Open when order created, after closing order status changed to Closed
Orders filtered by receipt date using date filter, order status selecting dropdown opened, closed, all.
By using search option also data filtered.
Click on Create Goods Receiving to receive products without purchase order
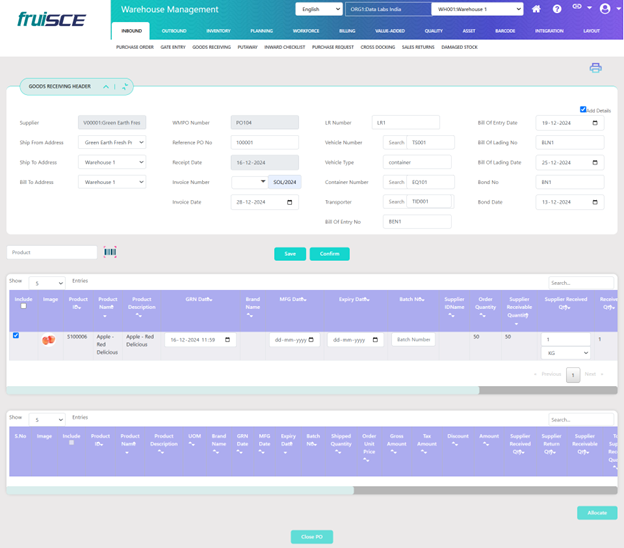
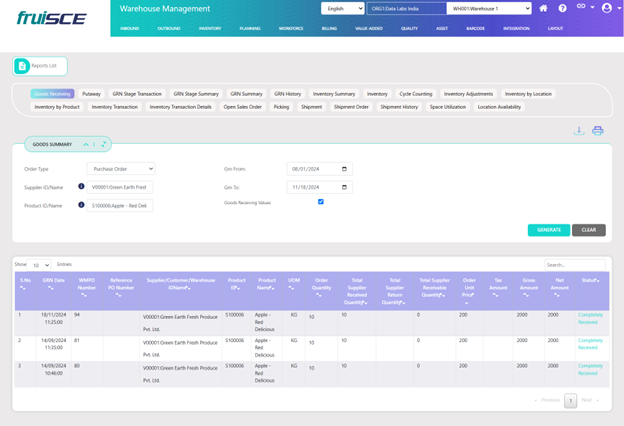
Goods Receiving
The Goods Receiving Process in a Warehouse Management System (WMS) is a systematic approach to recording, verifying, and organizing inbound goods as they arrive at the warehouse.
It is the first step in ensuring inventory accuracy and operational efficiency within the warehouse.
The WMS streamlines this process by automating data capture, enabling real-time tracking, and reducing manual errors.
Here is the meaning of the field for the Description along with Navigation for the fields
Goods Receiving Header
Order Number
Description: A unique identifier for the Goods Receiving process, automatically generated after confirming the purchase order (WMPO).
Navigation: This number is auto-generated after the purchase order is confirmed, and will appear automatically in the Order Number field.
Supplier ID
Description: The unique identifier for the supplier, manually selected from the Supplier Master list.
Navigation: Select the Supplier ID from the Supplier Master list, which will be populated with the available options (e.g., 1223: Induri factory).
Reference PO Number
Description: A reference number associated with the purchase order, manually entered by the user.
Navigation: Input the Reference PO Number manually in the respective text field.
Ship From Address
Description: The address from where the goods are shipped, typically the supplier's address (e.g., Bangalore depot).
Navigation: This field is auto-filled from the Supplier Master, displaying the default shipping address associated with the supplier.
Ship To Address
Description: The address to which the goods are shipped, usually the warehouse address (e.g., Bangalore depot).
Navigation: This field is auto-filled from the Warehouse Master, displaying the default shipping address of the warehouse.
Bill To Address
Description: The billing address for the goods receiving, typically the warehouse address (e.g., Bangalore depot).
Navigation: This field is auto-filled from the Warehouse Master, using the default billing address saved for the warehouse.
Receipt Date
Description: The date when the goods are received. This date is automatically set to the current date by the system.
Navigation: The Receipt Date field will automatically display the current system date as the default value.
Invoice Number
Description: The unique identifier for the invoice, which can either be manually entered by the user or selected from available entries.
Navigation: Input the Invoice Number manually, or select from the available list of invoices. If it is available in the Gate Entry records, it will be populated from there.
Invoice Date
Description: The date of the invoice, manually entered by the user or selected from the invoice options available.
Navigation: The Invoice Date can be manually entered, or if an invoice is selected from the Gate Entry records, the date will be populated from there.
LR Number
Description: The Lorry Receipt (LR) number, used to track the shipment. This number can either be entered manually by the user or selected from available records.
Navigation: Input the LR Number manually, or select it from the available invoices in the Gate Entry records.
Vehicle Number
Description: The vehicle number used for transportation of the goods, such as a container or truck, can be manually entered or selected from available records.
Navigation: Input the Vehicle Number manually, or select it from the available vehicle numbers in the Gate Entry records.
Vehicle Type
Description: The type of vehicle used to transport the goods (e.g., Trolly).
Navigation: Enter the Vehicle Type manually, or select it from the available options, if populated from the Gate Entry records.
Container Number
Description: A unique identifier for the container used to transport goods (e.g., C10001).
Navigation: Input the Container Number manually, or select it from the available records if it is part of the Gate Entry information.
Bill of Entry Number
Description: A unique number associated with the bill of entry, used for customs clearance (e.g., B10001).
Navigation: Enter the Bill of Entry Number manually, or select it from the available list, if it is populated in the Gate Entry records.
Bill of Entry Date
Description: The date when the bill of entry was issued (e.g., 03-12-2024).
Navigation: The Bill of Entry Date can be entered manually, or if an invoice is selected, it will be populated from the Gate Entry records.
Bill of Lading Number
Description: A unique identifier for the Bill of Lading, which is a document confirming the goods are being shipped (e.g., BL10001).
Navigation: Enter the Bill of Lading Number manually, or select it from available records, if it is part of the Gate Entry details.
Bill of Lading Date
Description: The date when the Bill of Lading was issued (e.g., 03-12-2024).
Navigation: The Bill of Lading Date can be entered manually, or if an invoice is selected, it will be populated from the Gate Entry records.
Bond Number
Description: A unique identifier for the bond used to ensure payment or compliance with legal requirements (e.g., BO10001).
Navigation: Enter the Bond Number manually, as this field is not pre-populated from any other records.
Bond Date
Description: The date associated with the bond (e.g., 03-12-2024).
Navigation: The Bond Date can be selected manually by the user.
Goods Receiving Lines
Product ID
Description: The unique identifier for the product (e.g., MLX039000038).
Navigation: Select the Product ID from a dropdown, which is populated based on the configuration either from the Product Master or Product by Supplier Master.
Product Name
Description: The name of the product (e.g., 4.20MM MINI-FIT FEMALE CRIMP TIN/REEL).
Navigation: Product Name is automatically populated after selecting the Product ID.
Product Description
Description: A description of the product (e.g., 100-500 gm).
Navigation: Product Description is populated based on the Product ID selection, and it comes from either the Product Master or Product by Supplier Master based on the configuration.
Brand Name
Description: The brand name of the product (e.g., Amul).
Navigation: Brand Name is selected from a dropdown, and it is populated from either the Product Master or Product by Supplier Master based on configuration.
Batch Number
Description: The batch number assigned to the product (e.g., ads1332).
Navigation: Batch Number is manually entered while receiving goods.
MFG Date (Manufacturing Date)
Description: The manufacturing date of the product (e.g., 03-12-2024).
Navigation: MFG Date is entered manually during the goods receiving process.
Expiry Date
Description: The expiration date of the product (e.g., 03-12-2024).
Navigation: Expiry Date is manually entered while receiving the goods.
GRN Date (Goods Receipt Note Date)
Description: The date the goods receipt note is created (e.g., 03-12-2024).
Navigation: GRN Date is automatically populated with the current date, but users can update it if required.
Supplier Received Quantity
Description: The quantity of goods received from the supplier (e.g., 100).
Navigation: Supplier Received Quantity is manually entered by the user while receiving the goods.
Receiving Unit
Description: The unit of measure for the received product (e.g., NOS).
Navigation: Receiving Unit is selected by the user during the receiving process.
Received Quantity
Description: The total quantity received, calculated by the system.
Navigation: Received Quantity is calculated automatically using the formula: Received Quantity = Supplier received Quantity * Conversion factor.
Supplier Return Quantity
Description: The quantity of products returned by the supplier (e.g., 100).
Navigation: Supplier Return Quantity is manually entered by the user if there are any returned products.
Returned Quantity
Description: The total quantity of returned products, calculated by the system.
Navigation: Returned Quantity is calculated automatically using the formula: Returned Quantity = Supplier Return Quantity * Conversion factor.
Order Unit Price
Description: The unit price of the product (e.g., 100).
Navigation: Order Unit Price is fetched from either the Product Master or Product by Supplier Master based on the configuration. It is calculated as: Order unit price = price or product purchase price * conversion factor value.
Gross Amount
Description: The total amount before any discounts and taxes, calculated by the system.
Navigation: Gross Amount is automatically calculated using the formula: Gross amount = received Quantity * order unit price.
Discount
Description: The discount percentage applied on the product price (e.g., 50.5).
Navigation: Discount is manually entered by the user while receiving the goods.
Purchase Tax
Description: The tax applicable on the purchase (e.g., GST 18%).
Navigation: Purchase Tax is fetched from the Product Master or Tax Master by considering the ship-to address state.
Tax Amount
Description: The amount of tax applied to the goods, calculated by the system.
Navigation: Tax Amount is automatically calculated by the system based on the provided tax rate.
Amount
Description: The total amount after applying the discount and tax (e.g., 4500.5).
Navigation: Amount is calculated automatically by the system using the formula: Amount = (Gross Amount - Discount Amount) + Tax Amount.
Invoice Number
Description: The unique identifier for the invoice (e.g., INV1000001).
Navigation: Invoice Number is automatically filled from the GRN header.
Invoice Date
Description: The date of the invoice (e.g., 12-12-2024).
Navigation: Invoice Date is automatically filled from the GRN header.
LR Number
Description: The unique identifier for the Lorry Receipt (e.g., LR10001).
Navigation: LR Number is automatically filled from the GRN header.
Vehicle Number
Description: The vehicle number used for transport (e.g., 20 feet container).
Navigation: Vehicle Number is automatically filled from the GRN header.
Vehicle Type
Description: The type of vehicle used for transport (e.g., Trolly).
Navigation: Vehicle Type is automatically filled from the GRN header.
Transporter
Description: The name of the transporter (e.g., Mythili Technologies).
Navigation: Transporter is automatically filled from the GRN header.
Bill of Entry Number
Description: The unique identifier for the Bill of Entry (e.g., B10001).
Navigation: Bill of Entry Number is automatically filled from the GRN header.
Bill of Entry Date
Description: The date the Bill of Entry was issued (e.g., 03-12-2024).
Navigation: Bill of Entry Date is automatically filled from the GRN header.
Bill of Lading Number
Description: The unique identifier for the Bill of Lading (e.g., BL10001).
Navigation: Bill of Lading Number is automatically filled from the GRN header.
Bill of Lading Date
Description: The date the Bill of Lading was issued (e.g., 03-12-2024).
Navigation: Bill of Lading Date is automatically filled from the GRN header.
Bond Number
Description: The unique identifier for the bond used to ensure payment or compliance (e.g., BO10001).
Navigation: Bond Number is automatically filled from the GRN header.
Bond Date
Description: The date associated with the bond (e.g., 03-12-2024).
Navigation: Bond Date is automatically filled from the GRN header.
Manual Location Allocation
Location Name
Description: The name(s) of the location(s) where the goods are to be allocated (e.g., Z1R1C1L1, Z1R1C1L2).
Navigation: Location Name is automatically populated from the Location Master based on either partial or full availability and by satisfying the merge conditions.
Quantity
Description: The quantity of items available in the location (e.g., 299908.999).
Navigation: Quantity is automatically populated from the Location Master and reflects the quantity that can be placed in the location based on pallet quantities.
Max Dimension
Description: The maximum dimension of the location (e.g., 89.5728).
Navigation: Max Dimension is automatically filled from the Location Master and displays the available dimension of the location based on the pallet quantity and placement.
Max Weight
Description: The maximum weight capacity of the location (e.g., 999.696).
Navigation: Max Weight is automatically filled from the Location Master and indicates the weight that can be placed in the location based on pallet quantity.
Required Quantity
Description: The quantity the user wants to allocate to the specific location (e.g., 100).
Navigation: Required Quantity is manually entered by the user, specifying how much quantity they wish to place in the location.
Get More
Description: Option to fetch additional location information if needed.
Navigation: Clicking the Get More button allows users to fetch additional locations as per their requirements.
Search
Description: A search field for the user to quickly search for specific location data.
Navigation: Search allows the user to input location names (e.g., Z1R1C1L1, Z1R1C1L2) to quickly filter and view location details.
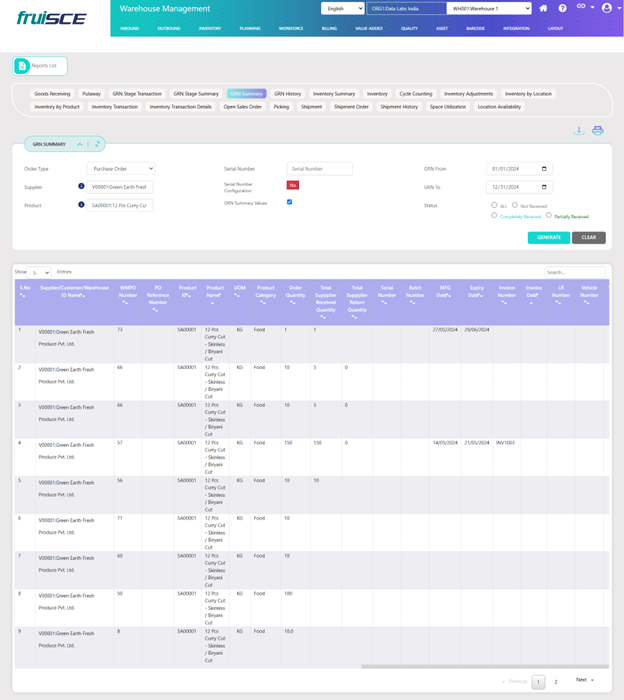
GRN Management Table
Product ID
Description: Unique identifier for the product in the Goods Receipt Note (GRN).
Navigation: Product ID is automatically populated after confirming the GRN.
Product Name
Description: The name of the product.
Navigation: Product Name is automatically populated after confirming the GRN.
Product Description
Description: A brief description of the product, such as weight or packaging.
Navigation: Product Description is automatically populated after confirming the GRN.
Brand Name
Description: The brand name of the product.
Navigation: Brand Name is automatically populated after confirming the GRN.
Batch Number
Description: The batch number of the product.
Navigation: Batch Number is automatically populated after confirming the GRN.
GRN Date
Description: The date on which the GRN is created.
Navigation: GRN Date is automatically populated after confirming the GRN.
MFG Date
Description: The manufacturing date of the product.
Navigation: MFG Date is automatically populated after confirming the GRN.
Expiry Date
Description: The expiry date of the product.
Navigation: Expiry Date is automatically populated after confirming the GRN.
Order Unit Price
Description: The unit price for the order.
Navigation: Order Unit Price is automatically populated after confirming the GRN.
Gross Amount
Description: The total gross amount for the product.
Navigation: Gross Amount is automatically populated after confirming the GRN.
Discount
Description: Any discount applied to the product.
Navigation: Discount is automatically populated after confirming the GRN.
Tax Amount
Description: The tax amount applicable to the product.
Navigation: Tax Amount is automatically populated after confirming the GRN.
Amount
Description: The total amount after applying discount and tax to the product.
Navigation: Amount is automatically populated after confirming the GRN.
Supplier Receive Quantity
Description: The quantity of the product received from the supplier.
Navigation: Supplier Receive Quantity is automatically populated after confirming the GRN.
Supplier Return Quantity
Description: The quantity of the product returned by the supplier.
Navigation: Supplier Return Quantity is automatically populated after confirming the GRN.
Supplier Receivable Quantity
Description: The receivable quantity populated after products receiving from the supplier.
Navigation: Supplier Receivable Quantity is automatically populated after confirming the GRN.
Total Supplier Received Quantity
Description: The total quantity of the product received from the supplier.
Navigation: Total Supplier Received Quantity is automatically populated after confirming the GRN.
Total Supplier Return Quantity
Description: The total quantity of the product returned to the supplier.
Navigation: Total Supplier Return Quantity is automatically populated after confirming the GRN.
Invoice Number
Description: The invoice number related to the GRN.
Navigation: Invoice Number is automatically populated after confirming the GRN.
Invoice Date
Description: The date of the invoice.
Navigation: Invoice Date is automatically populated after confirming the GRN.
LR Number
Description: The Lorry Receipt number associated with the GRN.
Navigation: LR Number is automatically populated after confirming the GRN.
Vehicle Number
Description: The vehicle number used for transportation.
Navigation: Vehicle Number is automatically populated after confirming the GRN.
Vehicle Type
Description: The type of vehicle used (e.g., Trolly).
Navigation: Vehicle Type is automatically populated after confirming the GRN.
Transporter
Description: The transporter name responsible for delivering the goods.
Navigation: Transporter is automatically populated after confirming the GRN.
Bill of Entry Number
Description: The bill of entry number associated with the GRN.
Navigation: Bill of Entry Number is automatically populated after confirming the GRN.
Bill of Entry Date
Description: The date of the bill of entry.
Navigation: Bill of Entry Date is automatically populated after confirming the GRN.
Bill of Lading Number
Description: The bill of lading number associated with the GRN.
Navigation: Bill of Lading Number is automatically populated after confirming the GRN.
Bill of Lading Date
Description: The date of the bill of lading.
Navigation: Bill of Lading Date is automatically populated after confirming the GRN.
Bond Number
Description: The bond number associated with the goods.
Navigation: Bond Number is automatically populated after confirming the GRN.
Bond Date
Description: The date of the bond.
Navigation: Bond Date is automatically populated after confirming the GRN.
Receive Location Name
Description: The location name where the goods are received.
Navigation: Receive Location Name is automatically populated while saving the GRN. If locations are not allocated, there is an option to update it.
Receive Location Allocation Type
Description: The type of allocation for the receive location (manual or auto).
Navigation: Receive Location Allocation Type is shown based on the configuration of the receive location allocation type, either Manual or Auto.
Return Location Name
Description: The location name where the returned goods are stored.
Navigation: Return Location Name is automatically populated while saving the GRN. If locations are not allocated, there is an option to update it.
Return Location Allocation Type
Description: The type of allocation for the return location (manual or auto).
Navigation: Return Location Allocation Type is shown based on the configuration of the return location allocation type, either Manual or Auto.
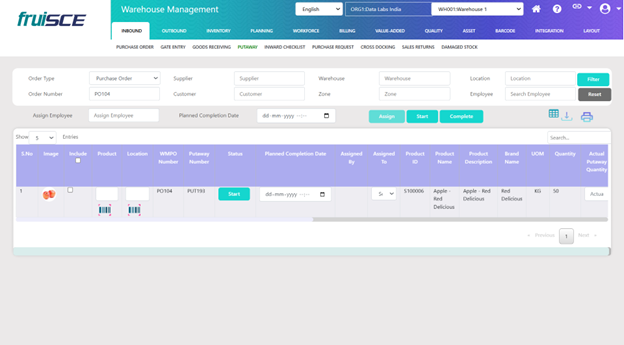
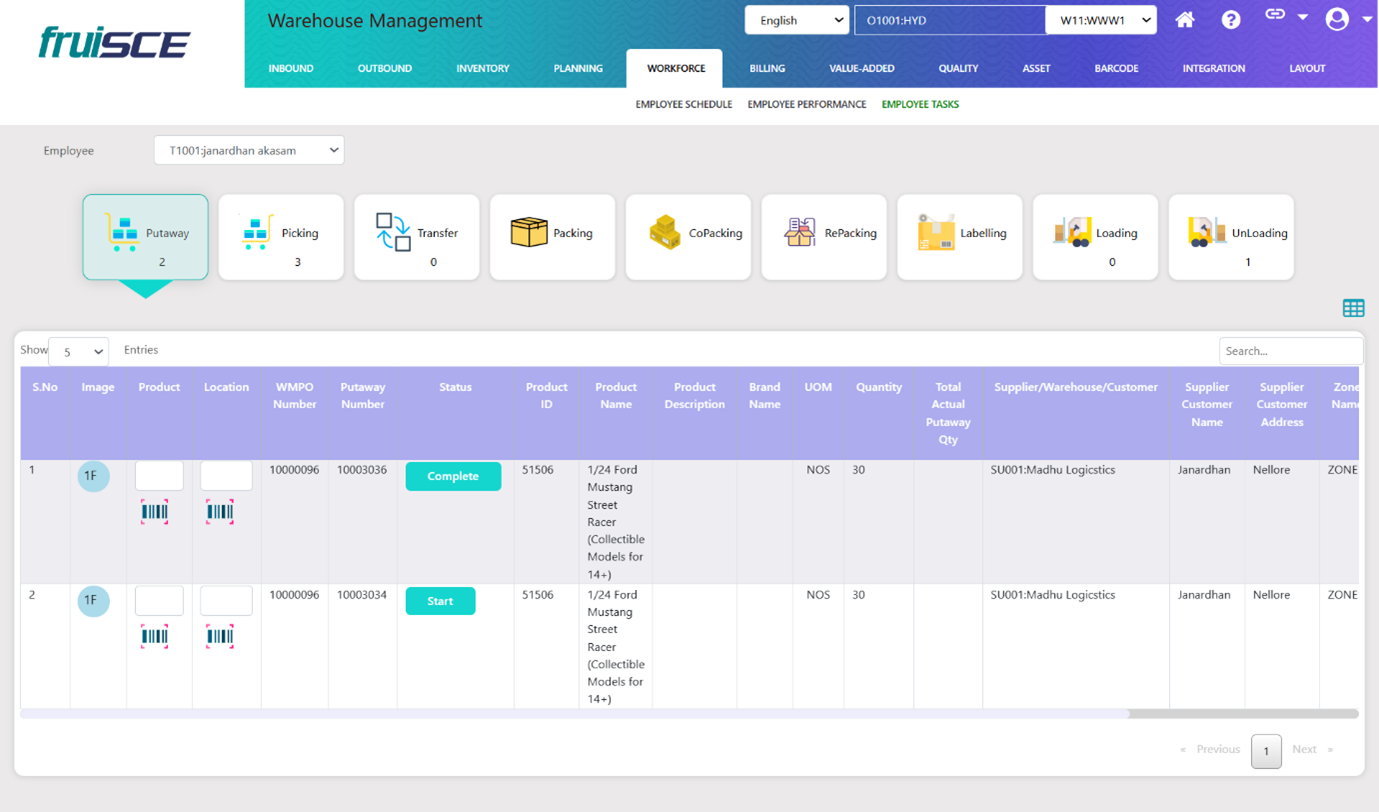
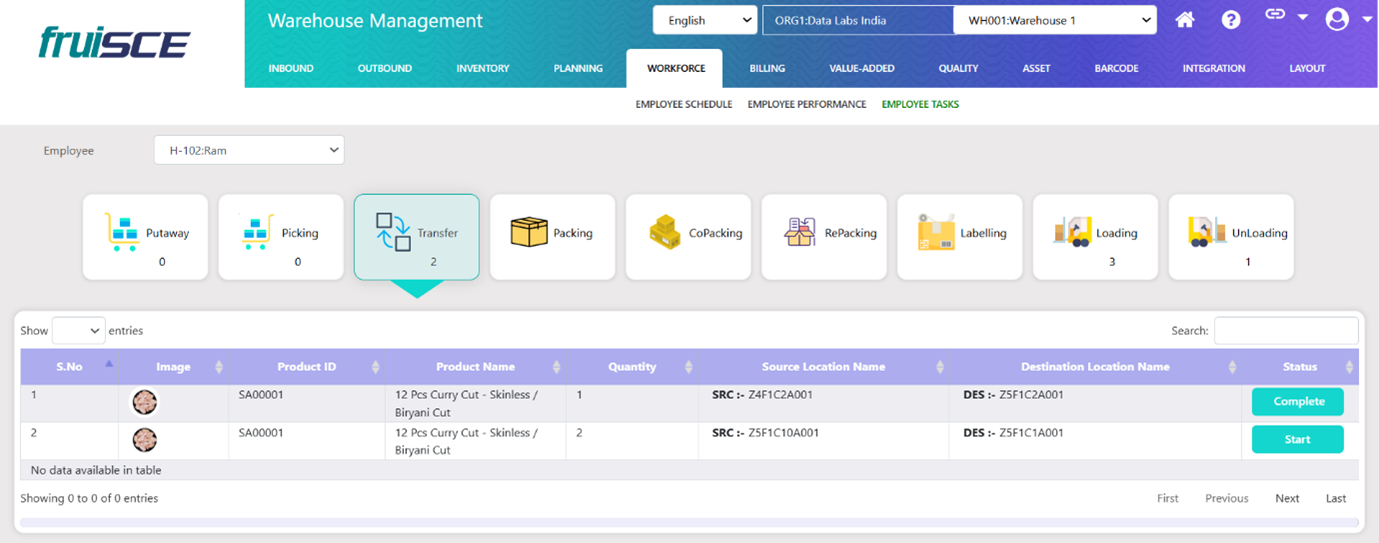
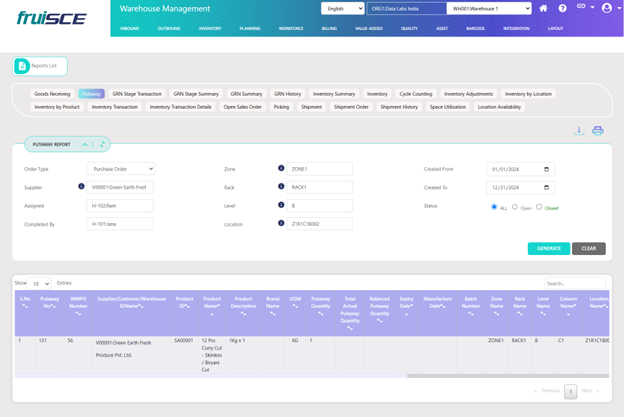
Putaway
The putaway process in a Warehouse Management System (WMS) refers to the systematic and organized method of moving received goods from the receiving area to their designated storage locations within a warehouse.
This process is crucial for maintaining warehouse efficiency, inventory accuracy, and streamlined operations.
Here is the meaning of the field for the Description along with Navigation for the fields
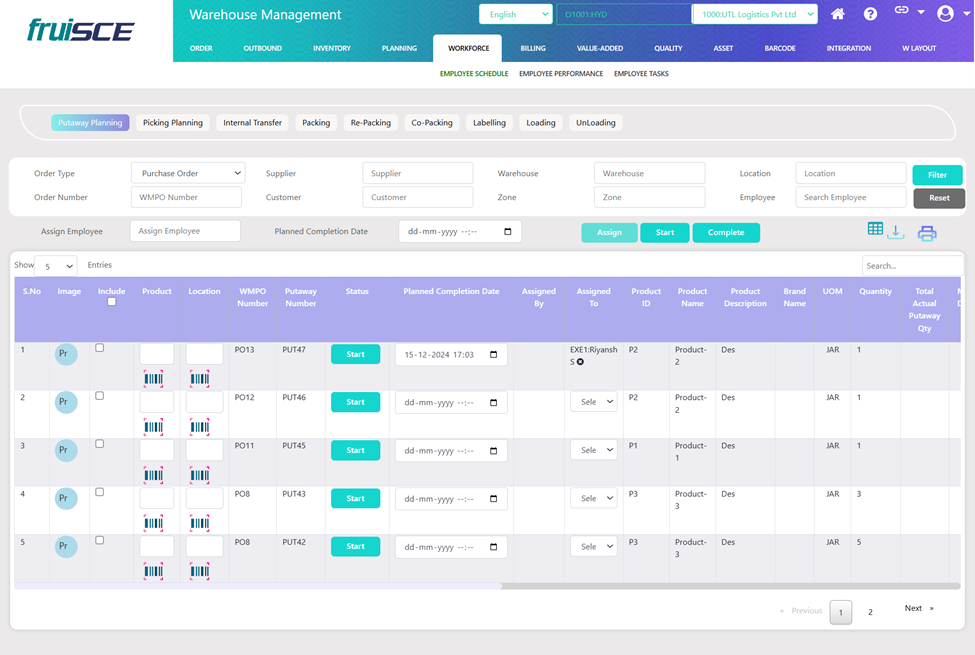
Putaway Number:
Description: Automatically generated unique identifier for the Putaway process.
Navigation: After confirming the GRN with respective PO lines, the system will auto-generate an 8-digit Putaway number. The first two digits start with '10,' and the remaining six digits are sequentially auto-generated. Example: 10000001, 10000002.
Order Number:
Description: Displays the order number generated during the PO process.
Navigation: The system will automatically fetch and display the number generated during the PO.
Status:
Description: Indicates the current status of the picking task. Options: Start or Complete.
Navigation: Click the button to update the status to "Start" when beginning the task or "Complete" upon finishing it.
Planned Completion Date:
Description: The target date for completing the Putaway task.
Navigation: Select the date manually from the calendar in the "Planned Completion Date" field.
Assigned By:
Description: Displays the name of the user assigning the Putaway task.
Navigation: Automatically captured based on the logged-in user credentials.
Assigned To:
Description: Specifies the executive assigned to complete the Putaway task.
Navigation: Select the executive manually from the dropdown, populated from the Executive Master list.
Start Time:
Description: The exact time the Putaway task was initiated.
Navigation: Automatically recorded by the system when the task is started.
End Time:
Description: The exact time the Putaway task was completed.
Navigation: Automatically recorded by the system upon task completion.
Product ID:
Description: Unique identifier for the product being put away.
Navigation: Automatically fetched and displayed from the GRN based on the respective PO ID and line number.
Product Name:
Description: Name of the product being put away.
Navigation: Automatically fetched and displayed from the GRN based on the respective PO ID and line number.
Product Description:
Description: Detailed description of the product (e.g., weight, size, or type).
Navigation: Automatically fetched and displayed from the GRN.
Brand Name:
Description: The brand associated with the product.
Navigation: Automatically fetched and displayed from the GRN based on the respective PO ID and line number.
UOM (Unit of Measure):
Description: The unit in which the product is measured (e.g., NOS).
Navigation: Automatically fetched and displayed from the GRN.
Quantity:
Description: The total quantity of the product being put away.
Navigation: Automatically fetched from the GRN.
Total Actual Putaway Quantity:
Description: The putaway quantity for the task, corresponding to the GRN.
Navigation: Automatically the quantity after completion of putaway.
Manufacturing Date:
Description: The date the product was manufactured.
Navigation: Automatically fetched and displayed from the GRN.
Expiry Date:
Description: The date the product expires.
Navigation: Automatically fetched and displayed from the GRN.
Batch Number:
Description: The batch number associated with the product.
Navigation: Automatically fetched and displayed from the GRN.
Supplier/Customer/Warehouse:
Description: The mapped supplier, customer, or warehouse details.
Navigation: Automatically fetched and displayed from the GRN.
Zone Name:
Description: The zone where the product is stored.
Navigation: Automatically assigned by the system.
Rack Name:
Description: The rack within the warehouse where the product is stored.
Navigation: Automatically assigned by the system.
Level Name:
Description: The storage level within the rack.
Navigation: Automatically assigned by the system.
Column:
Description: The column within the warehouse layout.
Navigation: Automatically assigned by the system.
Location Name:
Description: The location in the warehouse where the product is stored.
Navigation: Automatically fetched and displayed based on the GRN.
Invoice Number:
Description: The invoice number associated with the product.
Navigation: Automatically fetched from the GRN, as mapped from the Gate Entry.
Invoice Date:
Description: The date of the invoice.
Navigation: Automatically fetched from the GRN, as mapped from the Gate Entry.
Bill of Entry Number:
Description: The entry number of the bill.
Navigation: Automatically fetched from the GRN, as mapped from the Gate Entry.
Bill of Entry Date:
Description: The date of the bill entry.
Navigation: Automatically fetched from the GRN, as mapped from the Gate Entry.
Bond Number:
Description: The bond number linked to the Putaway task.
Navigation: Automatically fetched from the GRN.
Bond Date:
Description: The date of the bond associated with the task.
Navigation: Automatically fetched from the GRN.
Created Date:
Description: The date when the Putaway task was created.
Navigation: Automatically recorded by the system.
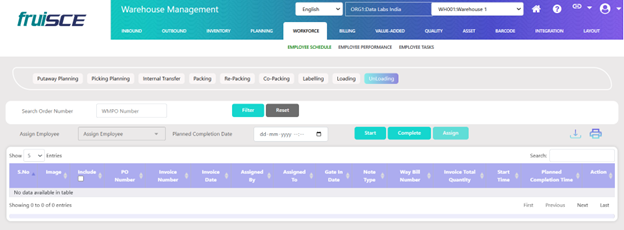
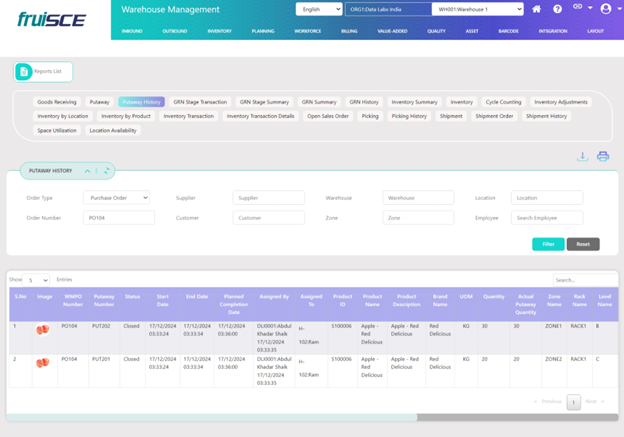
Putaway Filters
Order Type:
Description: The type of order (e.g., Purchase Order or Sales Order).
Navigation: This is an invisible field. The order type is automatically displayed in the Goods Receipt (GRN) after saving the PO. This differentiates between transfer orders from the warehouse or plants.
Order Number:
Description: The number associated with the respective order.
Navigation: Select manually from the dropdown list. The list contains incomplete state orders from the GRN.
Supplier:
Description: The supplier linked to the task.
Navigation: Select manually from the dropdown list. The supplier list is populated from the Supplier Master.
Customer:
Description: The customer associated with the task.
Navigation: Select manually from the dropdown list. The customer list is populated from the Customer Master.
Warehouse:
Description: The warehouse associated with the task.
Navigation: Select manually from the dropdown list. The warehouse list is populated from the Warehouse Master.
Zone:
Description: The zone within the warehouse for the task.
Navigation: Select manually from the dropdown list. The zone list is populated from the Zone Master.
Location:
Description: The specific location within the warehouse for the task.
Navigation: Select manually from the dropdown list. The list is populated from the Location Master, mapped to the selected zone.
Employee:
Description: The employee managing the task.
Navigation: Select manually from the dropdown list. The list is populated from the Executive Master.
Assignee Employee:
Description: The employee assigned to execute the task.
Navigation: Select manually from the dropdown list. The list is populated from the Executive Master.
Planned Completion Date:
Description: The target date for completing the task.
Navigation: Select manually in the "Planned Completion Date" field using the calendar.
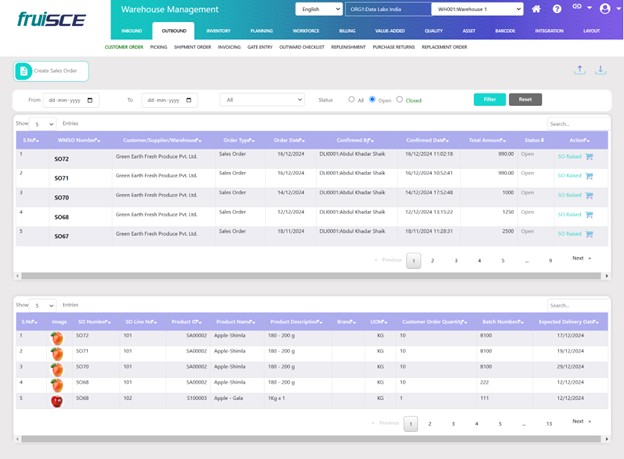
Maintain SO
List of sales orders are displayed with order details in first table and product details in second table.
When Order is saved Action column in table shows edit option for editing the order, by Clicking on edit option it navigates to sales order screen to edit or confirm order
When the order is confirmed it displays as SO Raised.
Status of order is displayed as Open when order created, after closing order status changed to Closed
Orders filtered by order date using date filter, order status selecting dropdown opened, closed, all.
By using search option also data filtered.
Create sales order is an option for creating new sales order.
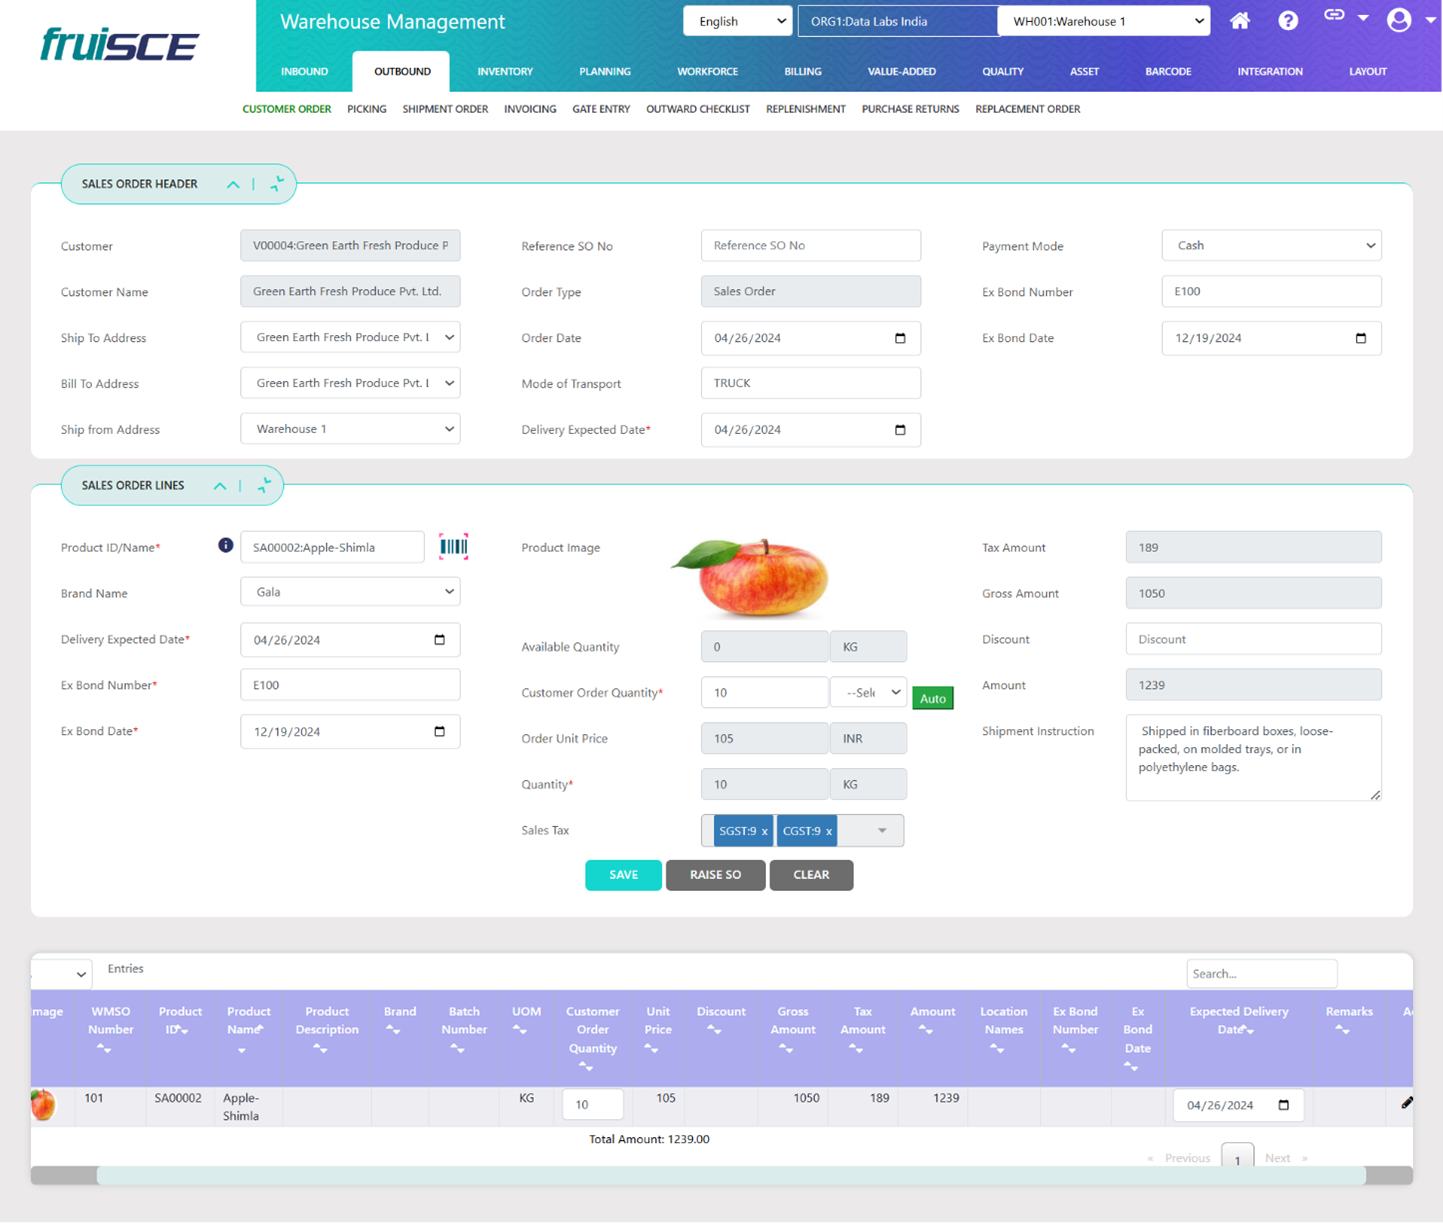
Create Sales Order
A Sales Order in a Warehouse Management System refers to the process and record associated with fulfilling a customer's request for products.
The sales order is created when a customer places an order, and it initiates a series of operations within the WMS, including inventory allocation, picking, packing, shipping, and invoicing.
Here is the meaning of the field for the Description along with Navigation for the fields
Customer
Description: The unique identifier for the customer placing the order. It helps in identifying and associating the sales order with a specific customer.
Navigation: Select the Customer ID from the auto-suggest dropdown or search manually. If the Customer ID does not exist, you can add a new customer by entering their details.
Customer Name
Description: The name of the customer associated with the selected Customer ID. This provides a readable reference to identify the customer.
Navigation: This field is auto-filled based on the selected Customer ID; no manual entry is required.
Order Type
Description: Specifies the category or nature of the sales order (e.g., Sales Order). This is important for classifying and processing orders correctly.
Navigation: Input the order type manually from dropdown.
Ship To
Description: The address where the products will be shipped. This is typically the customer's delivery address.
Navigation: Review and edit the address if necessary in the same form; this field is auto-filled based on the Customer ID.
Bill To
Description: The address where the invoice or billing documents are sent. This is usually the customer's billing address.
Navigation: Review and edit the address if necessary in the same form; this field is auto-filled based on the Customer ID.
Ship From
Description: The address of the warehouse or location from where the products will be shipped to the customer.
Navigation: Review and edit the default warehouse address in the same form.
Reference SO Number
Description: A unique identifier for the sales order that comes from the ERP system, used for tracking and integrating data between systems.
Navigation: Input the SO number manually or let it sync automatically from the ERP system.
SO Order Date
Description: The date on which the sales order is created or initiated.
Navigation: Use the calendar tool to select the desired date.
Mode of Transport
Description: The method of delivery for the order, such as truck, air, or sea transport.
Navigation: Input the mode of transport manually in the text field.
Delivery Exp Date
Description: The expected date by which the order is scheduled to be delivered to the customer.
Navigation: Use the calendar tool to select the desired date.
Payment Mode
Description: The method used for payment by the customer, such as NEFT, cash, or credit card.
Navigation: Choose an option from the dropdown menu.
Ex Bond Number
Description: A unique identifier associated with customs clearance or bonded warehouse transactions.
Navigation: Enter the Ex Bond Number manually in the text field.
Ex Bond Date
Description: The date associated with the Ex Bond Number, indicating when the customs clearance or bonded transaction occurred.
Navigation: Use the calendar tool to select the date.
Customers' Customer Address
Description: The address of the end customer to whom the primary customer is delivering the order.
Navigation: Input the address manually in the text field.
Customers' Customer Name
Description: The name of the end customer to whom the primary customer is delivering the order.
Navigation: Input the name manually in the text field.
Product ID/Name
Description: The unique identifier or name of the product being ordered. It is essential for selecting the correct product from the master list.
Navigation: Select or search for the product from the dropdown list. If the product doesn't exist, the system should allow you to add a new product.
Brand Name
Description: The brand associated with the selected product.
Navigation: Choose the brand from the dropdown menu.
Delivery Expected Date (Product)
Description: The expected delivery date for the specific product being ordered.
Navigation: Use the calendar tool to select the desired date.
Ex Bond Number (Product)
Description: The unique customs clearance identifier related to the specific product, auto-generated based on the header details.
Navigation: This field is auto-generated unless "Add Details" is enabled in the header.
Ex Bond Date (Product)
Description: The customs clearance date related to the specific product, auto-generated based on the header details.
Navigation: This field is auto-generated unless "Add Details" is enabled in the header.
Product Image
Description: Displays the product image based on the selected product.
Navigation: No manual action required; the image is auto-displayed.
Available Quantity
Description: The current stock or inventory quantity available for the selected product.
Navigation: This field is auto-filled from inventory data.
Customer Order Quantity
Description: The number of units of the product that the customer wants to order.
Navigation: Input the quantity manually in the text field.
Order Unit Price
Description: The price per unit of the product being ordered, as defined in the product master or supplier configurations.
Navigation: This field is auto-filled from the product data.
Quantity
Description: The total number of units of the product being ordered.
Navigation: Input the quantity manually in the text field.
Sales Tax
Description: The tax percentage applicable to the product, based on the sales tax mapping in the system.
Navigation: This field is auto-filled based on product data.
Tax Amount
Description: The total tax amount calculated based on the quantity, unit price, and applicable sales tax percentage.
Navigation: This field is auto-calculated.
Gross Amount
Description: The total cost of the order, including quantity, price, and tax.
Navigation: This field is auto-calculated.
Discount (%)
Description: The percentage of discount applied to the order, if any.
Navigation: Input the discount percentage manually in the text field.
Amount
Description: The final amount for the order, calculated as quantity multiplied by unit price, including tax and less any discounts.
Navigation: This field is auto-calculated.
Shipment Instruction
Description: Special instructions provided by the customer for handling or shipping the order.
Navigation: Input the instructions manually in the text field.
Manual Location Allocation (Details)
Location Name
Description: Refers to the specific storage location within the warehouse where the product is stored. This helps pinpoint the precise area in the inventory.
Navigation: This field is auto-filled from the inventory based on the selected product. If multiple locations are available, users can select the preferred location from a dropdown.
Available Quantity
Description: The quantity of the product currently available in the specified storage location. This ensures that the required inventory is accessible.
Navigation: This field is auto-filled from the inventory data for the selected product and location.
Batch Number
Description: Identifies the batch associated with the product for traceability and quality control purposes.
Navigation: This field is auto-filled from inventory data based on the selected product and location.
Serial Number
Description: A unique identifier assigned to individual units of the product for detailed tracking.
Navigation: This field is auto-filled from inventory data but can also be edited manually for specific cases if allowed.
BOE Number
Description: A Bill of Entry (BOE) identifier used for tracking customs clearance of imported goods.
Navigation: This field is auto-filled from the inventory details of the product.
BOE Date
Description: The date corresponding to the Bill of Entry (BOE) number, which marks when the goods were cleared through customs.
Navigation: This field is auto-filled from inventory but can be manually entered if required.
Picked Quantity
Description: Represents the quantity manually allocated for picking from the specified location.
Navigation: Automatically generated based on the order or inventory requirements.
Remarks
Description: Notes or comments added during the picking process to provide additional context or instructions.
Navigation: Enter remarks manually in the text field as needed.
MFG Date
Description: The manufacturing date of the product, used for batch control and ensuring product freshness.
Navigation: This field is auto-filled from inventory data based on the batch/serial information.
Received Date
Description: The date the product was received into the warehouse. It helps in inventory tracking and management.
Navigation: This field is auto-filled from inventory data.
Expiry Date
Description: The expiration date of the product, ensuring timely usage or dispatch to prevent wastage.
Navigation: This field is auto-filled from inventory data based on the product's batch/serial information.
Search
Search
Description: A utility field that allows users to find specific data quickly, such as locations, products, or inventory details.
Navigation: Input the search query manually in the text field and press "Enter" or use the search icon to initiate the search. The system will display matching results from the database.
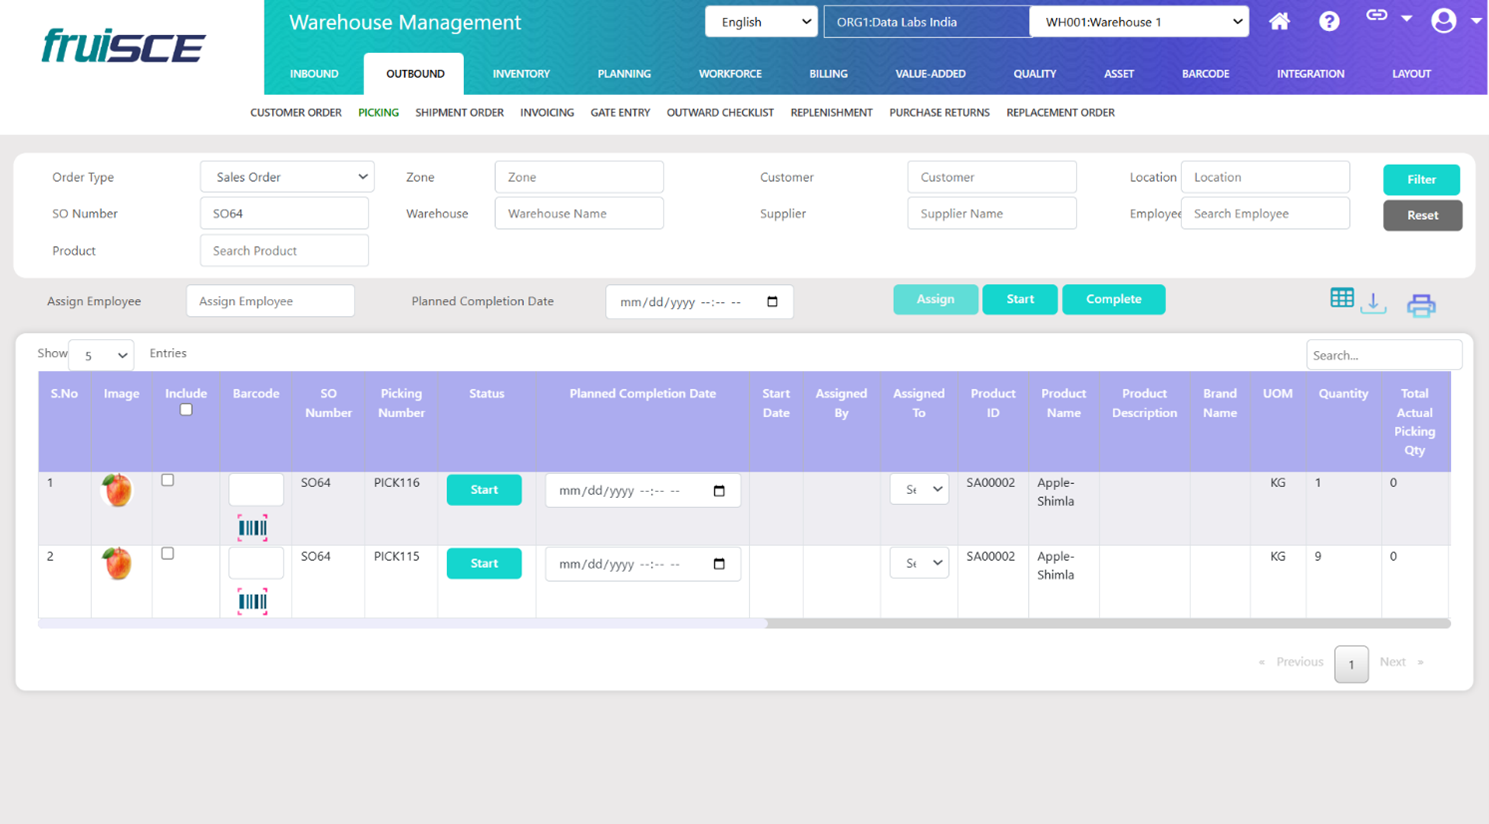
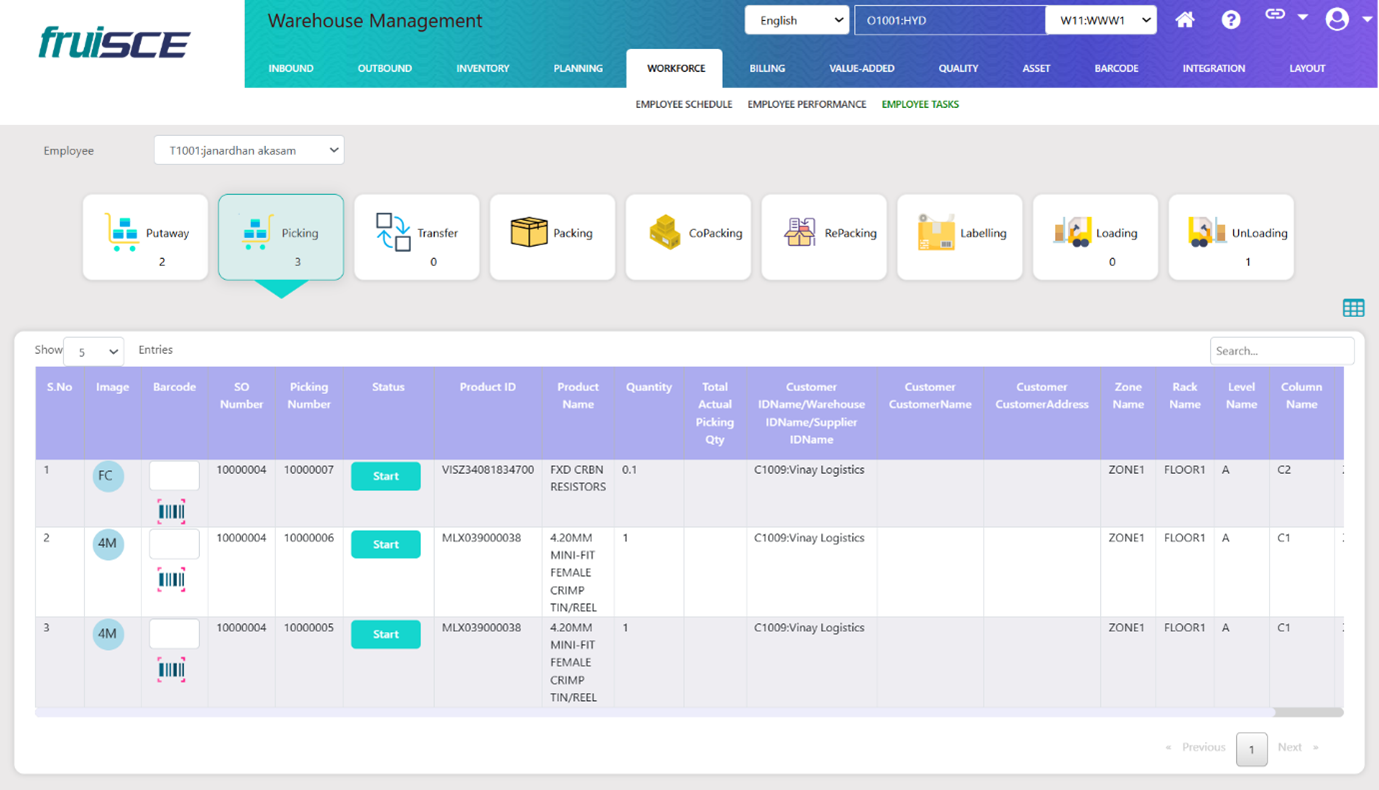
Picking
Picking is a crucial process within a Warehouse Management System (WMS) that involves locating, retrieving, and preparing items from storage to fulfill customer orders.
It is a key step in the order fulfillment workflow, ensuring that the correct products are selected in the right quantities and prepared for shipment or further processing.
Here is the meaning of the field for the Description along with Navigation for the fields
Product Image:
Description: The field represents the image of the selected product. It helps the user visually identify the product being picked based on the product master data.
Navigation: If the product has an image in the master data, it will automatically display here.
Barcode:
Description: This field contains the barcode used for scanning the product or location. It allows the system to quickly capture product and location details through scanning.
Navigation: Use a barcode scanner or webcam to scan the product or location. This updates the picking details.
SO Number:
Description: The unique Sales Order number, generated in the Sales Order system. It helps identify and track the specific order being processed.
Navigation: The Sales Order number is automatically populated based on the SO details and will be displayed here.
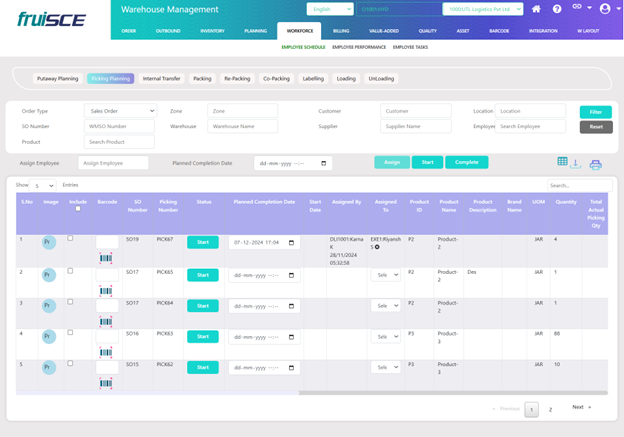
Picking Number:
Description: A unique identifier generated after confirming the Sales Order (SO), assigned to specific SO lines to track the picking process.
Navigation: The picking number is auto-generated as an number starting with '10'. For example, 10000001, 10000002, etc.
Status:
Description: The current status of the picking process, indicating whether the picking task is complete or incomplete.
Navigation: After completing the picking, the user (team) should update the status to either "Complete" or "Incomplete."
Planned Completion Date:
Description: The expected date for completing the picking task, used for scheduling and tracking purposes.
Navigation: Select the planned completion date from the calendar. The system will allow users to pick a date manually.
Start Date:
Description: The actual date and time when the picking process begins. It is recorded automatically by the system when the picking is initiated.
Navigation: The system records the start date and time automatically when the picking process begins.
Assigned By:
Description: The person who assigned the picking task to an employee or team. This identifies the individual responsible for the task allocation.
Navigation: This is auto-populated with the user ID (e.g., "1001: CLIENT 1") after the task is assigned.
Assigned To:
Description: The person to whom the picking task is assigned. This field identifies who is responsible for carrying out the picking task.
Navigation: Select the assigned person from the dropdown list. The list is populated from the executive master.
Product ID:
Description: The unique identifier for the product being picked. This ID is linked to the Sales Order and the specific line item to track the exact product being processed.
Navigation: The system automatically populates the Product ID based on the respective Sales Order ID and line number.
Product Name:
Description: The name of the product being picked. This field identifies the product associated with the picking task.
Navigation: The product name is automatically populated based on the selected Product ID from the Sales Order.
Product Description:
Description: A description of the product, providing more detailed information about the product being picked.
Navigation: The product description is auto-filled based on the selected Product.
Brand Name:
Description: The brand of the selected product, helping to identify the manufacturer or product line.
Navigation: The system will auto-populate the brand name based on the corresponding Sales Order.
UOM (Unit of Measure):
Description: The unit of measure for the selected product, such as pieces, kilograms, or boxes. It defines how the product is quantified during the picking process.
Navigation: The system automatically displays the unit of measure based on the customer's order.
Quantity:
Description: The quantity of the product to be picked, as per the Sales Order.
Navigation: The system will display the quantity based on the customer's order for the product.
Total Actual Picking Quantity:
Description: The total quantity of the product that was actually picked, as compared to the quantity requested in the Sales Order.
Navigation: This field is auto-filled by the system based on the quantity that was actually picked.
Manufacturing Date:
Description: The manufacturing date of the product, providing information on when the product was produced.
Navigation: The system automatically displays the product's manufacturing date.
Expiry Date:
Description: The expiry date of the product, if applicable. This helps track products that have a shelf life.
Navigation: The system will auto-populate the expiry date of the product, if available.
Batch Number:
Description: The batch number associated with the product, important for tracking and traceability purposes, especially in case of recalls or quality issues.
Navigation: This is auto-filled from the system, based on the product selected in the Sales Order.
Customer ID Name / Warehouse ID Name / Supplier ID Name:
Description: Displays the Customer, Warehouse, or Supplier ID names linked to the Order.
Navigation: This field is auto-filled based on the Order.
Zone Name:
Description: The name of the zone within the warehouse where the product is stored. Zones help organize inventory for more efficient picking.
Navigation: Input the zone name manually or select from the available options.
Rack Name:
Description: The rack location within the warehouse where the product is stored. This helps locate the product for picking.
Navigation: Enter the rack name manually or select from the available options.
Level Name:
Description: The specific level within the rack where the product is located. Levels help identify the exact position of the product within the rack.
Navigation: Enter the level name manually or select from the available options.
Location Name:
Description: The location within the warehouse from where the product is being picked. This field helps track the exact picking location.
Navigation: This field displays the location name after the Sales Order is confirmed. The user cannot manually edit this.
Invoice Number:
Description: The invoice number associated with the product in the inventory. It is used for billing and tracking purposes.
Navigation: If available, the invoice number is auto-filled based on the inventory records.
Invoice Date:
Description: The date when the invoice for the product was generated. It helps with tracking and auditing purposes.
Navigation: The system automatically populates the invoice date if the product has invoice details in the inventory.
BOE Number (Bill of Entry):
Description: The Bill of Entry number associated with the product, which is used for import/export tracking.
Navigation: If applicable, the BOE number will be auto-filled from the product's inventory data.
BOE Date (Bill of Entry):
Description: The date associated with the Bill of Entry, which is relevant for customs and regulatory tracking.
Navigation: If applicable, the system will auto-populate the BOE date.
Bond Number:
Description: The bond number linked with the product, often used in customs or bonded warehouse scenarios.
Navigation: If applicable, the bond number will be auto-filled from the product's inventory records.
Bond Date:
Description: The bond date associated with the product, important for customs clearance and tracking bonded goods.
Navigation: The system will automatically populate this field based on inventory details.
EX Bond Number:
Description: The Ex Bond-Number associated with the Sales Order, typically used for goods cleared from bond.
Navigation: If the Sales Order has an Ex Bond-Number, it will be auto-filled here.
Ex Bond Date:
Description: The Ex Bond-Date related to the Sales Order, indicating when goods were released from bond.
Navigation: If the Sales Order has an Ex Bond-Date, the system will auto-populate this field.
Created Date:
Description: The date when the picking record was created. It helps track when the picking task was initiated.
Navigation: This date is automatically populated by the system when the Sales Order is saved and the picking process begins.
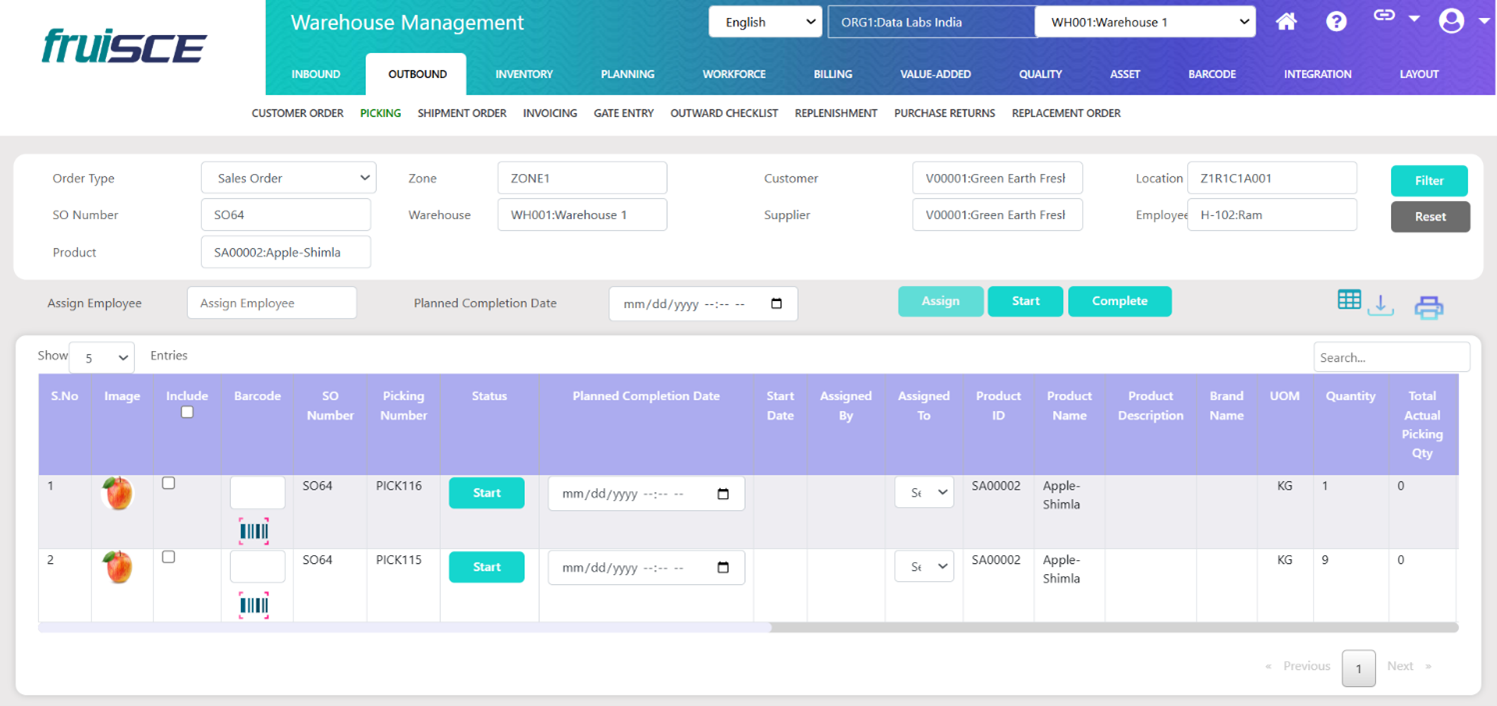
Picking filters
Picking filters are an essential feature in a Warehouse Management System (WMS) that allow warehouse staff to streamline and optimize the picking process.
Picking refers to the process of retrieving products from storage locations in the warehouse to fulfill customer orders.
picking filters are used to define specific conditions or criteria that narrow down which items should be picked for an order.
These filters help the warehouse team focus on the relevant items, improving efficiency and accuracy in order fulfillment.
Here is the meaning of the field for the Description along with Navigation for the fields
Order Type:
Description: Specifies the type of order being processed. It could be a Purchase returns (PR) or Sales Order (SO), helping differentiate between various types of transactions such as transfer orders or purchase orders.
Navigation: This field is invisible and is auto-generated after the order is saved. The system displays it in the Goods Receipt (GRN), determining the order type (e.g., Transfer, Sales) based on the order process.
SO Number:
Description: The unique identifier for the Sales Order linked to a specific goods receipt. It helps track which sales order is being processed and links the GRN to the respective SO.
Navigation: The SO Number is auto-generated. The user selects it manually from the dropdown list, which includes incomplete state Picklist against sales order.
Product:
Description: Refers to the product involved in the order. It helps identify which product (SKU, item) is part of the transaction, facilitating product tracking and inventory management.
Navigation: The product list is retrieved from the Product Master. Users select the product from the dropdown.
Supplier:
Description: Refers to the supplier providing the product. This identifies the vendor or external party supplying goods and is essential for managing procurement and supplier relations.
Navigation: The list of suppliers is fetched from the Supplier Master, and users select from available suppliers like "SU001: Madhu Logistics" or "SU002: Janardhan Logistics."
Customer:
Description: Represents the customer who will receive the products. It tracks which customer is placing the order or receiving goods, linking the sales transaction to customer-specific records.
Navigation: The list of customers is retrieved from the Customer Master, and users select a customer (e.g., "SU001: Madhu Logistics") from the dropdown.
Warehouse:
Description: Refers to the warehouse where the product is stored or managed. It indicates the physical location of the product, helping with inventory tracking and warehouse operations.
Navigation: The list of warehouses is retrieved from the Warehouse Master. Users select a warehouse (e.g., "W11: Cold Warehouse" or "W22: Warm Warehouse") from the dropdown.
Zone:
Description: Specifies the zone within the warehouse where the product is located. Zones help organize inventory into manageable sections, facilitating easier product location and retrieval.
Navigation: The zone list is fetched from the Zone Master, and users select from available zones (e.g., "ZONE1" or "ZONE2").
Location:
Description: Refers to the exact location within the warehouse (such as a shelf or section) where the product is stored. It provides precise details about the product's position within a zone for efficient order fulfillment.
Navigation: The location list is retrieved from the Location Master. Users select from mapped locations (e.g., "Z1F1C1A002") related to the selected zone.
Employee:
Description: Refers to the employee associated with performing the task or operation. It identifies who is responsible for carrying out the work, ensuring accountability and task tracking.
Navigation: The employee list is fetched from the Executive Master, and users select the employee (e.g., "E100: Sugan" or "E101: Mohan") from the dropdown.
Assignee Employee:
Description: Refers to the employee who is specifically assigned to the task or job. It helps track responsibility for specific operations like picking or packing.
Navigation: The assignee employee list is fetched from the Executive Master, and users select an assignee (e.g., "E100: Jack") from the dropdown.
Planned Completion Date:
Description: Represents the planned completion date for the task or operation. It is used to schedule tasks, ensuring all operations are completed within the set timeframes.
Navigation: The user selects the planned completion date from the calendar. The system allows manual date selection for task scheduling.
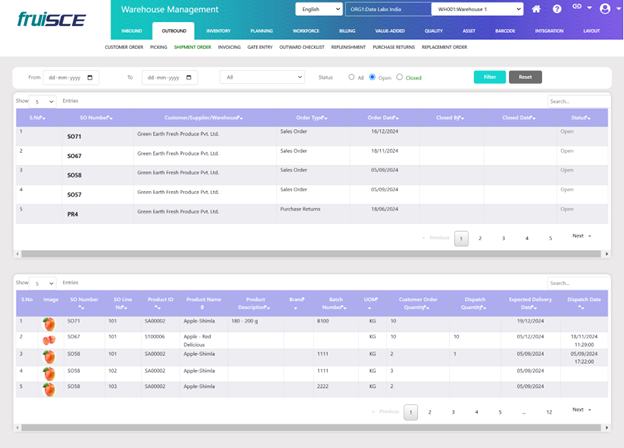
Maintain Shipment Order
List of Shipment orders are displayed with order details in first table and product details in second table. By completing all picking records Shipment order is created.
When Order is open Action shows edit option for editing the order, by Clicking on edit option it navigates to shipment order screen to edit or confirm order
When the order is confirmed it displays as Shipment Confirmed.
Orders filtered by Delivery Expected date using date filter, order status selecting dropdown opened, closed, all.
By using search option also data filtered.
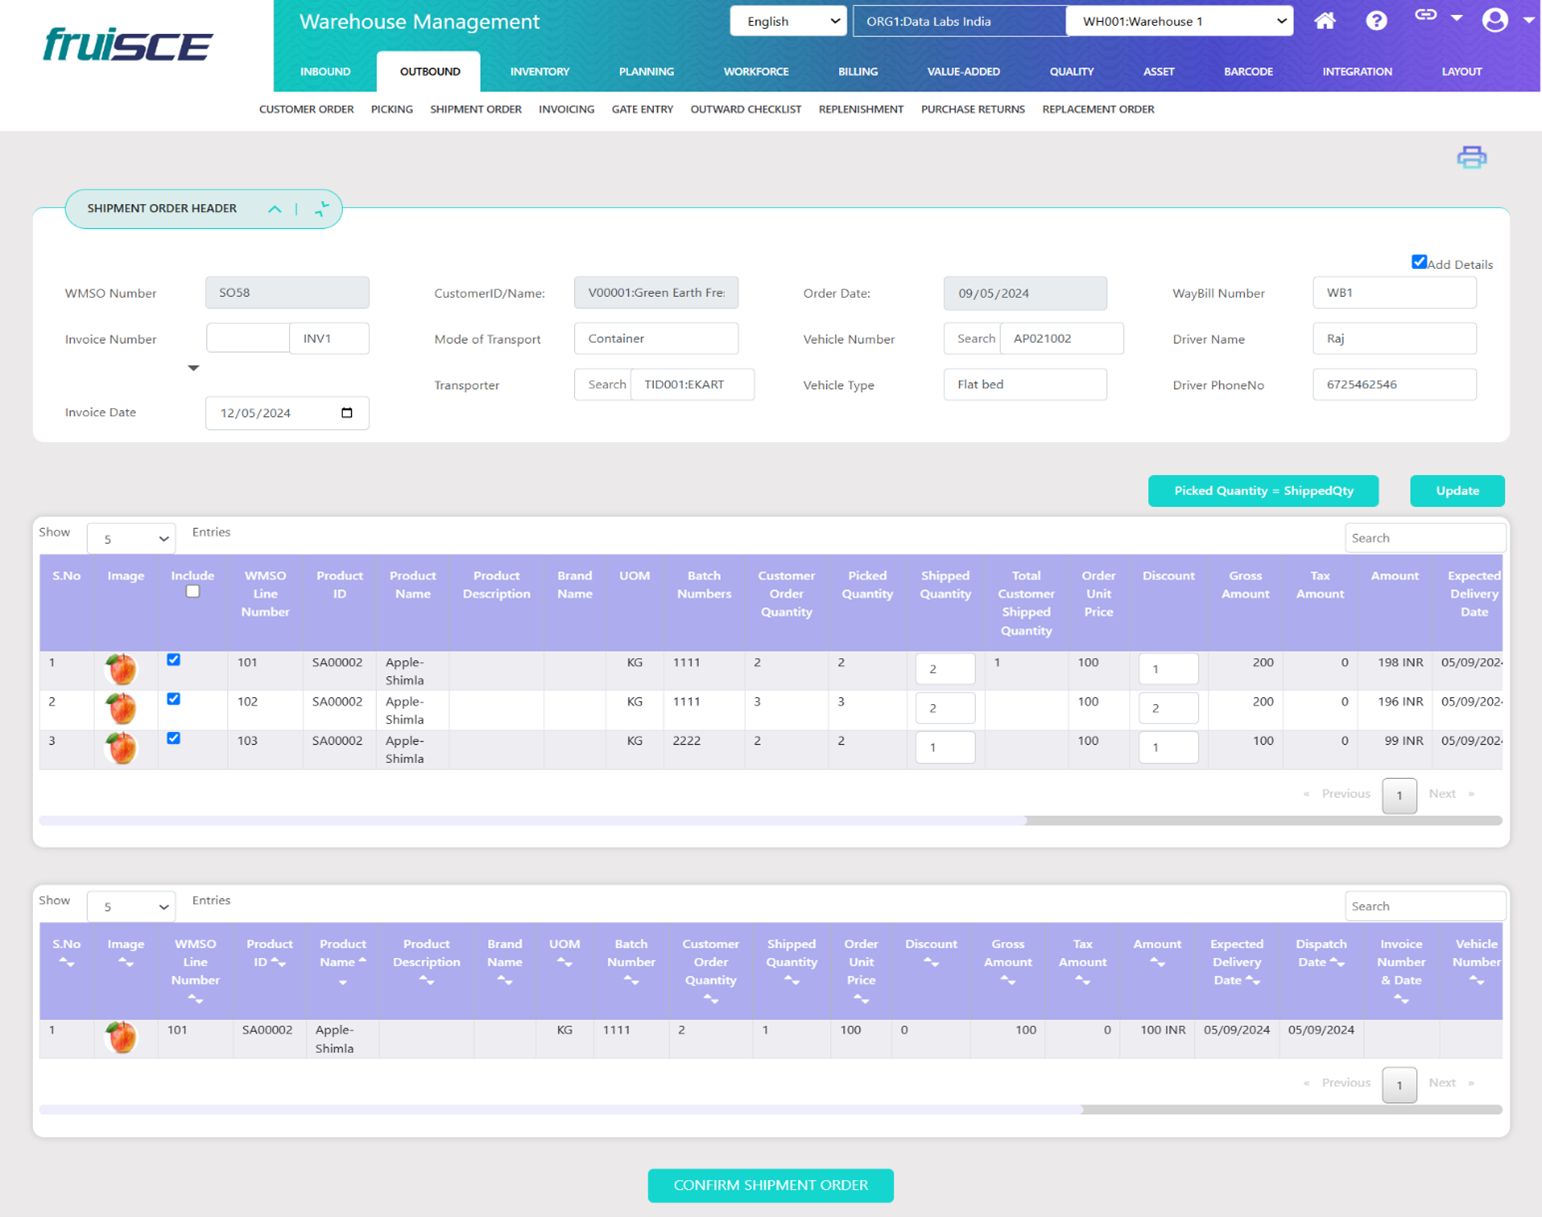
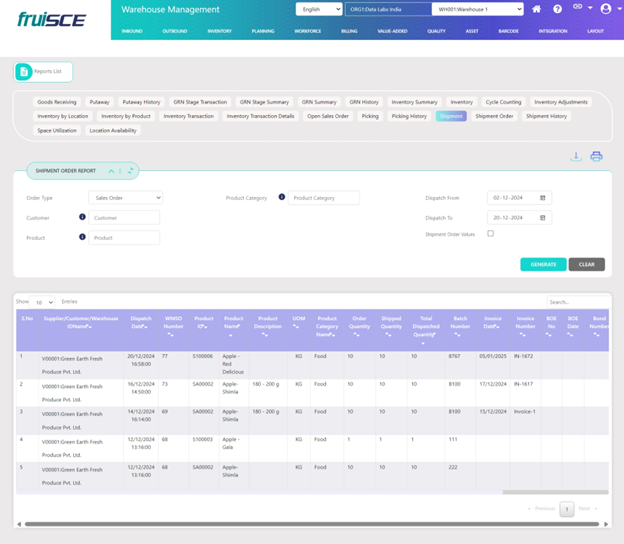
Shipment Order
The Shipment Order is a critical part of the logistics and fulfillment process.
It typically refers to the instructions or request to ship goods from the warehouse to the customer or distribution center.
Here is the meaning of the field for the Description along with Navigation for the fields
Shipment Order header fields
Order Number
Description: A unique number generated after confirming the Picking process, used to track the Dispatch Order.
Navigation: Automatically fetched from Picking.
Invoice Number
Description: The invoice number associated with the outbound shipment.
Navigation: Can be selected from a dropdown menu populated by outbound gate entry or entered manually.
Invoice Date
Description: The date of the invoice related to the shipment.
Navigation: Select from a dropdown menu or enter manually; auto-filled when an invoice is selected.
Customer's Customer Name
Description: The end customer's name from the Sales Order.
Navigation: Auto-filled from the Sales Order but can be manually edited in the shipment screen.
Customer's Customer Address
Description: The end customer's address from the Sales Order.
Navigation: Auto-filled from the Sales Order but can be manually edited in the shipment screen.
Customer ID/Name
Description: The customer's unique identifier and name from the Sales Order.
Navigation: Auto-filled by referencing the Order Number and line number.
Mode of Transport
Description: The mode of transport for the dispatch (e.g., road, air, sea).
Navigation: Auto-filled based on the Order Number and line number.
Transporter
Description: The transporter handling the shipment.
Navigation: Auto-fetched from the invoice; can also be entered manually.
Order Date
Description: The date when the Sales Order was placed.
Navigation: Auto-filled from the Sales Order based on the WMSO details.
Vehicle Number
Description: The number of the vehicle transporting the shipment.
Navigation: Auto-fetched from the invoice; can be entered manually.
Vehicle Type
Description: The type of vehicle used for transport.
Navigation: Auto-fetched from the invoice; can be entered manually.
Waybill Number
Description: A reference number for tracking the shipment.
Navigation: Entered manually by the user.
Driver Name
Description: The name of the driver handling the shipment.
Navigation: Entered manually by the user.
Driver Phone Number
Description: The contact number of the driver handling the shipment.
Navigation: Entered manually by the user.
Shipment Order Line Fields
Image
Description: Displays an image of the product being dispatched.
Navigation: Automatically fetched from the product master, if available.
Include
Description: Indicates whether the line item is included in the dispatch.
Navigation: Selected manually by the user.
WMSO Line Number
Description: The line number of the Sales Order associated with the product.
Navigation: Auto-filled based on the selected WMSO line.
Product ID
Description: The unique identifier for the product being dispatched.
Navigation: Auto-filled by referencing the Order Number and line number.
Product Name
Description: The name of the product being dispatched.
Navigation: Auto-filled by referencing the Order Number and line number.
Product Description
Description: A brief description of the product being dispatched.
Navigation: Auto-filled from the Sales Order based on the selected product.
Brand Name
Description: The brand of the product being dispatched.
Navigation: Auto-filled from the Sales Order, if available.
UOM (Unit of Measure)
Description: The unit of measurement for the product.
Navigation: Auto-filled based on the customer's Sales Order.
Batch Number
Description: The batch number of the product being dispatched.
Navigation: Auto-filled by referencing the Order Number and line number.
Customer Order Quantity
Description: The quantity of the product ordered by the customer.
Navigation: Auto-filled from the Sales Order.
Picked Quantity
Description: The quantity of the product picked for dispatch.
Navigation: Auto-filled from the Picking details.
Shipped Quantity
Description: The quantity of the product being shipped.
Navigation: Entered manually during shipping.
Total Customer Shipped Quantity
Description: The cumulative quantity shipped to the customer.
Navigation: Auto-filled during partial shipping.
Serial Number
Description: The serial number of the product being dispatched.
Navigation: Auto-filled from inventory data, if available.
Order Unit Price
Description: The unit price of the product being dispatched.
Navigation: Auto-filled from configurations or the PBC master.
Discount
Description: The discount applied to the product.
Navigation: Entered manually if applicable.
Gross Amount
Description: The total amount before tax and discounts.
Navigation: Auto-calculated based on shipped quantity and unit price.
Tax Amount
Description: The tax calculated on the gross amount.
Navigation: Auto-calculated based on the tax percentage.
Amount
Description: The final amount after applying discounts and adding taxes.
Navigation: Auto-calculated.
Expected Delivery Date
Description: The estimated date for delivery to the customer.
Navigation: Defaulted to the Sales Order's date; can be changed by the user.
BOE Number
Description: The Bill of Entry number associated with the product.
Navigation: Auto-filled from inventory, if available.
BOE Date
Description: The Bill of Entry date associated with the product.
Navigation: Auto-filled from inventory, if available.
Bond Number
Description: The bond number linked to the product.
Navigation: Auto-filled from inventory, if available.
Bond Date
Description: The bond date linked to the product.
Navigation: Auto-filled from inventory, if available.
Ex Bond Number
Description: The Ex Bond number associated with the Sales Order.
Navigation: Auto-filled from the Sales Order.
Ex Bond Date
Description: The Ex Bond date associated with the Sales Order.
Navigation: Auto-filled from the Sales Order.
Remarks
Description: Additional notes or remarks related to the product.
Navigation: Auto-filled from inventory, if available.
Status
Description: Indicates the completion status of the order (Complete/In-Complete).
Navigation: Automatically updated by the system after order completion.
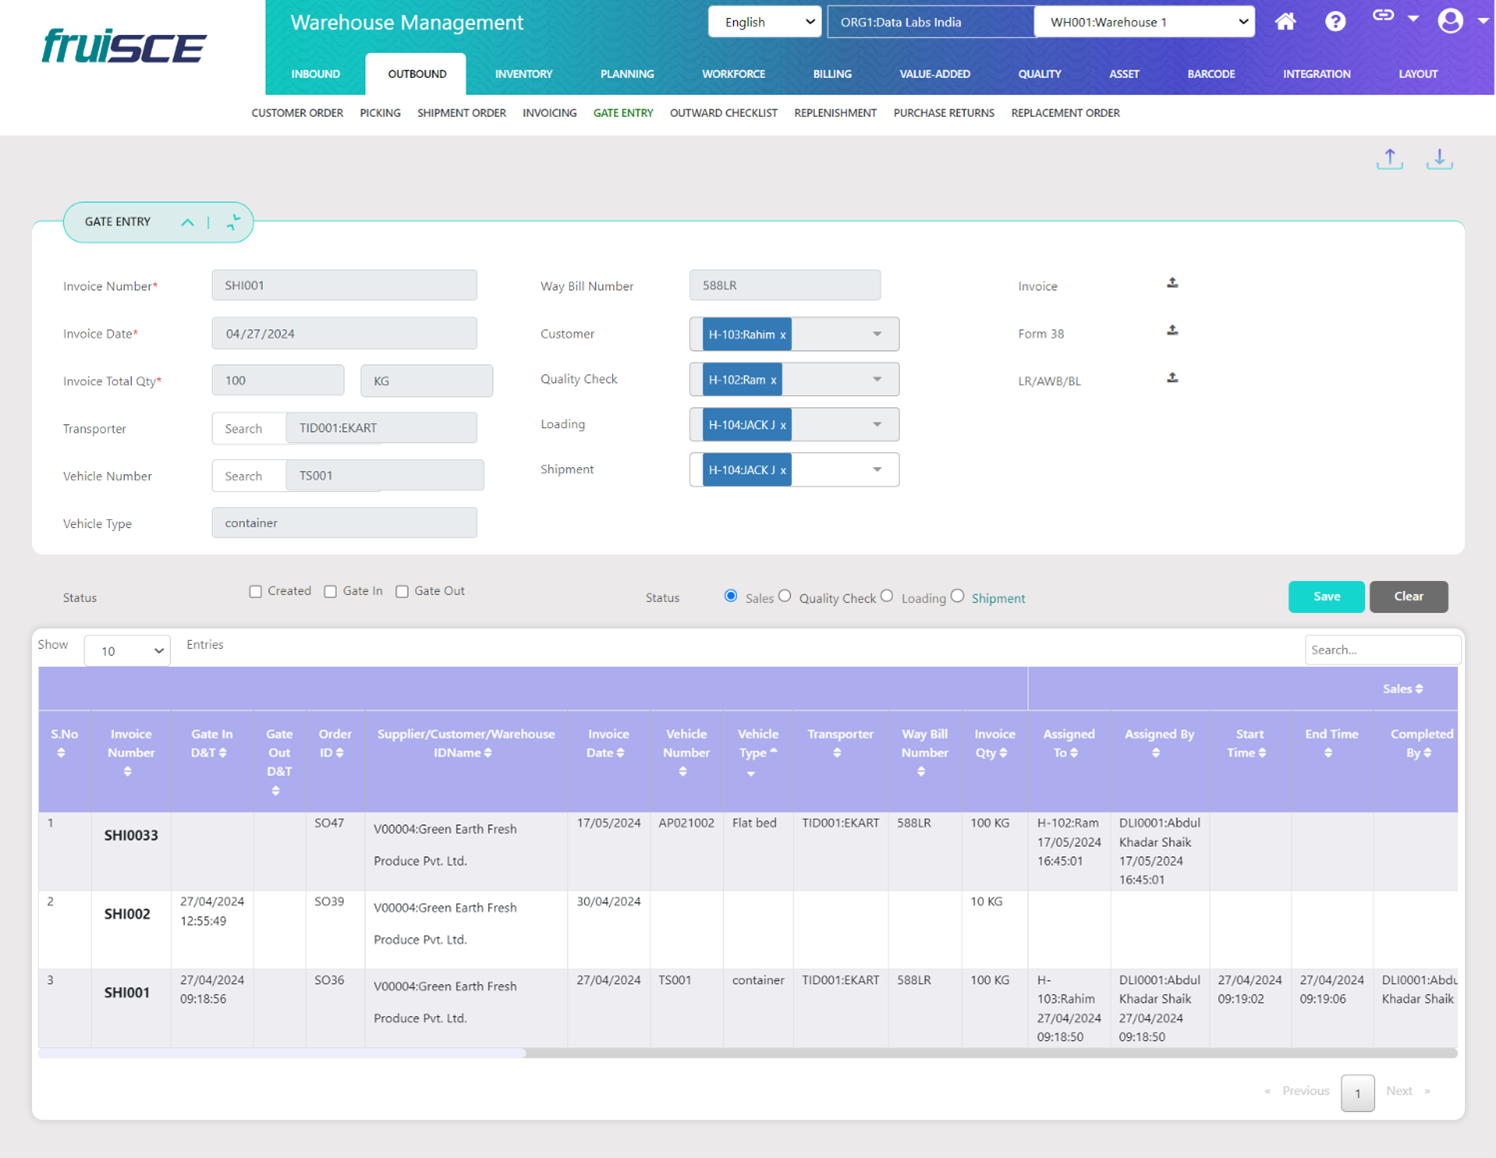
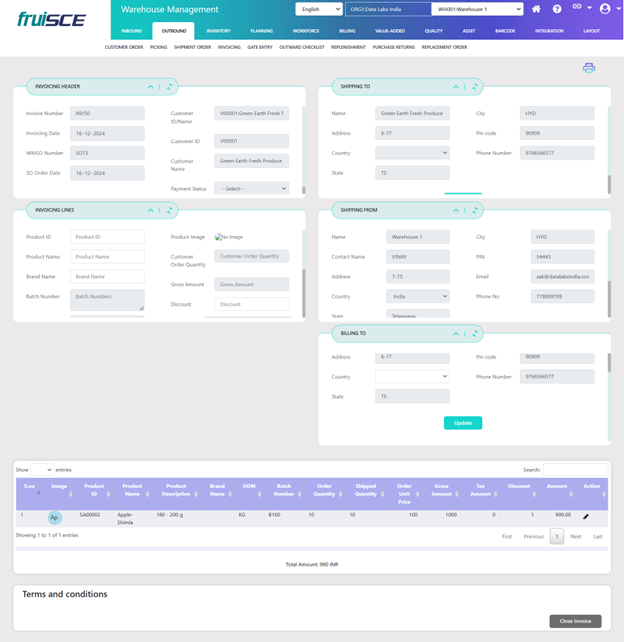
Outbound gate entry
The Outbound Gate Entry process in a Warehouse Management System (WMS) is designed to track and manage the movement of goods leaving the warehouse.
This process ensures proper documentation, verification, and compliance, minimizing errors and streamlining logistics operations.
Here is the meaning of the field for the Description along with Navigation for the fields
Invoice Number
Description: A unique identifier for the customer invoice associated with the outbound shipment.
Navigation: Enter the invoice number manually in the Invoice Number field in the Invoice Details section.
Invoice Date
Description: The date mentioned on the customer's invoice.
Navigation: Select the invoice date using the calendar picker in the Invoice Date field.
Invoice Total Quantity
Description: The total quantity of items on the invoice being shipped.
Navigation: Enter the total quantity of goods manually in the Invoice Total Quantity field.
Invoice Total Quantity UOM
Description: The Unit of Measure (UOM) for the total quantity (e.g., boxes, jars, pallets).
Navigation: Select the unit of measure from the dropdown in the Invoice Total Quantity UOM field.
Transporter
Description: The transporter responsible for delivering the goods.
Navigation: Select the transporter from the dropdown in the Transporter field or enter manually if not listed.
Vehicle
Description: The vehicle used for transporting the goods.
Navigation: Select the vehicle from the dropdown in the Vehicle field or enter manually if not listed.
Vehicle Type
Description: The type of vehicle used for transport (e.g., flatbed, lorry).
Navigation: If the vehicle is selected, the Vehicle Type will auto-fill. Otherwise, manually enter the vehicle type.
LR Number
Description: The Lorry Receipt (LR) number associated with the shipment.
Navigation: Enter the Lorry Receipt number manually in the LR Number field.
Waybill Number
Description: The unique identifier for the shipment's waybill.
Navigation: Enter the Waybill number manually in the Waybill Number field.
Sales Assigned To
Description: The executive responsible for managing the sales order or shipment.
Navigation: Select the responsible sales executive from the dropdown in the Sales Assigned To field.
Loading Assigned To
Description: The executive responsible for overseeing the loading of the goods.
Navigation: Select the responsible loading executive from the dropdown in the Loading Assigned To field.
Quality Check Assigned To
Description: The executive responsible for conducting the quality check on the goods.
Navigation: Select the responsible quality check executive from the dropdown in the Quality Check Assigned To field.
Shipment Assigned To
Description: The executive responsible for overseeing the shipment process.
Navigation: Select the responsible shipment executive from the dropdown in the Shipment Assigned To field.
Invoice (File)
Description: A digital copy of the supplier's invoice associated with the shipment.
Navigation: Upload the invoice file by clicking the Upload button in the Invoice (File) field.
Form 38 (File)
Description: Upload the Form 38 (or similar) document required for outbound goods.
Navigation: Upload the Form 38 file by clicking the Upload button in the Form 38 (File) field.
LA/AWB/BL (File)
Description: Upload the required documents such as the Letter of Authorization (LA), Airway Bill (AWB), or Bill of Lading (BL).
Navigation: Upload the LA/AWB/BL document by clicking the Upload button in the LA/AWB/BL (File) field.
Order Number
Description: The sales order number linked to the outbound shipment.
Navigation: Select the relevant order number from the dropdown in the Order Number field.
Status and Workflow Fields
Sales Planned Completion Date
Description: The planned date for completing the sales order processing.
Navigation: Select the sales planned completion date from the calendar in the Sales Planned Completion Date field.
Sales Start
Description: The action to start the sales process.
Navigation: Click the Start button in the Sales Start field to initiate the sales process.
Sales Complete
Description: Mark the sales process as complete.
Navigation: Click the Complete button in the Sales Complete field to mark the sales process as finished.
Quality Check Planned Completion Date
Description: The target date for completing the quality check.
Navigation: Select the quality check planned completion date from the calendar in the Quality Check Planned Completion Date field.
Quality Check Start
Description: Start the quality check process.
Navigation: Click the Start button in the Quality Check Start field to begin the quality check.
Quality Check Complete
Description: Mark the quality check as completed.
Navigation: Click the Complete button in the Quality Check Complete field to finalize the quality check.
Loading Planned Completion Date
Description: The planned date for completing the loading process.
Navigation: Select the loading planned completion date from the calendar in the Loading Planned Completion Date field.
Loading Start
Description: Start the loading process.
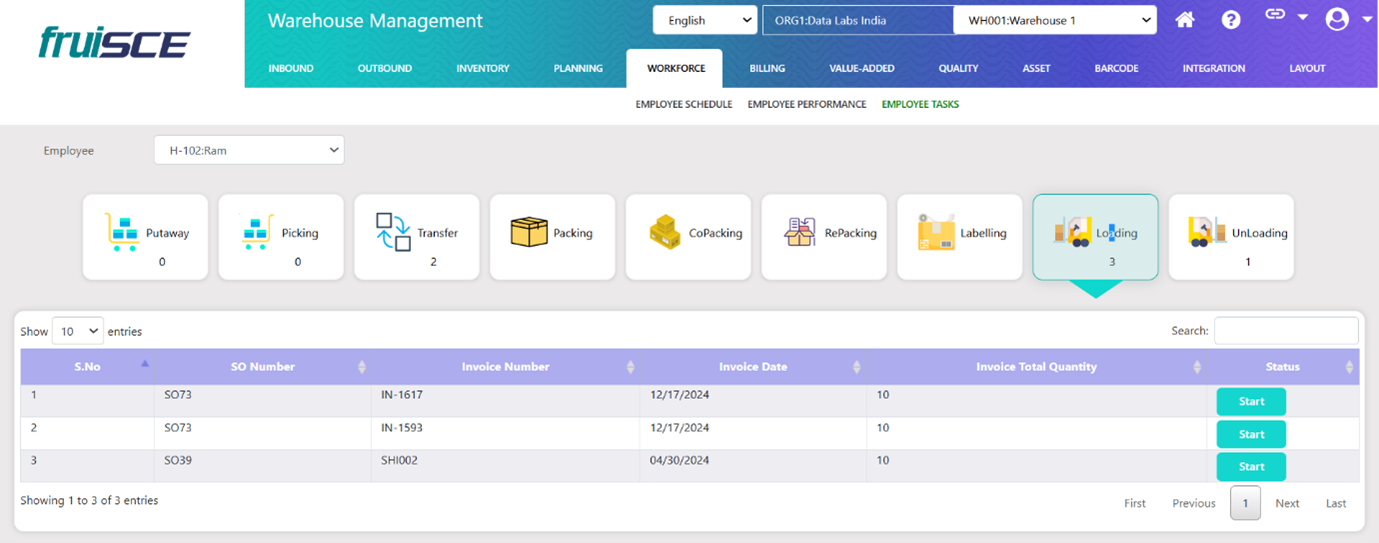
Navigation: Click the Start button in the Loading Start field to begin loading.
Loading Complete
Description: Mark the loading process as complete.
Navigation: Click the Complete button in the Loading Complete field to finalize loading.
Shipment Planned Completion Date
Description: The planned date for completing the shipment process.
Navigation: Select the shipment planned completion date from the calendar in the Shipment Planned Completion Date field.
Shipment Start
Description: Start the shipment process.
Navigation: Click the Start button in the Shipment Start field to begin shipment.
Shipment Complete
Description: Mark the shipment as completed.
Navigation: Click the Complete button in the Shipment Complete field to finalize the shipment.
Maintain Invoicing
List of confirmed Shipment orders are displayed with order details in first table and product details in second table.
When Invoice is open Action shows edit option for editing Invoice, by Clicking on edit option it navigates to Invoice screen to edit or close invoice or print invoice
When the Invoice is closed it displays as Closed.
Orders filtered by Delivery Expected date using date filter, order status selecting dropdown opened, closed, all.
By using search option also data filtered.
Invoicing
Print Invoice for confirmed and payment Settled Shipments for the customers.
Order Details
Order details like Invoice Number, Invoicing Date, Order Number, Sales Order Date, Customer ID/Name, Customer ID, Customer Name, Payment status are displayed by default in Invoicing Header panel.
Product Details
Product details like Product ID, Product Name, Batch Number, Shelf life, Order Quantity, Shipped Unit Price, Quantity, Taxes, Discount, Amount UPC details displayed in below table
Editing Options
Table contains Edit option for every order line. By clicking on edit option details displayed in Invoicing Lines panel. Unit Price, Discount, Taxes can be edited and click on save to updated details.
Actions
Click on Print option for printing Invoice.
Click on Close Invoice for closing Invoice.
Crossdocking
Deliver products to customers directly through crossdocking process.
List of crossdocking records are displayed with details like:
Order Number
WMPO Line Number
Supplier ID
Supplier Name
Receipt Date
PO Delivery Date
Order Number
WMSO Line Number
Customer ID
Customer Name
Sales Order Date
Deliver Expected date
Product ID
Product Name
Order Quantity
Replenishment
Moving products from Replenishment Area to Picking Location.
List of replenishment records are displayed with details like:
Product ID
Product Name
Source Location
Destination Location
Replenishment Quantity
Start Date
End Date
Replenishment status is updated by selecting completed option in status dropdown.
Introduction
The inventory process in a Warehouse Management System (WMS) encompasses all activities related to tracking, managing, and optimizing the movement, storage, and usage of goods within a warehouse. It plays a vital role in ensuring inventory accuracy, efficient warehouse operations, and smooth order fulfillment. A well-implemented inventory process enables organizations to maintain optimal stock levels, reduce carrying costs, and improve overall supply chain efficiency.
Here is the meaning of the field for the Description along with Navigation for the fields
Inventory ID
Description: A unique identifier automatically generated by the system once the putaway process is completed. This ID helps to track the inventory item in the system.
Navigation: The Inventory ID is auto-generated by the system after the completion of the putaway process and cannot be manually entered.
Product ID
Description: This field contains the product identifier, retrieved from the Goods Receipt Note (GRN) document. It refers to the specific product in the inventory.
Navigation: The Product ID is automatically fetched from the GRN and displayed in the Product ID field.
Product Name
Description: The name of the product, which is also fetched from the GRN. It is typically used for identification and tracking purposes.
Navigation: The product name is automatically populated from the GRN in the Product Name field.
Product Description
Description: A brief description of the product, such as its weight or packaging details. This information is pulled from the Product Info database.
Navigation: The product description is automatically retrieved from the Product Info section and displayed in this field.
Inventory Unit
Description: The unit of measurement for the product, e.g., "NOS" (pieces), which is retrieved from the GRN.
Navigation: This value is mapped from the GRN and automatically displayed in the Inventory Unit field.
Brand Name
Description: The brand name of the product, which is automatically fetched from the GRN and identifies the manufacturer or brand.
Navigation: The brand name is populated from the GRN, based on the product entry.
Manufacturing Date
Description: The date the product was manufactured, fetched from the GRN.
Navigation: The system automatically fills this field with the manufacturing date from the GRN.
Expiry Date
Description: The date when the product expires, retrieved from the GRN, used to track the shelf life of the product.
Navigation: This field is populated from the GRN's expiry date field.
Batch Number
Description: A unique batch number assigned to the product. It helps track the product batch and manage inventory more effectively.
Navigation: The batch number is fetched from the GRN and displayed in this field.
Serial Number
Description: The serial number for each unit of the product, which can vary per unit. This helps in tracking individual units.
Navigation: The serial number is fetched from the GRN and displayed for each product unit.
Quantity inventory unit
Description: The quantity of the product available in inventory for use or sale, represented in the units of the Inventory Unit.
Navigation: The user will enter the received quantity manually in this field. For example, 200 units.
Available Quantity
Description: The quantity available physically available in warehouse, calculated as Quantity inventory unit - Reserved Quantity. This is a calculated field.
Navigation: This value is automatically calculated based on the available quantity minus the reserved quantity.
Reserved Quantity
Description: The quantity that has been reserved for a specific purpose, such as dispatch or allocation, and is subtracted from the total quantity.
Navigation: This reserved against orders based on requirement.
Supplier/Customer/Warehouse
Description: The supplier or warehouse identifier associated with the product, which is mapped from the GRN.
Navigation: This value is retrieved automatically from the GRN.
Zone Name
Description: The zone in which the inventory is stored, e.g., "ZONE1". This value is fetched from the GRN.
Navigation: The zone is automatically populated from the GRN data.
Rack Name
Description: The name of the rack where the inventory is stored, e.g., "RACK1". This value is mapped from the GRN.
Navigation: The rack name is automatically fetched from the GRN.
Level Name
Description: The level or tier on the rack where the product is located. This is mapped from the GRN.
Navigation: The level name is retrieved automatically from the GRN.
Column Name
Description: The column on the rack where the inventory is placed. This is mapped from the GRN.
Navigation: The column name is automatically populated from the GRN.
Location Name
Description: The unique identifier for the location where the inventory is stored, such as "Z1F1C1A002". This data is mapped from the GRN.
Navigation: The location name is automatically fetched from the GRN.
Remarks
Description: Any additional remarks or notes related to the inventory item. This information is retrieved from the GRN.
Navigation: This field is populated from the GRN, providing any additional comments or details about the product.
Product Purchase Price
Description: The purchase price of the product, retrieved from the GRN.
Navigation: This price is populated automatically from the GRN.
Stock Value
Description: The total value of the product in inventory, calculated as Quantity inventory unit * Weighted Average Cost Price. This is a calculated field.
Navigation: The stock value is automatically calculated based on the quantity and average cost price.
Product Category
Description: The category of the product, which is fetched from the Product Master Information.
Navigation: This value is mapped from the Product Master and displayed here.
Product Type
Description: The type of the product, which is also fetched from the Product Master Information.
Navigation: This field is populated automatically based on the product type in the Product Master.
Product Class
Description: The class or classification of the product, which is retrieved from the Product Master.
Navigation: This field is automatically populated from the Product Master.
Invoice Number
Description: The invoice number related to the product, which is automatically fetched from the GRN.
Navigation: The invoice number is populated automatically from the GRN.
Invoice Date
Description: The date of the invoice related to the product, which is fetched from the GRN.
Navigation: This field is automatically filled with the invoice date from the GRN.
Bill of Entry Number
Description: The Bill of Entry number related to the import or entry of the product, automatically fetched from the GRN.
Navigation: This value is populated from the GRN.
Bill of Entry Date
Description: The date of the Bill of Entry, which is fetched from the GRN.
Navigation: This field is automatically populated from the GRN.
Bond Number
Description: The bond number associated with the inventory, entered manually by the user.
Navigation: Enter the bond number manually in the Bond Number field.
Bond Date
Description: The date the bond was issued. This date is entered manually by the user.
Navigation: Enter the bond date manually in the Bond Date field.
Created Date
Description: The date when the inventory record was created, which is automatically inserted by the system.
Navigation: The system automatically populates this field with the current date when the record is created.
Inventory Availability
Description: Indicates whether the inventory is available or not, with values of true or false.
Navigation: The system automatically updates this field based on inventory status.
Inventory Filters
Product ID/Name
Description: This filter allows users to select a specific product or product ID from the Product Master.
Navigation: Select the product from the dropdown, which displays data from the Product Master.
Category
Description: Allows users to filter by product category.
Navigation: Select the category from the dropdown, with options sourced from Parameter settings.
Zone Name
Description: This filter allows users to select the zone where the inventory is stored.
Navigation: Select the zone from the dropdown, with options from the Zone Master.
Rack Name
Description: Allows users to filter by the specific rack in which the inventory is located.
Navigation: Select the rack from the dropdown, with options from the Rack Master.
Location Name
Description: Filters inventory based on the location name.
Navigation: Select the location name from the dropdown, with options from the Location Master.
Product Description
Description: Filters inventory based on product description.
Navigation: Select the product description from the dropdown.
Supplier
Description: This filter allows users to select a specific supplier for the inventory.
Navigation: Select the supplier from the dropdown, with options from the Product Master.
Batch Number
Description: Filters inventory based on the batch number.
Navigation: Select the batch number from the dropdown, which is populated from the inventory table.
Created From Date
Description: Filters inventory records based on a specific start date.
Navigation: Select the start date from the calendar field.
Created To Date
Description: Filters inventory records based on a specific end date.
Navigation: Select the end date from the calendar field.
Serial Number
Description: Select the serial number for the item, representing the quantity per unit. Data is fetched from the inventory table.
Navigation: Select the serial number from the dropdown list, which displays available serial numbers from the inventory.
MFG Date From
Description: Select the starting date for the manufacturing date range.
Navigation: Use the calendar to select the start date for the manufacturing date.
MFG Date To
Description: Select the ending date for the manufacturing date range.
Navigation: Use the calendar to select the end date for the manufacturing date.
Expiry Date From
Description: Select the starting date for the expiry date range.
Navigation: Use the calendar to select the start date for the expiry date.
Expiry Date To
Description: Select the ending date for the expiry date range.
Navigation: Use the calendar to select the end date for the expiry date.
Inventory by Location
Inventory by Location is a key feature in a Warehouse Management System (WMS) that provides detailed visibility into the quantities and status of inventory stored at different physical locations within a warehouse. This feature helps warehouse staff and managers track where each product is stored, ensuring efficient stock management, order fulfillment, and inventory control. the concept of Inventory by Location refers to the ability to manage, monitor, and access inventory data based on its storage location within the warehouse. These locations could be specific zones, racks, shelves, or bins, each representing a physical space within the warehouse.
Here is the meaning of the field for the Description along with Navigation for the fields
Product
Description: The product that you are searching for or filtering by. It represents a specific item within your inventory.
Navigation: User will select the product from the dropdown list, populated from the Product Master (e.g., P1: Product-1).
Category
Description: Represents the classification of products in your inventory. Categories allow you to filter products by their type or nature (e.g., Drinks, Electronics, etc.).
Navigation: User will select the category from the dropdown list, which is populated from the Parameters (e.g., ALL DRINKS).
Product Type
Description: Indicates the classification of the product as per its nature, such as finished goods, raw materials, etc. It helps to filter inventory based on the product's status or role.
Navigation: User will select the product type from a static dropdown list, which is predefined (e.g., Finished product).
Zone Name
Description: Denotes the specific zone within the warehouse where the product is stored. Zones help to organize inventory in the warehouse for easy tracking.
Navigation: User will select the zone from the dropdown list, populated from the Zone Master (e.g., ZONE 1).
Rack Name
Description: Refers to the rack within the zone where the product is placed. It further helps narrow down inventory to a specific rack in a zone.
Navigation: User will select the rack from the dropdown list, populated from the Rack Master (e.g., RACK 1).
Location Name
Description: Identifies the exact location of the product within the warehouse. It is used to track the precise placement of the product in a designated space.
Navigation: User will select the location from the dropdown list, populated from the Location Master (e.g., Z1R1C1L1).
Inventory by Product
The "Inventory by Product" feature in a Warehouse Management System (WMS) allows warehouse managers and users to track, filter, and manage the inventory at a granular level by focusing on individual products. This tool offers a comprehensive view of each product's status across various locations, categories, and other filtering parameters. It is especially helpful for understanding the stock levels, storage details, and movement of each product.
Here is the meaning of the field for the Description along with Navigation for the fields
Product
Description: This field represents the specific product in the inventory. It helps identify what item is being referred to and is used to search or filter products within the system.
Navigation: User selects the product from the dropdown list, which is populated from the Product Master (e.g., P1: Product-1).
Category
Description: The category classifies the product into a specific group based on its type or nature (e.g., Drinks, Electronics). It allows for filtering or sorting products by category.
Navigation: User selects the category from the dropdown list, which is populated from the Parameters (e.g., ALL DRINKS).
Supplier
Description: This refers to the vendor or source of the product. It helps track from whom the product was sourced, allowing for easier management of product orders, deliveries, and relationships.
Navigation: User selects the supplier from the dropdown list, populated from the Supplier Master (e.g., S1:RAJESH).
Batch Number
Description: The batch number refers to a specific group of products that are manufactured or received together. This helps to track products that share the same production or delivery cycle.
Navigation: User selects the batch number from the dropdown list, populated from the inventory (e.g., BATCH-1).
Serial Number
Description: The serial number is a unique identifier for individual items in inventory. It is typically used for tracking products that are sold or handled separately, such as electronics or machinery.
Navigation: User selects the serial number from the dropdown list, populated from the inventory (e.g., SN1).
Inventory Totals
Grand total of Inventory stock is viewed.
Grand total of Inventory stock record is displayed with details like Available Quantity, Reserved Quantity, Quantity Inventory Unit.
Inventory Transaction
Inventory transactions in a Warehouse Management System (WMS) are critical operations that enable the accurate tracking, management, and control of stock within a warehouse. These transactions represent the movement of inventory, whether it's being added, removed, adjusted, or transferred between locations in the warehouse. They provide a comprehensive record of stock movements, ensuring that inventory levels are always accurate and that orders are fulfilled in a timely manner.
Here is the meaning of the field for the Description along with Navigation for the fields
Transaction Type
Description: Defines the nature of the inventory transaction, such as goods receiving, shipment, or transfer. It helps categorize and identify the type of movement or activity for the inventory.
Navigation: User selects the transaction type from a dropdown list, populated from a static list (e.g., "Goods receiving").
Product
Description: Specifies the particular product involved in the transaction. It identifies the product being processed and helps differentiate it during inventory management.
Navigation: User selects the product from a dropdown list, populated from the Product Master (e.g., "PRO1: Product 1").
Supplier ID/Name
Description: Indicates the supplier from whom the product is sourced. It helps track where the products are coming from and supports vendor management.
Navigation: User selects the supplier from a dropdown list, populated from the Supplier Master (e.g., "S1: RAJESH").
Customer
Description: Refers to the recipient of the product in cases of sales or deliveries. It helps track which customer is involved in the transaction.
Navigation: User selects the customer from a dropdown list, populated from the Customer Master (e.g., "CUS1: NEHA").
Order ID
Description: Unique identifier for the order related to the transaction. It helps track orders and link them to the inventory transaction.
Navigation: User selects the order ID from a dropdown list, populated based on the order type (e.g., "PO94").
Zone
Description: Identifies the specific zone in the warehouse where the product is stored or being moved. Zones help in organizing the inventory for easier tracking and management.
Navigation: User selects the zone from a dropdown list, populated from the Zone Master (e.g., "ZONE 1").
Rack
Description: Represents the specific rack within a warehouse zone where the product is stored. It helps to locate the product within the warehouse more precisely.
Navigation: User selects the rack from the dropdown list, populated from the Rack Master (e.g., "RACK 1").
Location
Description: Specifies the exact location of the product within the warehouse (e.g., shelf, row, column), providing a precise reference for the inventory item.
Navigation: User selects the location from the dropdown list, populated from the Location Master (e.g., "Z1R1C1L1").
Warehouse
Description: Refers to the physical warehouse where the transaction is taking place. This helps identify the specific warehouse location for the transaction.
Navigation: User selects the warehouse from the dropdown list, populated from the Warehouse Master (e.g., "WH001: Warehouse 1").
Transaction From (Date)
Description: Marks the start date for the inventory transaction. This is the date when the product is received, shipped, or moved as part of the transaction.
Navigation: User selects the date from the calendar (e.g., "12/2/2024").
Transaction To (Date)
Description: Marks the end date for the inventory transaction. This represents the date when the product is expected to be delivered, received, or transferred out.
Navigation: User selects the date from the calendar (e.g., "12/2/2024").
Inventory Transaction Details
The Inventory Transaction Details section in a Warehouse Management System (WMS) provides a comprehensive record of all inventory movements within a warehouse. This feature plays a crucial role in tracking, managing, and analyzing inventory operations, ensuring accuracy and transparency.
Here is the meaning of the field for the Description along with Navigation for the fields
Transaction Type
Description: Defines the nature of the inventory transaction, such as goods receiving, shipment, or transfer. It helps categorize and identify the type of movement or activity for the inventory.
Navigation: User selects the transaction type from a dropdown list, populated from a static list (e.g., "Goods receiving").
Product
Description: Specifies the particular product involved in the transaction. It identifies the product being processed and helps differentiate it during inventory management.
Navigation: User selects the product from a dropdown list, populated from the Product Master (e.g., "PRO1: Product 1").
Supplier ID/Name
Description: Indicates the supplier from whom the product is sourced. It helps track where the products are coming from and supports vendor management.
Navigation: User selects the supplier from a dropdown list, populated from the Supplier Master (e.g., "S1: RAJESH").
Customer
Description: Refers to the recipient of the product in cases of sales or deliveries. It helps track which customer is involved in the transaction.
Navigation: User selects the customer from a dropdown list, populated from the Customer Master (e.g., "CUS1: NEHA").
Order ID
Description: Unique identifier for the order related to the transaction. It helps track orders and link them to the inventory transaction.
Navigation: User selects the order ID from a dropdown list, populated based on the order type (e.g., "PO94").
Zone
Description: Identifies the specific zone in the warehouse where the product is stored or being moved. Zones help in organizing the inventory for easier tracking and management.
Navigation: User selects the zone from a dropdown list, populated from the Zone Master (e.g., "ZONE 1").
Rack
Description: Represents the specific rack within a warehouse zone where the product is stored. It helps to locate the product within the warehouse more precisely.
Navigation: User selects the rack from the dropdown list, populated from the Rack Master (e.g., "RACK 1").
Location
Description: Specifies the exact location of the product within the warehouse (e.g., shelf, row, column), providing a precise reference for the inventory item.
Navigation: User selects the location from the dropdown list, populated from the Location Master (e.g., "Z1R1C1L1").
Warehouse
Description: Refers to the physical warehouse where the transaction is taking place. This helps identify the specific warehouse location for the transaction.
Navigation: User selects the warehouse from the dropdown list, populated from the Warehouse Master (e.g., "WH001: Warehouse 1").
Transaction From (Date)
Description: Marks the start date for the inventory transaction. This is the date when the product is received, shipped, or moved as part of the transaction.
Navigation: User selects the date from the calendar (e.g., "12/2/2024").
Transaction To (Date)
Description: Marks the end date for the inventory transaction. This represents the date when the product is expected to be delivered, received, or transferred out.
Navigation: User selects the date from the calendar (e.g., "12/2/2024").
Overall Inventory
The Overall Inventory module in a Warehouse Management System (WMS) provides a centralized view of all stock within a warehouse or across multiple locations. This feature is essential for ensuring that inventory is accurately tracked, efficiently managed, and aligned with operational needs.
Here is the meaning of the field for the Description along with Navigation for the fields
Organization
Description: Represents the organization managing the inventory. It helps identify which entity's inventory data is being accessed or tracked.
Navigation: User will select the organization from the dropdown list, which is populated from the Organization Master (e.g., "ORG1: DLI").
Warehouse
Description: Refers to the specific warehouse where inventory is stored. It provides the physical location or storage facility details for the inventory.
Navigation: User will select the warehouse from the dropdown list, which is populated from the Warehouse Master (e.g., "WH001: Warehouse 1").
Supplier
Description: Identifies the supplier who provided the products in the inventory. This field helps in sourcing and tracking inventory origins.
Navigation: User will select the supplier from the dropdown list, which is populated from the Supplier Master (e.g., "V00001: Green Earth Fresh Produce Pvt. Ltd.").
Product Category
Description: Denotes the classification of products into categories based on their type, such as food, electronics, or apparel. It helps organize inventory data for easier analysis and management.
Navigation: User will select the product category from the dropdown list, which is populated from the Parameters (e.g., "Food").
Product
Description: Refers to the specific product being tracked in the inventory. It uniquely identifies the item and allows for detailed tracking of stock levels.
Navigation: User will select the product from the dropdown list, which is populated from the Product Master (e.g., "SA00002: Apple-Shimla").
Internal Transfers
In a Warehouse Management System (WMS), internal transfers refer to the process of moving goods or inventory from one location to another within the same warehouse or across different warehouse locations controlled by the same organization. These transfers are crucial for maintaining proper stock levels, optimizing warehouse space, and ensuring the correct placement of goods for efficient picking, packing, and shipping.
Here is the meaning of the field for the Description along with Navigation for the fields
Product
Description: This field allows the user to select the product that is being transferred. The options available come from the Product Master, which stores all product details.
Navigation: Choose the product from the dropdown list populated from the Product Master.
Source Location
Description: This field is used to specify the location from where the product will be transferred. The available locations come from the Inventory.
Navigation: Choose the source location from the dropdown list populated from the Inventory.
Destination Location
Description: This field is used to specify the location to which the product will be transferred. The available locations come from the Location Master.
Navigation: Choose the destination location from the dropdown list populated from the Location Master.
Allocation Type
Description: This field displays the allocation type for the transfer, which is determined by system configuration. The allocation type can be a predefined method, such as "Auto" or "Manual".
Navigation: The allocation type is automatically displayed based on system configuration.
Transfer Quantity
Description: This field allows the user to enter the quantity of the product to be transferred. The user manually inputs the number representing the quantity of the product being moved.
Navigation: Input the transfer quantity manually in the Transfer Quantity field.
Reason
Description: This field allows the user to specify the reason for the transfer, such as "Stock Movement," "Inventory Reorganization," or any custom reason.
Navigation: Input the reason manually in the Reason field.
Transfer Quantity
Description: This field represents the amount of the product to be transferred from the source location. It indicates how much quantity needs to be moved from the current location to the destination.
Navigation: Input the transfer quantity manually in the Transfer Quantity field.
Reason (for Transfer)
Description: This field allows the user to provide an additional reason for the transfer. It can be used to give more context to why the transfer is occurring, offering a more detailed explanation.
Navigation: Enter the reason manually in the Reason field for the transfer.
Inventory Adjustments
Inventory adjustments refer to the process of modifying or correcting the inventory levels recorded in a company's system to reflect accurate quantities. This is crucial for businesses to maintain proper stock control, avoid discrepancies, and ensure the financial records are correct. Inventory adjustments can be either an increase or a decrease in stock quantities and are usually made based on physical counts, inventory audits, or after identifying issues like theft, damage, or errors in data entry.
Here is the meaning of the field for the Description along with Navigation for the fields and example
Product ID
Description: A unique identifier for the product used to track it within the system.
Navigation: Manually enter the product ID while creating an entry.
Example Value: MLX039000038
Product Name
Description: The name of the product associated with the entered product ID.
Navigation: This field is automatically populated by the system based on the entered Product ID from the Product Master.
Example Value: 4.20MM MINI-FIT FEMALE CRIMP TIN/REEL
Product ID/Name
Description: A combination of Product ID and Product Name to simplify selection.
Navigation: Select the desired product from the dropdown menu.
Example Value: MLX039000038:4.20MM MINI-FIT FEMALE CRIMP TIN/REEL
Location Name
Description: The storage location identifier where the product is stored.
Navigation: Select the location name manually from the dropdown menu.
Example Value: Z4R2C1A098
Available Quantity
Description: The quantity of the product available in the system after adjustments.
Navigation: Manually enter the available quantity in the text field.
Example Value: 100
Reserved Quantity
Description: The quantity of the product reserved in the inventory for specific purposes.
Navigation: This field is automatically populated based on inventory data.
Example Value: 50
Adjusted Quantity
Description: The current inventory quantity of the product after adjustment.
Navigation: Manually input the adjusted quantity in the text field.
Example Value: 20
Inventory Adjustment table
Product Type
Description: The category of the product (e.g., Finished Product, Raw Material).
Navigation: This field is automatically populated when the Product ID is selected.
Example Value: Finished Product
Product Class
Description: A classification that provides additional details about the product (e.g., Class 1, Class 2).
Navigation: This field is automatically populated when the Product ID is selected.
Example Value: Class 1
Product Category
Description: The category of the product as defined in the Product Master.
Navigation: This field is automatically populated from the Product Master based on the Product ID.
Example Value: Chemicals Non-Bonded Room Temperature C-KA-040
Addition
Description: The amount of product added to the inventory.
Navigation: Manually input the addition quantity while creating an entry.
Example Value: 10
Reduction
Description: The amount of product deducted from the inventory.
Navigation: Manually input the reduction quantity while creating an entry.
Example Value: -10
Reason
Description: The reason for making an inventory adjustment.
Navigation: Manually input the reason in the text area while creating an entry.
Example Value: Maintenance
Cycle Counting
Cycle Counting is a crucial inventory management process within a Warehouse Management System (WMS), designed to ensure inventory accuracy and streamline warehouse operations. Unlike traditional physical inventory audits that require the entire warehouse to be counted, cycle counting focuses on counting specific subsets of inventory on a regular and systematic basis.
Here is the meaning of the field for the Description along with Navigation for the fields
Cycle Count Header
Criteria Type
Description: Specifies the type of criteria used to perform the cycle counting, such as warehouse, zone, location, product, supplier, or product category.
Navigation: Select a value from the Criteria Type static dropdown list.
Counting Type
Description: Defines whether the cycle counting will be conducted in a single or double counting process.
Navigation: Select either Single or Double from the Counting Type static dropdown list.
Freeze Inventory
Description: Indicates whether the inventory should be frozen during the cycle count to prevent adjustments while counting is in progress.
Navigation: Check or uncheck the Freeze Inventory checkbox as required.
Cycle Counting Executive
Description: Assigns the person responsible for conducting the cycle counting.
Navigation: Select the desired executive (e.g., E100:Sugan) from the Cycle Counting Executive dropdown list.
Status
Description: Indicates the current status of the cycle count (Created, Confirmed, or Complete).
Navigation: The system updates this field automatically based on the progress of the cycle counting.
Cycle Count Lines
Product ID/Name
Description: Identifies the product being counted in the cycle count.
Navigation: This field is auto-populated based on the product details in the inventory.
Inventory Unit
Description: Represents the unit of measurement for the product in inventory.
Navigation: This field is auto-populated from the inventory.
Brand Name
Description: Displays the brand name of the product being counted.
Navigation: This field is auto-populated from the inventory.
Quantity Inventory Unit
Description: Displays the recorded quantity of the product in the inventory unit.
Navigation: The system auto-populates this field from the inventory.
Available Quantity
Description: Displays the total available quantity of the product in the inventory.
Navigation: The system auto-populates this field from the inventory.
Location Name
Description: Displays the location of the product within the warehouse.
Navigation: The system auto-populates this field from the inventory.
Variance
Description: Represents the difference between the counted quantity and the recorded inventory quantity.
Navigation: The system calculates this value as Variance = Quantity Inventory Unit - Counter Quantity.
Variance%
Description: Represents the variance as a percentage of the total quantity.
Navigation: The system calculates this value as Variance% = Variance / 100.
Price
Description: Displays the price of the product being counted.
Navigation: The system auto-populates this field from the inventory.
Cycle Counting Filters
Planned Scheduled From
Description: Indicates the start date of the planned schedule for cycle counting.
Navigation: Select the date manually from the Planned Scheduled From date field.
Planned Scheduled To
Description: Indicates the end date of the planned schedule for cycle counting.
Navigation: Select the date manually from the Planned Scheduled To date field.
Actual Scheduled From
Description: Indicates the start date of the actual schedule for cycle counting.
Navigation: Select the date manually from the Actual Scheduled From date field.
Actual Scheduled To
Description: Indicates the end date of the actual schedule for cycle counting.
Navigation: Select the date manually from the Actual Scheduled To date field.
Criteria Type
Description: Specifies the criteria type (Warehouse, Zone, Location, Product, Supplier, or Product Category) used for filtering.
Navigation: Select a value from the Criteria Type static dropdown list.
Status
Description: Represents the current status of the cycle count during filtering (Created, Confirmed, or Complete).
Navigation: Select a value manually in the Status field.
Search
Description: Allows filtering the data based on a search keyword.
Navigation: Enter the desired keyword in the Search text field to filter results.
Ageing Report
An Aging Report is a crucial tool used by businesses to track Inventory stock over time. It categorizes inventory ages on how long they have been stored, usually into time intervals (e.g., 0-30 days, 31-60 days, 61-90 days, and 90+ days). This report helps businesses monitor the Inventory health.
Here is the meaning of the field for the Description along with Navigation for the fields
Organization Id/Name
Description: Displays the organization ID and name associated with the logged-in user.
Navigation: This field is auto-populated by the system with the mapped organization details of the logged-in user.
Warehouse
Description: Specifies the warehouse for which the ageing report is to be generated.
Navigation: Select a value from the Warehouse dropdown list. The list is populated based on the organization master.
Aging Style
Description: Defines the ageing style, such as "To Be Expired," to filter products nearing expiry.
Navigation: Select the desired option from the Aging Style static dropdown list.
Date
Description: Represents the reference date for calculating product ageing.
Navigation: Use the calendar picker to select a date manually in the Date field.
Category
Description: Includes the category filter for the ageing report.
Navigation: By default, the Category checkbox is checked. Users can update this by checking or unchecking the box as needed.
Include Price
Description: Indicates whether the report should include product prices.
Navigation: By default, the Include Price checkbox is checked. Users can update this by checking or unchecking the box as needed.
Product
Description: Allows selection of a specific product for the ageing report.
Navigation: Select a product manually from the Product dropdown list. The list is populated from the product master.
Product Category
Description: Filters the report by product category.
Navigation: Select a product category manually from the Product Category dropdown list. The list is populated from parameters.
Supplier
Description: Specifies the supplier for which the ageing report is to be generated.
Navigation: Select a supplier manually from the Supplier dropdown list. The list is populated based on the organization master.
Grand Total
Description: Displays the total value of all items in the ageing report.
Navigation: This field is calculated automatically by the system as the sum of each item's value.
Issue Inventory
The Issue Inventory process in a Warehouse Management System (WMS) involves allocating and dispatching inventory items to fulfill outbound orders, internal requests, or operational needs. It ensures that the correct items are picked, packed, and delivered while maintaining inventory accuracy and operational efficiency.
Here is the meaning of the field for the Description along with Navigation for the fields
Issue Inventory
Include Checkbox
Description: Allows the user to select whether to include the specific inventory item for processing.
Navigation: User manually selects this checkbox to include the item in the issue inventory process.
Issue Quantity
Description: Represents the quantity of the product to be issued from inventory.
Navigation: User manually enters the required issue quantity in this text field.
Remarks
Description: Provides additional notes or comments regarding the inventory issue process, such as quality or quantity concerns.
Navigation: User manually enters remarks in this text field.
Issue Inventory Filters
Product Category
Description: Filters the inventory items based on their main product category (e.g., ALL DRINKS).
Navigation: User selects the desired category from a dropdown list populated with values from the system parameters.
Sub Category-1
Description: Filters inventory items by the first level of subcategory (e.g., Food).
Navigation: User selects the subcategory from a dropdown list populated with values from the system parameters.
Sub Category-2
Description: Filters inventory items by the second level of subcategory (e.g., Dairy).
Navigation: User selects the subcategory from a dropdown list populated with values from the system parameters.
Sub Category-3
Description: Filters inventory items by the third level of subcategory (e.g., Blend).
Navigation: User selects the subcategory from a dropdown list populated with values from the system parameters.
Issue Inventory Transaction
Include Checkbox
Description: Allows the user to include the specific inventory item for status updates.
Navigation: User manually selects this checkbox to include the item in the update process.
Action
Description: Represents the status action to be taken for the inventory item (e.g., Approved).
Navigation: User selects the desired action from a dropdown list populated with predefined static options.
Inbound Capacity Planning
Inbound Capacity Planning in a Warehouse Management System (WMS) involves forecasting, managing, and optimizing the warehouse's ability to handle incoming shipments effectively. It is a critical component of warehouse operations, ensuring that resources such as space, labor, and equipment are adequately allocated to meet the demands of incoming goods.
Here is the meaning of the field for the Description along with Navigation for the fields
Order Number
Description: A unique identifier for the Warehouse Management Purchase Order (WMPO). This field is system-generated and includes an number that starts with "10" followed by six digits generated by the system. The number is reflected in the "Goods Receipt" process.
Navigation: This field is invisible to the user and auto-filled by the system once the order is created. It cannot be edited manually.
Product ID/Name
Description: Represents the specific item being ordered, identified by either its product ID or name. This field ensures that the correct product is selected for the order.
Navigation: The field is auto-filled based on the details from the purchase order. The user cannot manually modify this field.
UOM (Unit of Measure)
Description: The unit of measure for the product (e.g., JAR, KG, LITER). It defines how the product is measured or quantified during the receipt process.
Navigation: This field is auto-filled based on the purchase order data. If the unit of measure is available in the purchase order, it will populate automatically.
Supplier ID/Name
Description: Identifies the supplier of the product. It's either displayed by the supplier ID or name as provided in the purchase order.
Navigation: The supplier ID or name is auto-filled from the purchase order data and is linked to the master data of suppliers. Users cannot manually edit this field.
Receipt Date
Description: The date when the goods are expected to be received. By default, it is filled with the current date.
Navigation: This field is auto-filled with the current date. Users may modify the date if necessary for specific reasons.
Expected Delivery Date
Description: The date when the supplier is expected to deliver the goods, based on the purchase order's expected delivery date.
Navigation: This field is auto-filled based on the purchase order and is visible for the user to review or modify if required.
Receipt Type
Description: Specifies the type of receipt being processed, such as a standard or expedited receipt. It is automatically generated based on the order type.
Navigation: The system auto-generates this field based on the order details. Users cannot modify it manually.
No of Days
Description: This field displays the duration for which the inventory receipt is planned, starting from the current date to the next 15 days. It helps in planning the warehouse activities.
Navigation: The field is auto-filled with a 15-day duration starting from the current date. The system calculates this automatically.
Equipment Required
Description: Displays the quantity of equipment needed for the order fulfillment based on the ordered quantity. Equipment requirements are mapped in the Bill of Resources (BOR).
Navigation: This field is auto-filled based on the order quantity and the resource mapping in the Bill of Resources (BOR). Users cannot modify it manually.
Equipment Available
Description: The number of equipment items available in the warehouse for use in fulfilling the order. This data is pulled from the equipment master.
Navigation: The field is auto-filled with equipment availability data from the equipment master.
Equipment Remaining
Description: The remaining quantity of equipment available after subtracting the required equipment from the available equipment.
Navigation: This field is auto-calculated based on the formula: Equipment Remaining = Available Equipment - Required Equipment. It updates automatically.
Executives Required
Description: Indicates the number of executives needed for order fulfillment based on the quantity ordered. Like the equipment, this is derived from the Bill of Resources (BOR).
Navigation: The field is auto-filled based on the ordered quantity and the resource mapping in the BOR. It cannot be manually edited.
Executives Available
Description: The number of executives available for fulfilling the order, pulled from the executive master.
Navigation: This field is auto-filled with the number of available executives from the executives master.
Executives Remaining
Description: Displays the remaining number of executives available after subtracting the required executives from the available count.
Navigation: This field is auto-calculated based on the formula: Executives Remaining = Executives Available - Executives Required.
Vehicle Required
Description: The number of vehicles required for transporting the order based on the quantity ordered. This value is also derived from the Bill of Resources (BOR).
Navigation: The system auto-fills this field based on the order quantity and the resource mapping in the BOR. It is not manually editable by the user.
Vehicle Available
Description: The number of vehicles available for the order fulfillment, pulled from the vehicle master data.
Navigation: This field is auto-filled with the available vehicles data from the vehicle master.
Vehicle Remaining
Description: The remaining number of vehicles available after subtracting the required vehicles from the available vehicles.
Navigation: This field is auto-calculated based on the formula: Vehicle Remaining = Vehicle Available - Vehicle Required. The calculation is done automatically by the system.
Outbound Capacity Planning
Outbound capacity planning is a critical function within a Warehouse Management System (WMS), focusing on ensuring that the warehouse has the necessary resources and space to fulfill outgoing orders efficiently. This process involves managing inventory, workforce, equipment, and transportation resources to meet order fulfillment deadlines while optimizing warehouse operations.
Here is the meaning of the field for the Description along with Navigation for the fields
Order Number
Description: The Warehouse Management Sales Order (WMSO) number is a unique 8-digit identifier for each sales order, starting with "10" followed by six system-generated digits. It helps track and reference the sales order in the system. This number is reflected in the "Sales Order" process.
Navigation: This field is invisible to the user and is auto-filled by the system once the sales order is created. It cannot be manually edited.
Product ID/Name
Description: This field represents the specific item details for a particular sales order. It ensures the correct product is selected for the order.
Navigation: The field is auto-filled based on the sales order details and cannot be manually modified by the user.
UOM (Unit of Measure)
Description: The Unit of Measure (UOM) defines how the product is measured (e.g., JAR). It ensures consistency in tracking quantities.
Navigation: This field is auto-filled from the sales order details and displayed automatically when available.
Customer ID/Name
Description: The Customer ID/Name represents the specific customer associated with the sales order. It links the sales order to the correct customer from the master data.
Navigation: This field is auto-filled based on the sales order details. The customer data is pulled from the master data and cannot be manually changed.
Receipt Date
Description: The receipt date is the date when the sales order is received. By default, this is set to the current date when the order is processed.
Navigation: This field is auto-filled with the current date upon order creation.
Expected Delivery Date
Description: The expected delivery date is the date on which the customer is expected to receive the goods. This date is taken from the sales order.
Navigation: This field is auto-filled based on the expected delivery date provided in the sales order.
Receipt Type
Description: This field indicates the type of receipt for the order, such as "Standard" or "Express." It is automatically generated based on the order type.
Navigation: This field is auto-filled based on the sales order type and cannot be modified by the user.
No of Days
Description: This field shows the number of days from the current date to the expected delivery date, typically set for 15 days. It helps in planning the outbound shipment schedule.
Navigation: The system auto-calculates this value and displays the 15-day period starting from the current date.
Equipment Required
Description: The number of equipment items required for processing the order based on the order quantity. The required equipment is determined by the Bill of Resources (BOR).
Navigation: The system auto-fills this based on the order quantity and the resources mapped in the Bill of Resources.
Equipment Available
Description: The count of available equipment based on the equipment master. It reflects how many units of equipment are currently available.
Navigation: This value is auto-filled from the equipment master data, which is updated regularly.
Equipment Remaining
Description: This field calculates the remaining equipment available for the order. It is the difference between available equipment and required equipment.
Navigation: This value is automatically calculated by subtracting the required equipment from the available equipment.
Executives Required
Description: The number of executives needed for order processing based on the order quantity, as defined by the Bill of Resources.
Navigation: This value is auto-calculated based on the order quantity and the executive requirements defined in the Bill of Resources.
Executives Available
Description: The count of available executives based on the data from the executive master.
Navigation: This value is auto-filled from the executive master, which is updated to reflect current availability.
Executives Remaining
Description: The remaining executives available for the order. It is the difference between available executives and required executives.
Navigation: This value is auto-calculated by subtracting the required executives from the available executives.
Vehicle Required
Description: The number of vehicles required for the order based on the order quantity, as determined by the Bill of Resources.
Navigation: This value is auto-filled based on the order quantity and the vehicle requirements specified in the Bill of Resources.
Vehicle Available
Description: The count of available vehicles as per the vehicle master data.
Navigation: This value is auto-filled from the vehicle master, which tracks vehicle availability.
Vehicle Remaining
Description: This field calculates the remaining vehicles available for the order. It is the difference between available vehicles and required vehicles.
Navigation: This value is auto-calculated by subtracting the required vehicles from the available vehicles.
Putaway Planning
Put away planning is a critical component of a Warehouse Management System (WMS) that ensures the efficient storage of goods within the warehouse. It involves determining the optimal storage locations for incoming inventory to maximize space utilization, streamline retrieval processes, and maintain inventory accuracy.
Here is the meaning of the field for the Description along with Navigation for the fields
Put away Number
Description: The Put away Number is an auto-generated number that uniquely identifies each put away task. This sequence number is generated automatically by the system.
Navigation: The system will generate this number automatically when a new putaway task is created.
Order Number
Description: The Order Number is the number generated during the Purchase Order (PO) or Goods Receipt Note (GRN) process. This number is displayed here and is linked to the specific PO or GRN.
Navigation: The system will display this number automatically based on the related PO or GRN.
Status
Description: The Status indicates the current state of the put away task, with two possible values: "Start" or "Complete." After picking is completed, the user (team) is required to update the status.
Navigation: Click the button to toggle between "Start" and "Complete."
Planned Completion Date
Description: The Planned Completion Date represents the date when the put away task is expected to be completed. This date is selected by the user.
Navigation: The user will select the date from the calendar.
Assigned By
Description: The Assigned By field captures the name of the user who assigns the put away task. This is automatically populated with the user's login name.
Navigation: This value is automatically captured from the user login.
Assigned To
Description: The Assigned To field allows the user to select the executive responsible for the put away task. The list of executives is retrieved from the Executive Master list.
Navigation: The user selects the executive from the dropdown list.
Start Time
Description: The Start Time records the exact time when the user begins the put away task. This is system-generated.
Navigation: The system will record this time when the user begins the task.
End Time
Description: The End Time records the exact time when the user completes the put away task. This is system-generated.
Navigation: The system will record this time when the task is completed.
Product ID
Description: The Product ID is the identifier for the product involved in the put away task. It is retrieved from the GRN based on the related PO ID and PO line number.
Navigation: The system will display the product ID automatically from the GRN.
Product Name
Description: The Product Name is the name of the product involved in the put away task. It is pulled from the GRN based on the PO ID and PO line number.
Navigation: The system will display the product name automatically from the GRN.
Product Description
Description: The Product Description provides additional details about the product, such as size or characteristics. This is automatically retrieved from the GRN.
Navigation: The system will display the product description based on the GRN.
Brand Name
Description: The Brand Name refers to the brand associated with the product. It is retrieved from the GRN based on the PO ID and PO line number.
Navigation: The system will display the brand name automatically from the GRN.
UOM (Unit of Measure)
Description: The UOM specifies the unit of measurement for the product (e.g., NOS). It is retrieved from the GRN.
Navigation: The system will display the UOM automatically from the GRN.
Quantity
Description: The Quantity field indicates the number of units of the product involved in the put away task. This value is pulled from the GRN.
Navigation: The system will display the quantity from the GRN.
Total Actual Put away Quantity
Description: The Total Actual Put away Quantity indicates the quantity actually put away as per the GRN, typically based on the quantity ordered for putaway.
Navigation: The user will enter the quantity in the Total Actual Put away Quantity field manually.
MFG Date (Manufacturing Date)
Description: The MFG Date indicates the manufacturing date of the product. It is retrieved from the GRN.
Navigation: The system will display the manufacturing date based on the GRN.
Expiry Date
Description: The Expiry Date is the date until which the product is valid. This is automatically fetched from the GRN.
Navigation: The system will display the expiry date from the GRN.
Batch Number
Description: The Batch Number refers to the unique identifier for the product batch. It is pulled from the GRN.
Navigation: The system will display the batch number from the GRN.
Supplier/Customer/Warehouse
Description: The Supplier/Customer/Warehouse indicates the supplier, customer, or warehouse associated with the product. This is fetched from the GRN.
Navigation: The system will display the supplier, customer, or warehouse based on the GRN.
Zone Name
Description: The Zone Name indicates the zone within the warehouse where the product is stored. It is automatically assigned by the system.
Navigation: The system will display the zone name automatically.
Rack Name
Description: The Rack Name refers to the specific rack within the zone where the product is placed. It is automatically populated by the system.
Navigation: The system will display the rack name automatically.
Level Name
Description: The Level Name refers to the specific level within the rack where the product is stored. It is automatically assigned by the system.
Navigation: The system will display the level name automatically.
Column Name
Description: The Column Name specifies the column within the level where the product is placed. It is automatically assigned by the system.
Navigation: The system will display the column name automatically.
Location Name
Description: The Location Name refers to the exact location within the warehouse where the product is stored. It is based on the combination of zone, rack, level, and column.
Navigation: The system will display the location name automatically.
Invoice Number
Description: The Invoice Number is automatically retrieved from the GRN and reflects the invoice associated with the goods receipt.
Navigation: The system will display the invoice number based on the GRN.
Invoice Date
Description: The Invoice Date represents the date when the invoice was issued. It is automatically retrieved from the GRN.
Navigation: The system will display the invoice date from the GRN.
Bill of Entry Number
Description: The Bill of Entry Number is automatically retrieved from the GRN and is linked to the goods receipt entry.
Navigation: The system will display the bill of entry number from the GRN.
Bill of Entry Date
Description: The Bill of Entry Date indicates the date when the bill of entry was issued. This value is fetched from the GRN.
Navigation: The system will display the bill of entry date based on the GRN.
Bond Number
Description: The Bond Number refers to the identification number for the bond associated with the product. This is manually entered by the user.
Navigation: The user will input the bond number manually.
Bond Date
Description: The Bond Date represents the date when the bond was issued. This date is manually entered by the user.
Navigation: The user will select the bond date manually.
Created Date
Description: The Created Date represents the date when the putaway task was created. It is automatically populated by the system.
Navigation: The system will insert the created date automatically.
Picking Planning
Picking planning is a core functionality of a Warehouse Management System (WMS) that focuses on optimizing the retrieval of goods from their storage locations to fulfill customer orders. It is a strategic process designed to minimize errors, reduce operational costs, and ensure timely order fulfillment.
Here is the meaning of the field for the Description along with Navigation for the fields
Order Number
Description: Sales Order (SO) number generated in the system.
Navigation: Number manually in the SO Number field.
Picking Number
Description: The picking number is generated after confirming the SO. It is an number where the first two digits are '10' and the remaining six digits are auto-generated.
Navigation: The picking number is auto-generated after SO confirmation.
Status
Description: Indicates whether the picking is complete or incomplete.
Navigation: Select the status from the dropdown once the picking process is complete or incomplete.
Planned Completion Date
Description: Select the planned completion date from the calendar.
Navigation: Choose the date from the calendar in the Planned Completion Date field.
Start Date
Description: Records the start date of the picking process.
Navigation: The system records the start date automatically once the picking process begins.
Assigned By
Description: Displays the name of the person who assigned the task.
Navigation: The system auto-generates this value after assigning the employee.
Assigned To
Description: Select the employee assigned to the task from the dropdown list.
Navigation: Choose the employee from the dropdown sourced from the Executive Master.
Product ID
Description: Displays the product ID based on the associated SO ID and SO line number.
Navigation: The system auto-fills this field based on the SO and line number.
Product Name
Description: Displays the product name corresponding to the SO ID and line number.
Navigation: The system auto-fills this field based on the SO and line number.
Product Description
Description: Displays the product description corresponding to the SO ID and line number.
Navigation: The system auto-fills this field based on the SO and line number.
Brand Name
Description: Displays the brand name based on the SO order details.
Navigation: The system auto-fills this field.
UOM (Unit of Measure)
Description: Displays the unit of measure based on the customer order.
Navigation: The system auto-fills this field.
Quantity
Description: Displays the quantity of products ordered for picking.
Navigation: The system auto-fills this field based on the sales order.
Total Actual Picking Quantity
Description: Displays the total actual picking quantity.
Navigation: The system auto-fills this field.
Manufacturing Date
Description: Displays the product's manufacturing date.
Navigation: The system auto-fills this field.
Expiry Date
Description: Displays the product's expiry date.
Navigation: The system auto-fills this field.
Batch Number
Description: Displays the mapped batch number from the sales order.
Navigation: The system auto-fills this field based on the sales order.
Description: Displays customer, warehouse, and supplier details based on the sales order.
Navigation: The system auto-fills these fields.
Zone Name
Description: Enter the zone name.
Navigation: Input the zone name manually.
Rack Name
Description: Enter the rack name.
Navigation: Input the rack name manually.
Level Name
Description: Enter the level name.
Navigation: Input the level name manually.
Location Name
Description: Displays the location from which products are to be picked.
Navigation: The location name is displayed after confirming the sales order.
Invoice Number
Description: Displays the invoice number if available in inventory.
Navigation: The system auto-fills this field.
Invoice Date
Description: Displays the invoice date if available in inventory.
Navigation: The system auto-fills this field.
BOE Number
Description: Displays the BOE number if available in inventory.
Navigation: The system auto-fills this field.
BOE Date
Description: Displays the BOE date if available in inventory.
Navigation: The system auto-fills this field.
Bond Number
Description: Displays the bond number if available in inventory.
Navigation: The system auto-fills this field.
Bond Date
Description: Displays the bond date if available in inventory.
Navigation: The system auto-fills this field.
Ex Bond Number
Description: Displays the ex-bond number if available in the sales order.
Navigation: The system auto-fills this field.
Ex Bond Date
Description: Displays the ex-bond date if available in the sales order.
Navigation: The system auto-fills this field.
Created Date
Description: Displays the date when the picking was created.
Navigation: The system records this date upon saving the SO and generating the picking.
Internal Transfers
Internal transfers in a Warehouse Management System (WMS) refer to the movement of goods or inventory within the warehouse or across different storage locations within the same facility. This process ensures efficient space utilization, reorganization of inventory, or preparation for specific operational needs such as order fulfillment or replenishment.
Here is the meaning of the field for the Description along with Navigation for the fields
Assigned By
Description: The person who assigned the internal transfer task.
Navigation: The system automatically inserts this value after the transfer is created.
Assigned To
Description: Select the employee who is assigned to complete the internal transfer.
Navigation: The user will manually select the employee from the dropdown list.
Created By
Description: The person who created the internal transfer.
Navigation: The system automatically inserts the user's name when the transfer is created.
Approved By
Description: The person who approves the internal transfer.
Navigation: The system records the approval details automatically after the transfer is approved.
Product ID/Name
Description: Select the product involved in the internal transfer.
Navigation: The user manually selects the product ID and name.
Quantity
Description: Enter the quantity of products to be transferred.
Navigation: The user manually enters the quantity during the creation of the transfer.
Source Location
Description: Select the location from where the product is being transferred.
Navigation: The user selects the source location during transfer creation.
Destination Location
Description: Select the location where the product is being transferred to.
Navigation: The user selects the destination location during transfer creation.
Created Date
Description: Displays the date and time when the internal transfer was created.
Navigation: The system automatically records the current date and time as the created date.
Start Date
Description: Displays the start date when the transfer process begins.
Navigation: The system automatically inserts this value when the transfer starts.
Planned Completion Date
Description: Select the planned completion date for the transfer process.
Navigation: The user manually selects the planned completion date from the calendar.
Packing
Packing is a critical step in the Warehouse Management System (WMS) workflow, focused on preparing goods for shipment after they have been picked. It involves verifying the items picked, ensuring proper packaging to prevent damage, and labeling packages for accurate delivery. The packing process bridges the gap between picking and shipping, ensuring that customer orders are accurate, secure, and ready for transit.
Here is the meaning of the field for the Description along with Navigation for the fields
Order Number
Description: The Sales Order (SO) number associated with the packing process.
Navigation: This field is auto-generated after the sales order is picked and confirmed. It will display the corresponding Order Number.
Assigned By
Description: The person who assigned the packing task.
Navigation: The system automatically inserts this value when the task is assigned.
Assigned Date
Description: The date when the packing task was assigned.
Navigation: The system automatically records the assigned date.
Assigned To
Description: The employee assigned to complete the packing task.
Navigation: The user manually selects the employee from the dropdown list, which is sourced from the Executive Master.
Product ID Name
Description: The product associated with the sales order that is being packed.
Navigation: This field is populated automatically from the sales order after the picking process is complete.
Brand Name
Description: The brand name of the product being packed.
Navigation: This field is populated automatically from the sales order after the picking process is complete.
UOM (Unit of Measure)
Description: The unit of measure for the product being packed (e.g., JAR, BOX).
Navigation: This field is populated automatically from the sales order after the picking process is complete.
Quantity
Description: The total quantity of the product in the sales order.
Navigation: This field is populated automatically from the sales order after the picking process is complete.
Picked Quantity
Description: The quantity of products picked for the order.
Navigation: This field is populated automatically from the picking process.
Packed Quantity
Description: The quantity of products that have been packed.
Navigation: The user manually enters the quantity after the packing process.
Packing Type
Description: The type of packing used for the product (e.g., box, bag).
Navigation: The user manually enters the packing type.
Packing Material
Description: The material used for packing (e.g., plastic, cardboard).
Navigation: The user manually enters the packing material.
Created Date
Description: The date and time when the packing record was created.
Navigation: The system automatically records the current date and time as the created date.
Start Date
Description: The date when the packing task started.
Navigation: The system automatically records the start date when the packing process begins.
Planned Completion Date
Description: The planned completion date for the packing process.
Navigation: The user manually enters the planned completion date using the calendar.
Filters
Order Number
Description: Select the Order Number for the packing task.
Navigation: This dropdown lists available sales orders, and the user can select the Order Number associated with the packing task.
Employee
Description: Select the employee responsible for the packing task.
Navigation: This dropdown lists employees from the Executive Master, and the user selects the responsible employee.
Repacking
Re-packing in a Warehouse Management System (WMS) refers to the process of unpacking, reorganizing, and repackaging goods that were previously packed. This operation is typically triggered by the need to meet customer requirements, correct packaging errors, or adapt to changes in shipping methods or order consolidation.
Here is the meaning of the field for the Description along with Navigation for the fields
Order Number
Description: The Sales Order (SO) number associated with the re-packing process.
Navigation: This field is populated automatically after the sales order is picked and confirmed. The Order Number comes from the related sales order.
Assigned By
Description: The person who assigned the re-packing task.
Navigation: The system will automatically insert this value (e.g., DLI1001: Jack) when the task is assigned.
Assigned Date
Description: The date when the re-packing task was assigned.
Navigation: The user selects the assigned date manually using the calendar.
Assigned To
Description: The employee assigned to complete the re-packing task.
Navigation: This value comes automatically from the sales order after the picking process is complete (e.g., EXE1: Jack).
Product ID Name
Description: The product associated with the sales order that is being re-packed.
Navigation: The product ID is auto-populated from the sales order after picking (e.g., P2: Product-2).
Brand Name
Description: The brand name of the product being re-packed.
Navigation: This field is auto-filled from the sales order after the picking process is complete (e.g. Amul).
UOM (Unit of Measure)
Description: The unit of measure for the product being re-packed (e.g., JAR).
Navigation: This value is auto-filled from the sales order after the picking process is complete.
Order Quantity
Description: The total quantity of the product in the sales order.
Navigation: This value is auto-filled based on the sales order after the picking process.
Picked Quantity
Description: The quantity of products picked for the order.
Navigation: This value is auto-filled based on the picking data.
Conversion Type
Description: The type of conversion, if applicable, for the re-packing process (e.g., weight conversion).
Navigation: The user will select the conversion type manually, depending on the specific re-packing process.
Re-Packed Quantity
Description: The quantity of products that have been re-packed.
Navigation: The user will manually enter the quantity of re-packed products.
Gain Weight/Loss/Gain
Description: The weight difference between the original packed quantity and the re-packed quantity, indicating whether there was a gain or loss during re-packing.
Navigation: The user manually enters this value to track any weight differences.
Packing Type
Description: The type of packing used during re-packing (e.g., mechanical, manual).
Navigation: The user selects the packing type from the available options.
Packing Material
Description: The material used for re-packing (e.g., plastic, cardboard).
Navigation: The user will manually enter the packing material.
Created Date
Description: The date when the re-packing record was created.
Navigation: The system automatically records the current date and time as the created date.
Start Date
Description: The date when the re-packing task started.
Navigation: The system automatically records the start date when the re-packing process begins.
Planned Completion Date
Description: The planned date for completing the re-packing task.
Navigation: The user manually enters the planned completion date using the calendar.
Filters
Order Number
Description: Select the Order Number for the re-packing task.
Navigation: This dropdown lists available sales orders, and the user can select the Order Number that corresponds to the re-packing task.
Employee
Description: Select the employee responsible for the re-packing task.
Navigation: This dropdown lists employees from the Executive Master, and the user selects the responsible employee.
Co-packing
Co-packing, or contract packing, in a Warehouse Management System (WMS) refers to the process of assembling or repackaging products for promotional, retail, or distribution purposes. It often involves combining items from different sources into a single package, customizing product bundles, or preparing goods for retail display. Co-packing enhances product presentation, optimizes logistics, and helps meet specific marketing or operational goals.
Here is the meaning of the field for the Description along with Navigation for the fields
Order Number
Description: The Sales Order (SO) number associated with the co-packing process.
Navigation: This field is automatically populated from the sales order after the picking process is complete.
Assigned By
Description: The person who assigned the co-packing task.
Navigation: The system will insert the value automatically (e.g., DLI1001:Jack) when the task is assigned.
Assigned Date
Description: The date when the co-packing task was assigned.
Navigation: The user selects the assigned date manually using the calendar.
Assigned To
Description: The employee responsible for completing the co-packing task.
Navigation: This value is automatically populated from the sales order after the picking process is complete (e.g., EXE1:Jack).
Product ID Name
Description: The product associated with the sales order being co-packed.
Navigation: The product ID is auto-filled from the sales order after picking is complete (e.g., P2:Product-2).
Brand Name
Description: The brand name of the product being co-packed.
Navigation: This field is auto-filled from the sales order after the picking process is complete (e.g., Amul).
UOM (Unit of Measure)
Description: The unit of measure for the product being co-packed (e.g., JAR).
Navigation: This value is auto-filled from the sales order after the picking process is complete.
Order Quantity
Description: The total quantity of the product in the sales order.
Navigation: This field is auto-filled based on the sales order after the picking process.
Picked Quantity
Description: The quantity of the product that has been picked for the order.
Navigation: This value is auto-filled from the picking data.
Re-Packing Quantity
Description: The quantity of the product to be co-packed.
Navigation: The user manually enters the quantity of products that need to be co-packed.
Packing Type
Description: The type of packing used during co-packing (e.g., mechanical).
Navigation: The user selects the packing type from the available options.
Packing Material
Description: The material used for co-packing (e.g., yes for a specific material type).
Navigation: The user manually enters the packing material.
Created Date
Description: The date when the co-packing record was created.
Navigation: The system automatically records the current date and time as the created date.
Start Date
Description: The date when the co-packing task started.
Navigation: The system automatically records the start date when the co-packing process begins.
Planned Completion Date
Description: The planned date for completing the co-packing task.
Navigation: The user manually enters the planned completion date using the calendar.
Filters
Order Number
Description: Select the Order Number for the co-packing task.
Navigation: This dropdown lists the available sales orders, and the user selects the Order Number that corresponds to the co-packing task.
Employee
Description: Select the employee responsible for the co-packing task.
Navigation: This dropdown lists employees from the Executive Master, and the user selects the responsible employee.
Labelling
Labelling in a Warehouse Management System (WMS) refers to the process of generating and affixing identifying labels to inventory items, packages, or pallets. These labels typically contain information such as product details, barcodes, batch numbers, and destination addresses. Proper labelling ensures seamless tracking, accurate identification, and efficient handling throughout the warehouse operations and supply chain.
Here is the meaning of the field for the Description along with Navigation for the fields
Order Number
Description: The Sales Order (SO) number associated with the labelling task.
Navigation: This value is automatically populated from the sales order after the picking process is complete.
Assigned By
Description: The person who assigned the labelling task.
Navigation: The system will automatically insert the value (e.g., DLI1001:Jack) when the task is assigned.
Assigned Date
Description: The date when the labelling task was assigned.
Navigation: The user selects the assigned date manually using the calendar.
Assigned To
Description: The employee responsible for completing the labelling task.
Navigation: This value is automatically populated from the sales order after the picking process is complete (e.g., EXE1:Jack).
Product ID Name
Description: The product associated with the sales order being labelled.
Navigation: The product ID is auto-filled from the sales order after picking is complete (e.g., P2:Milk).
Brand Name
Description: The brand name of the product being labelled.
Navigation: This field is auto-filled from the sales order after the picking process is complete (e.g., Amul).
Inventory Unit (UOM)
Description: The unit of measurement for the product being labelled (e.g., JAR).
Navigation: This value is auto-filled from the sales order after the picking process is complete.
Quantity
Description: The total quantity of the product in the sales order.
Navigation: This field is auto-filled based on the sales order after the picking process.
Picked Quantity
Description: The quantity of the product that has been picked for the order.
Navigation: This value is auto-filled from the picking data.
Customer Confirmation
Description: Whether the customer has confirmed the product details for labelling.
Navigation: The user manually selects either "Yes" or "No."
Packing Type
Description: The type of packing used during labelling (e.g., mechanical).
Navigation: The user selects the packing type from the available options.
Packing Material
Description: The material used for packing during labelling.
Navigation: The user manually enters the packing material.
Created Date
Description: The date when the labelling record was created.
Navigation: The system automatically records the current date and time as the created date.
Start Date
Description: The date when the labelling task started.
Navigation: The system automatically records the start date when the labelling process begins.
Planned Completion Date
Description: The planned date for completing the labelling task.
Navigation: The user manually enters the planned completion date using the calendar.
Filters
Order Number
Description: Select the Order Number for the labelling task.
Navigation: This dropdown lists the available sales orders, and the user selects the Order Number that corresponds to the labelling task.
Employee
Description: Select the employee responsible for the labelling task.
Navigation: This dropdown lists employees from the Executive Master, and the user selects the responsible employee.
Loading
Loading in a Warehouse Management System (WMS) refers to the process of transferring packed and labeled goods from the warehouse to transportation vehicles for delivery. This step ensures that shipments are organized, verified, and securely placed in the vehicle to optimize space and ensure the safety of goods during transit.
Here is the meaning of the field for the Description along with Navigation for the fields
Order Number
Description: The Sales Order number associated with the loading task.
Navigation: This field is automatically populated from the sales order.
Invoice Number
Description: The invoice number related to the loading task.
Navigation: This value is automatically populated from the Gate Entry order (e.g., INV1001).
Invoice Date
Description: The date when the invoice was created.
Navigation: The invoice date is auto-filled from the Gate Entry order (e.g., 12-12-2024).
Assigned By
Description: The person who assigned the loading task.
Navigation: The system automatically inserts the value (e.g., DLI1001:Jack).
Assigned To
Description: The employee responsible for completing the loading task.
Navigation: This value is automatically populated from the sales order after the picking process is complete (e.g., EXE1:Jack).
Gate In Date
Description: The date when the goods were received at the gate.
Navigation: The user will enter this date manually.
Note Type
Description: The type of note related to the loading process.
Navigation: This field is not specified in the details, so it likely requires user input or is determined by other system rules.
Waybill Number
Description: The waybill number associated with the loading task.
Navigation: This value is mapped from the Gate Entry data (e.g., W1001).
Invoice Total Quantity
Description: The total quantity of products listed on the invoice.
Navigation: This value is mapped from the Gate Entry data (e.g., 100).
Start Time
Description: The time when the loading process starts.
Navigation: The system automatically records the start time when the loading process begins.
Planned Completion Time
Description: The planned time for completing the loading task.
Navigation: The user manually enters the planned completion time.
Filters
Order Number
Description: The user selects the Order Number for the loading task.
Navigation: This dropdown lists the available sales orders, and the user selects the corresponding Order Number for the task.
Unloading
Unloading in a Warehouse Management System (WMS) refers to the process of receiving goods from transportation vehicles and transferring them into the warehouse or storage facility. This step involves verifying the received items, inspecting their condition, and updating the WMS inventory to ensure accurate records.
Here is the meaning of the field for the Description along with Navigation for the fields
Order Number
Description: The Purchase Order number related to the unloading process.
Navigation: This field is automatically populated from the Purchase Order.
Invoice Number
Description: The invoice number related to the unloading process.
Navigation: This value comes from the Gate Entry order (e.g., INV1001).
Invoice Date
Description: The date when the invoice was issued.
Navigation: This field is auto-populated from the Gate Entry order (e.g., 04-12-2024).
Assigned By
Description: The person who assigned the unloading task.
Navigation: The system automatically fills in this field (e.g., DLI1001:Jack).
Assigned To
Description: The employee assigned to the unloading task.
Navigation: This value is populated from the sales order after picking is complete (e.g., EXE1:Jack).
Gate In Date
Description: The date when the goods were received at the gate.
Navigation: The user enters this date manually.
Note Type
Description: The type of note related to the unloading process.
Navigation: This field's value may need to be selected or assigned based on system logic, but specifics are not detailed.
Waybill Number
Description: The waybill number for the unloading process.
Navigation: This value is mapped from the Gate Entry data (e.g., W1001).
Invoice Total Quantity
Description: The total quantity of items listed on the invoice.
Navigation: This value is mapped from the Gate Entry data (e.g., 100).
Start Time
Description: The time when the unloading task begins.
Navigation: The system automatically records this time when the unloading starts.
Planned Completion Time
Description: The planned completion time for the unloading task.
Navigation: The user enters the planned completion time manually.
Filters
Order Number
Description: The user will select the Purchase Order number related to the unloading task.
Navigation: A dropdown menu is populated with available Purchase Orders, and the user manually selects the correct one.
Putaway
Putaway refers to the process of moving received goods or products from the receiving area to their appropriate storage locations within the warehouse. It is a critical operation in Warehouse Management Systems (WMS) that ensures products are stored in an organized and efficient manner, making future picking, packing, and shipping processes easier.
Here is the meaning of the field for the Description along with Navigation for the fields
Putaway Number
Description: System-generated sequence number for the putaway process. The sequence is number.
Navigation: Automatically generated by the system in the Putaway Number field.
Order Number
Description: Displays the Order Number generated in PO or GRN.
Navigation: Automatically generated in the Order Number field.
Status
Description: Update the status of the putaway process to "Start" or "Complete" after picking.
Navigation: Click the Status field to choose either Start or Complete.
Product ID
Description: Displays the Product ID as per the respective PO ID and PO line number.
Navigation: Automatically retrieved from GRN in the Product ID field.
Product Name
Description: Displays the Product Name as per the respective PO ID and PO line number.
Navigation: Automatically retrieved from GRN in the Product Name field.
Product Description
Description: Displays the description of the product (e.g., weight or size details).
Navigation: Automatically retrieved from GRN in the Product Description field.
Brand Name
Description: Displays the Brand Name of the product based on the respective PO ID and PO line number.
Navigation: Automatically retrieved from GRN in the Brand Name field.
UOM
Description: Displays the Unit of Measure (UOM) for the product.
Navigation: Automatically retrieved from GRN in the UOM field.
Quantity
Description: Displays the quantity of products picked, derived from GRN.
Navigation: Automatically retrieved from GRN in the Quantity field.
Total Actual Putaway Quantity
Description: Enter the actual quantity of items picked for putaway.
Navigation: Manually input the picked quantity in the Total Actual Putaway Quantity text field.
Supplier/Customer/Warehouse
Description: Displays the mapped Supplier, Customer, or Warehouse details.
Navigation: Automatically retrieved based on GRN in the Supplier/Customer/Warehouse field.
Zone Name
Description: Displays the zone name where the products are stored.
Navigation: Automatically retrieved in the Zone Name field.
Rack Name
Description: Displays the rack name for the product location.
Navigation: Automatically retrieved in the Rack Name field.
Level Name
Description: Displays the level within the rack where the product is stored.
Navigation: Automatically retrieved in the Level Name field.
Column
Description: Displays the column details for the product location.
Navigation: Automatically retrieved in the Column field.
Location Name
Description: Displays the location name for the picked product in the warehouse.
Navigation: Automatically retrieved in the Location Name field after confirming the sales order.
Created Date
Description: Displays the date when the putaway record was created.
Navigation: Automatically inserted by the system in the Created Date field.
Status
Description: Update the current status of the putaway process (e.g., Start or Closed).
Navigation: Manually update the Status field to Start or Closed as needed.
Picking
Picking is a crucial process in Warehouse Management Systems (WMS) where products are selected from their storage locations to fulfill customer orders. It involves retrieving items from various storage locations and bringing them to the packing or shipping area. The efficiency of the picking process directly impacts order fulfillment speed and accuracy.
Here is the meaning of the field for the Description along with Navigation for the fields
SO Number
Description: Displays the Sales Order number generated in the system.
Navigation: Manually input the SO number in the SO Number text field.
Picking Number
Description: After confirming the SO, a unique 8-digit picking number is generated. The first two digits always start with "10," followed by six auto-generated digits (e.g., 10000001, 10000002).
Navigation: Manually input or view the system-generated picking number in the Picking Number text field.
Status
Description: Update the status of the picking process to Complete or Incomplete.
Navigation: Choose the appropriate status in the Status field.
Planned Completion Date
Description: Select the planned date for completing the picking process.
Navigation: Use the calendar to choose a date in the Planned Completion Date field.
Product ID
Description: Displays the Product ID based on the respective SO ID and SO line number.
Navigation: Automatically filled in the Product ID field.
Product Name
Description: Displays the Product Name based on the respective SO ID and SO line number.
Navigation: Automatically filled in the Product Name field.
Product Description
Description: Displays the product description based on the respective SO ID and SO line number.
Navigation: Automatically filled in the Product Description field.
Brand Name
Description: Displays the brand name based on the SO order.
Navigation: Automatically filled in the Brand Name field.
UOM (Unit of Measure)
Description: Displays the UOM automatically based on the customer order.
Navigation: Automatically filled in the UOM field.
Quantity
Description: Displays the quantity ordered for picking in the sales order.
Navigation: Automatically filled in the Quantity field.
Total Actual Picking Quantity
Description: Displays the total quantity actually picked for the order.
Navigation: Automatically filled in the Total Actual Picking Quantity field.
Description: Displays customer, warehouse, or supplier details based on the sales order.
Navigation: Automatically filled in the Customer ID/Name/Warehouse ID/Name/Supplier ID/Name field.
Zone Name
Description: Enter the zone name where the products are located.
Navigation: Manually input the zone name in the Zone Name text field.
Rack Name
Description: Enter the rack name where the products are stored.
Navigation: Manually input the rack name in the Rack Name text field.
Level Name
Description: Enter the level name within the rack where the products are stored.
Navigation: Manually input the level name in the Level Name text field.
Location Name
Description: Enter the location name for the products picked in the warehouse.
Navigation: Manually input the location name in the Location Name text field.
Created Date
Description: Displays the system-generated date when the picking was created.
Navigation: Automatically inserted by the system in the Created Date field.
Status
Description: Update the current status of the picking process to Start or Closed.
Navigation: Manually update the Status field to Start or Closed.
Internal Transfers
Transfers in a Warehouse Management System (WMS) refer to the movement of goods or products within the warehouse or between different locations, such as warehouses or storage facilities. These transfers can involve moving products from one zone to another, from one storage location to another, or even between different warehouses to optimize inventory distribution. Efficient transfer management ensures better inventory accuracy, optimal use of warehouse space, and the ability to quickly meet order demands.
Here is the meaning of the field for the Description along with Navigation for the fields
ProductIDName
Description: Displays the Product ID name. The user can select the product manually during creation.
Navigation: Select the appropriate Product ID name from the available options in the ProductIDName field.
Quantity
Description: Enter the quantity of items to be transferred internally.
Navigation: Manually input the quantity value in the Quantity field during creation.
Source Location
Description: Select the source location where the products are currently stored.
Navigation: Choose the appropriate source location from the available list in the Source Location field during creation.
Destination Location
Description: Select the destination location where the products need to be transferred.
Navigation: Choose the appropriate destination location from the available list in the Destination Location field during creation.
Status
Description: Update the current status of the transfer process to Start or Closed.
Navigation: Manually update the Status field to Start or Closed during or after the transfer process.
Packing
Packing is a critical process in Warehouse Management Systems (WMS), where products that have been picked from storage locations are securely packaged for shipment to customers. It involves organizing and consolidating goods, ensuring they are ready for delivery in a safe, efficient, and cost-effective manner. The packing process also plays a vital role in inventory control, shipping cost management, and overall order fulfillment.
Here is the meaning of the field for the Description along with Navigation for the fields
Order Number
Description: Displays the Order Number, which is auto-generated and comes from the sales order after the picking process is complete.
Navigation: The system automatically fills the Order Number field based on the corresponding sales order.
Product ID Name
Description: Displays the Product ID name, fetched from the sales order after picking is complete.
Navigation: The system automatically fills the Product ID Name field based on the sales order details.
Brand Name
Description: Displays the brand name of the product. This value comes from the sales order after the picking process is complete.
Navigation: The system automatically fills the Brand Name field based on the sales order information.
UOM
Description: Displays the unit of measurement (UOM) for the product. It is fetched from the sales order after picking is complete.
Navigation: The system automatically fills the UOM field based on the respective sales order details.
Quantity
Description: Displays the quantity of the product to be packed. The value comes from the sales order after picking is complete.
Navigation: The system automatically fills the Quantity field based on the details from the sales order.
Status
Description: Allows the user to update the status of the packing process to Start or Closed.
Navigation: Manually update the Status field to Start or Closed during or after the packing process.
Co-packing
Co-packing, or contract packing, refers to the process of assembling, packaging, and labeling products on behalf of a company or brand. It is typically carried out by third-party service providers who specialize in packaging and product assembly. In Warehouse Management Systems (WMS), co-packing involves the management of products that are packed together into final consumer-ready packages or kits, often combining different items into a single package for retail or distribution.
Here is the meaning of the field for the Description along with Navigation for the fields
Order Number
Description: Displays the Order Number, which comes from the sales order after the picking process is complete.
Navigation: The system automatically fills the Order Number field based on the corresponding sales order details.
Product ID Name
Description: Displays the Product ID name, fetched from the sales order after the picking process is complete.
Navigation: The system automatically fills the Product ID Name field based on the sales order information.
Brand Name
Description: Displays the brand name of the product. This value comes from the sales order after the picking process is complete.
Navigation: The system automatically fills the Brand Name field based on the details from the sales order.
Picked Quantity
Description: Displays the quantity of items picked for co-packing. This value comes from the picking process.
Navigation: The system automatically fills the Picked Quantity field based on the picking details.
Status
Description: Allows the user to update the status of the co-packing process to Start or Closed.
Navigation: Manually update the Status field to Start or Closed during or after the co-packing process.
Re-packing
Re-packing in a Warehouse Management System (WMS) refers to the process of unpacking items from their original packaging and re-packaging them into new configurations, sizes, or types of packaging. This can involve a variety of tasks, such as consolidating products, changing packaging for retail compliance, or preparing goods for specific shipments. Re-packing typically happens when products need to be adjusted before they are shipped, stored, or sold.
Here is the meaning of the field for the Description along with Navigation for the fields
Order Number
Description: Displays the Order Number, which comes from the sales order after the picking process is complete.
Navigation: The system automatically fills the Order Number field based on the corresponding sales order details.
Product ID Name
Description: Displays the Product ID name, fetched from the sales order after the picking process is complete.
Navigation: The system automatically fills the Product ID Name field based on the sales order information.
Brand Name
Description: Displays the brand name of the product. This value comes from the sales order after the picking process is complete.
Navigation: The system automatically fills the Brand Name field based on the details from the sales order.
Picked Quantity
Description: Displays the quantity of items picked for re-packing. This value comes from the picking process.
Navigation: The system automatically fills the Picked Quantity field based on the picking details.
Status
Description: Allows the user to update the status of the re-packing process to Start or Closed.
Navigation: Manually update the Status field to Start or Closed during or after the re-packing process.
Labelling
Labelling in a Warehouse Management System (WMS) refers to the process of generating and applying labels to products, shipments, and packaging in a warehouse. These labels typically include essential information such as product details, barcodes, shipping information, handling instructions, and compliance data. The labelling process plays a crucial role in the accuracy, traceability, and efficiency of warehouse operations, including inventory management, picking, packing, shipping, and returns processing.
Here is the meaning of the field for the Description along with Navigation for the fields
Order Number
Description: Displays the Order Number, which comes from the sales order after the picking process is complete.
Navigation: The system automatically fills the Order Number field based on the corresponding sales order details.
Product ID Name
Description: Displays the Product ID name, fetched from the sales order after the picking process is complete.
Navigation: The system automatically fills the Product ID Name field based on the sales order information.
Quantity
Description: Displays the ordered quantity for labelling. This value comes from the sales order after picking is complete.
Navigation: The system automatically fills the Quantity field based on the sales order details.
Picked Quantity
Description: Displays the picked quantity for labelling. This value comes from the sales order after picking is complete.
Navigation: The system automatically fills the Picked Quantity field based on the picking process.
Status
Description: Allows the user to update the status of the labelling process to Start or Closed.
Navigation: Manually update the Status field to Start or Closed during or after the labelling process.
Loading
Loading in a Warehouse Management System (WMS) refers to the process of preparing and placing goods onto transportation vehicles (trucks, containers, etc.) for shipment to customers or other destinations. It is a critical step in the outbound logistics process, ensuring that products are loaded efficiently, accurately, and in compliance with transportation and safety regulations. The goal of loading is to ensure timely deliveries, minimize damage during transit, and optimize space utilization within transportation vehicles.
Here is the meaning of the field for the Description along with Navigation for the fields
Order Number
Description: Displays the Order Number, which comes from the sales order.
Navigation: The system automatically fills the Order Number field based on the sales order details.
Invoice Number
Description: Displays the invoice number, which comes from the gate entry order.
Navigation: The system automatically fills the Invoice Number field based on the gate entry order details.
Invoice Date
Description: Displays the date of the invoice, which comes from the gate entry order.
Navigation: The system automatically fills the Invoice Date field based on the gate entry order details.
Invoice Total Quantity
Description: Displays the total quantity of items in the invoice. This value is mapped and fetched from the gate entry order.
Navigation: The system automatically fills the Invoice Total Quantity field based on the gate entry details.
Status
Description: Allows the user to update the status of the loading process to Start or Closed.
Navigation: Manually update the Status field to Start or Closed during or after the loading process.
Unloading
Unloading in a Warehouse Management System (WMS) refers to the process of receiving goods into the warehouse from transportation vehicles, such as trucks, containers, or pallets. This is a critical step in the inbound logistics process that involves removing products from vehicles and properly storing them in designated areas. Unloading must be efficient and accurate to ensure that inventory levels are updated in real-time, and that products are handled safely and stored appropriately.
Here is the meaning of the field for the Description along with Navigation for the fields
Order Number
Description: Displays the Order Number, which comes from the purchase order.
Navigation: The system automatically fills the Order Number field based on the corresponding purchase order details.
Invoice Number
Description: Displays the invoice number, which comes from the gate entry order.
Navigation: The system automatically fills the Invoice Number field based on the gate entry order details.
Invoice Date
Description: Displays the date of the invoice, which comes from the gate entry order.
Navigation: The system automatically fills the Invoice Date field based on the gate entry order details.
Invoice Total Quantity
Description: Displays the total quantity of items in the invoice. This value is mapped and fetched from the gate entry order.
Navigation: The system automatically fills the Invoice Total Quantity field based on the gate entry details.
Status
Description: Allows the user to update the status of the unloading process to Start or Closed.
Navigation: Manually update the Status field to Start or Closed during or after the unloading process.
Employee Performance
In a Warehouse Management System (WMS), employee performance refers to the tracking and evaluation of individual workers' effectiveness, efficiency, and overall contribution to warehouse operations. The goal is to assess how well employees meet specific performance metrics, which could range from productivity to accuracy in tasks like inventory management, order picking, packing, shipping, and quality control.
Here is the meaning of the field for the Description along with Navigation for the fields
From Date:
Description: This field allows the user to select the start date for the performance report. The system will use this date to filter data starting from this specific date.
Navigation: Select the From Date using the calendar input to manually choose the desired date.
To Date:
Description: This field allows the user to select the end date for the performance report. The system will filter data up to this specific date.
Navigation: Select the To Date using the calendar input to manually choose the desired date.
Completed By:
Description: This field allows the user to select the employee who completed the task or activity. The list is populated from the Employee Master.
Navigation: Select the employee from the dropdown list, which is populated dynamically from the Employee Master.
Employee:
Description: This field allows the user to select the specific employee for whom the performance data is being filtered or viewed.
Navigation: Select the employee from the dropdown list, which is populated dynamically from the Employee Master.
Assigned By:
Description: This field allows the user to select the employee who assigned the task to the selected employee. The list is populated from the Employee Master.
Navigation: Select the employee from the dropdown list, which is populated dynamically from the Employee Master.
Calculation Fields
Total Actual Work Duration:
Description: Displays the sum of all actual work durations based on the records for the selected employees and dates. It is calculated automatically by the system.
Navigation: This value is calculated and displayed automatically by the system based on the selected data.
Total Planned Work Duration:
Description: Displays the sum of all planned work durations based on the records for the selected employees and dates. It is calculated automatically by the system.
Navigation: This value is calculated and displayed automatically by the system based on the selected data.
Total Early Time:
Description: Displays the total early time for all tasks or activities, based on the difference between planned and actual work durations. It is calculated automatically by the system.
Navigation: This value is calculated and displayed automatically by the system based on the selected data.
Total Delayed Time:
Description: Displays the total delayed time for all tasks or activities, based on the difference between the actual end time and the planned completion time. It is calculated automatically by the system.
Navigation: This value is calculated and displayed automatically by the system based on the selected data.
Planned Work Duration:
Description: Displays the planned work duration for each task or activity. It is automatically calculated by the system as the difference between planned completion time and start time.
Navigation: This value is calculated and displayed automatically by the system.
Actual Work Duration:
Description: Displays the actual work duration for each task or activity. It is automatically calculated by the system as the difference between the start time and end time.
Navigation: This value is calculated and displayed automatically by the system.
Early Time:
Description: Displays the early time for each task or activity, calculated by the system as the difference between planned work duration and actual work duration.
Navigation: This value is calculated and displayed automatically by the system.
Delayed Time:
Description: Displays the delayed time for each task or activity, calculated by the system as the difference between the actual end time and the planned completion time.
Navigation: This value is calculated and displayed automatically by the system.
Maintain Billing PO
List of Billing purchase orders are displayed with order details in first table and Rate details in second table.
When Order is saved Action column in table shows edit option for editing the order, by Clicking on edit option it navigates to create Billing PO screen to edit or confirm Billing purchase order
When the order is confirmed it displays as PO Raised.
Status of order is displayed as Open when order created, after closing order status changed to Closed
Create Billing purchase order is an option for creating new Billing purchase order.
Create Billing PO
A Warehouse Management System (WMS) is designed to oversee and streamline the storage, movement, and tracking of inventory within a warehouse. It helps in optimizing warehouse operations, improving order fulfillment accuracy, and managing stock levels efficiently. One important function in a WMS is the creation of Billing Purchase Orders (PO).
A Billing PO is an order created for invoicing purposes, typically linked to the goods and services delivered. In the context of WMS, this process ensures that the goods picked, packed, and shipped are accurately invoiced to the customer or vendor, aligning with the financial and operational aspects of inventory management.
Here is the meaning of the field for the Description along with Navigation for the fields
Supplier Details
Supplier:
Description: Select the supplier from the supplier dropdown list.
Navigation: Choose the appropriate supplier (e.g., V001: Green Earth) from the Supplier dropdown field.
Pallet Position Billing
UOM:
Description: Unit of Measurement (UOM) comes from the supplier master after selecting the supplier.
Navigation: Select the appropriate UOM (e.g., Pallet) from the dropdown.
Rate:
Description: The rate is fetched from the supplier master based on the selected supplier.
Navigation: Automatically populated as a numeric value (e.g., 100).
Period:
Description: Defines the billing period as determined by the supplier.
Navigation: Select the period (e.g., 1 Day) from the dropdown.
Total Number of Days Booked:
Description: Total days booked fetched from the supplier master.
Navigation: Automatically populated as a numeric value (e.g., 10).
Pallet Position Booked:
Description: Enter the number of pallet positions booked.
Navigation: Manually enter the value in the text field (e.g., 10).
Contract Start Date:
Description: Start date of the contract fetched from the supplier master.
Navigation: Automatically populated as a date value (e.g., 16/12/2024).
Contract End Date:
Description: End date of the contract fetched from the supplier master.
Navigation: Automatically populated as a date value (e.g., 16/12/2024).
Amount:
Description: Calculated as: Total Number of Days Booked × Pallet Position Booked.
Navigation: Automatically calculated and displayed.
Flat Rate
Loading/Unloading:
Description: Choose loading or unloading options.
Navigation: Select the radio button for Loading or Unloading.
Vehicle Type:
Description: Choose the type of vehicle used.
Navigation: Select the vehicle type (e.g., Side Truck) from the dropdown list.
Vehicle Rate:
Description: Enter the vehicle rate manually.
Navigation: Manually input the rate (e.g., 100).
Number of Vehicles:
Description: Enter the total number of vehicles.
Navigation: Manually input the number (e.g., 5).
Amount:
Description: Automatically calculated as: Vehicle Rate × Number of Vehicles.
Navigation: Displayed automatically.
Variable Rate
Loading/Unloading:
Description: Choose loading or unloading options.
Navigation: Select the radio button for Loading or Unloading.
Vehicle Type:
Description: Choose the type of vehicle used.
Navigation: Select the vehicle type (e.g., Side Truck) from the dropdown list.
Rate per Hour Staff:
Description: Enter the rate per hour for staff manually.
Navigation: Manually input the rate (e.g., 23).
Number of Hours Occupied Staff:
Description: Enter the number of hours staff is occupied.
Navigation: Manually input the hours (e.g., 10).
Amount:
Description: Automatically calculated as: Rate per Hour Staff × Number of Hours Occupied Staff.
Navigation: Displayed automatically.
Mechanical Rate
Loading/Unloading:
Description: Choose loading or unloading options.
Navigation: Select the radio button for Loading or Unloading.
Vehicle Type:
Description: Choose the type of vehicle used.
Navigation: Select the vehicle type (e.g., Side Truck) from the dropdown list.
Equipment Type:
Description: Choose the type of equipment used.
Navigation: Select the equipment type (e.g., Dry Van) from the dropdown list.
Number of Hours Occupied Equipment:
Description: Enter the number of hours the equipment is occupied.
Navigation: Manually input the hours (e.g., 1).
Rate per Hour Equipment:
Description: Enter the rate per hour for the equipment manually.
Navigation: Manually input the rate (e.g., 1).
Amount:
Description: Automatically calculated as: Number of Hours Occupied Equipment × Rate per Hour Equipment.
Navigation: Displayed automatically.
Packing Material
Packing Type:
Description: Choose the type of packing material used.
Navigation: Select the packing type (e.g., Labelling) from the dropdown list.
Size of Packing Type:
Description: Enter the size of the packing type.
Navigation: Manually input the size (e.g., 2).
Rate per Packing Type:
Description: Enter the rate per packing type.
Navigation: Manually input the rate (e.g., 3).
Amount:
Description: Automatically calculated as: Size of Packing Type × Rate per Packing Type.
Navigation: Displayed automatically.
Labour Charges
Packing Type:
Description: Choose the packing type involved.
Navigation: Select the packing type (e.g., Labelling) from the dropdown list.
Rate per Hour Staff:
Description: Enter the hourly rate for staff.
Navigation: Manually input the rate (e.g., 2).
Number of Hours Occupied Staff:
Description: Enter the number of hours the staff is occupied.
Navigation: Manually input the hours (e.g., 3).
Amount:
Description: Automatically calculated as: Rate per Hour Staff × Number of Hours Occupied Staff.
Navigation: Displayed automatically.
Action Buttons
Save:
Description: Click Save to store the billing details.
Clear:
Description: Use this button to clear all the input fields.
Raise PO:
Description: Confirm and raise the Purchase Order
Billing PO Invoice
A billing invoice is a critical document used in business transactions to request payment for goods or services provided. It serves as a formal request from a seller or service provider to the buyer, outlining the amounts due for products or services delivered. Invoices are key to the financial management process, as they ensure businesses can track sales, manage cash flow, and maintain accurate financial records.
Here is the meaning of the field for the Description along with Navigation for the fields
Billing PO Invoice
Supplier ID/Name:
Description: Select the supplier's ID or name from the supplier master. This field links the billing details to a specific supplier.
Navigation: Choose the supplier ID/Name from the dropdown list (e.g., V001:green Earth).
Product ID/Name:
Description: Select the product ID or name from the product master. This field associates the billing details with a specific product.
Navigation: Choose the product ID/Name from the dropdown list (e.g., V-1001:Volenuts).
Pallet Position Billing
Uom:
Description: Unit of Measurement (UoM) for the pallet position. This field is populated based on the supplier selection.
Navigation: Select the UoM (e.g., Pallet) from the dropdown list.
Rate:
Description: Rate per pallet position. The value is fetched based on the supplier selection.
Navigation: The field is pre-populated (e.g., 100), but the user can edit if required.
Period:
Description: Duration for which the pallets are booked. This is pre-fetched based on supplier selection.
Navigation: Select the period (e.g., 1 Day) from the dropdown list.
Total Number of Days Booked:
Description: Total duration for which pallet positions are booked.
Navigation: Manually enter the number of days (e.g., 10) in the text field.
Pallet Position Booked:
Description: Total number of pallet positions booked for the period.
Navigation: Enter the number of pallet positions (e.g., 10) in the text field.
Contract Start Date:
Description: Start date of the contract for pallet position booking.
Navigation: The date is fetched automatically (e.g., 16/12/2024), but the user can modify it.
Contract End Date:
Description: End date of the contract for pallet position booking.
Navigation: The date is fetched automatically (e.g., 16/12/2024), but the user can modify it.
Amount:
Description: Total amount for pallet position booking, calculated automatically.
Navigation: The system calculates the amount as: Amount = Total Number of Days Booked × Pallet Position Booked
Flat Rate
Loading:
Description: Indicates if the loading activity is performed.
Navigation: Select the Loading option using the radio button.
Unloading:
Description: Indicates if the unloading activity is performed.
Navigation: Select the Unloading option using the radio button.
Vehicle Type:
Description: Select the vehicle type required for loading/unloading.
Navigation: Choose the vehicle type (e.g., Side truck) from the dropdown list.
Vehicle Rate:
Description: Rate per vehicle for loading/unloading operations.
Navigation: Enter the vehicle rate (e.g., 100) in the text field.
No of Vehicles:
Description: Total number of vehicles used for loading/unloading.
Navigation: Enter the number of vehicles (e.g., 5) in the text field.
Amount:
Description: Total amount for the vehicle usage, calculated automatically.
Navigation: The system calculates the amount as: Amount = Vehicle Rate × No of Vehicles
Variable Rate
Loading:
Description: Indicates if loading is performed under variable rates.
Navigation: Select the Loading option using the radio button.
Unloading:
Description: Indicates if unloading is performed under variable rates.
Navigation: Select the Unloading option using the radio button.
Vehicle Type:
Description: Select the vehicle type used for the variable rate activity.
Navigation: Choose the vehicle type (e.g., Side truck) from the dropdown list.
Rate per Hour Staff:
Description: Rate charged per hour for the staff involved.
Navigation: Enter the rate (e.g., 23) in the text field.
No of Hours Occupied Staff:
Description: Total hours the staff is occupied.
Navigation: Enter the number of hours (e.g., 10) in the text field.
Amount:
Description: Total amount for staff charges, calculated automatically.
Navigation: The system calculates the amount as: Amount = Rate per Hour Staff × No of Hours Occupied Staff
Mechanical Rate
Loading:
Description: Indicates if loading is performed using mechanical equipment.
Navigation: Select the Loading option using the radio button.
Unloading:
Description: Indicates if unloading is performed using mechanical equipment.
Navigation: Select the Unloading option using the radio button.
Vehicle Type:
Description: Select the vehicle type used for mechanical operations.
Navigation: Choose the vehicle type (e.g., Side truck) from the dropdown list.
Equipment Type:
Description: Type of equipment used for mechanical operations.
Navigation: Choose the equipment type (e.g., Dry van) from the dropdown list.
No of Hours Occupied Equipment:
Description: Total hours the equipment was occupied.
Navigation: Enter the number of hours (e.g., 1) in the text field.
Rate per Hour Equipment:
Description: Rate charged per hour for the equipment used.
Navigation: Enter the rate (e.g., 1) in the text field.
Amount:
Description: Total amount for equipment charges, calculated automatically.
Navigation: The system calculates the amount as: Amount = No of Hours Occupied Equipment × Rate per Hour Equipment
Packing Material
Packing Type:
Description: Select the type of packing material used.
Navigation: Choose the packing type (e.g., Labelling) from the dropdown list.
Size of Packing Type:
Description: Specify the size or quantity of the packing material.
Navigation: Enter the size value (e.g., 2) in the text field.
Rate per Packing Type:
Description: Rate charged per unit of packing material.
Navigation: Enter the rate (e.g., 3) in the text field.
Amount:
Description: Total amount for packing material, calculated automatically.
Navigation: The system calculates the amount as: Amount = Size of Packing Type × Rate per Packing Type
Labour Charges
Packing Type:
Description: Select the type of labour activity performed.
Navigation: Choose the packing type (e.g., Labelling) from the dropdown list.
Rate per Hour Staff:
Description: Rate charged per hour for staff involved in labour activities.
Navigation: Enter the rate (e.g., 2) in the text field.
No of Hours Occupied Staff:
Description: Total hours the staff was occupied for labour activities.
Navigation: Enter the number of hours (e.g., 3) in the text field.
Amount:
Description: Total amount for labour charges, calculated automatically.
Navigation: The system calculates the amount as: Amount = Rate per Hour Staff × No of Hours Occupied Staff
Actions
Save:
Description: Save the entered billing details.
Navigation: Click the Save button to store the billing details.
Confirm:
Description: Confirm the billing details to finalize the process.
Navigation: Click the Confirm button to confirm the billing details.
Print Invoice:
Description: Generate and print the billing details as an invoice.
Navigation: Click the Print Invoice button to print the billing details.
Space Utilization
Space utilization refers to the efficient and effective use of available physical space, typically within a warehouse, office, retail store, or manufacturing facility. It involves optimizing the use of all available space to improve operations, reduce waste, increase productivity, and lower costs. The goal of space utilization is to make the most of the space available, ensuring that every square foot is used appropriately for its intended purpose.
Here is the meaning of the field for the Description along with Navigation for the fields
Supplier:
Description: Select the supplier's name or ID from the supplier list. This field links space utilization details to a specific supplier.
Navigation: Choose the supplier (e.g., J100:Jhan, G100:Ganga Technologies) from the dropdown list.
Zone:
Description: Select the zone where the space utilization is being recorded.
Navigation: Choose the zone (e.g., Zone1, Zone 2) from the dropdown list. The values are fetched from the zone master.
From Date:
Description: Specify the start date for tracking space utilization.
Navigation: Select the date (e.g., 16/12/2024) using the date picker.
To Date:
Description: Specify the end date for tracking space utilization.
Navigation: Select the date (e.g., 16/12/2024) using the date picker.
Open Balance:
Description: Enter the initial balance or utilization amount manually.
Navigation: Input the numeric value (e.g., 100) in the text field.
UOM (Unit of Measurement):
Description: Select the unit of measurement to quantify space utilization.
Navigation: Choose the UOM (e.g., KG, CM) from the dropdown list.
Actions
Save:
Description: Save the entered space utilization details.
Navigation: Click the Save button to store the details.
Clear:
Description: Clear all entered data in the space utilization form.
Navigation: Click the Clear button to reset the fields.
Generate:
Description: Generate a utilization report based on the entered details.
Navigation: Click the Generate button to generate the space utilization report.
Space Utilization Billing
Space utilization billing refers to the process of charging customers based on the amount of physical space they occupy or use within a facility. This type of billing is commonly used in industries such as warehousing, self-storage, logistics, and commercial real estate. The goal of space utilization billing is to fairly allocate charges based on the amount of space used by a customer, whether it's for storage, office space, or other types of leased areas.
Here is the meaning of the field for the Description along with Navigation for the fields
Supplier:
Description: Select the supplier's name or ID from the supplier list to link utilization billing details to a specific supplier.
Navigation: Choose the supplier (e.g., J100:Jhan, G100:Ganga Technologies) from the dropdown list.
Zone:
Description: Select the zone for which space utilization billing is recorded.
Navigation: Choose the zone (e.g., Zone1, Zone 2) from the dropdown list. The values are fetched from the zone master.
From Date:
Description: Specify the start date for tracking the space utilization billing.
Navigation: Select the date (e.g., 16/12/2024) using the date picker.
To Date:
Description: Specify the end date for tracking the space utilization billing.
Navigation: Select the date (e.g., 16/12/2024) using the date picker.
Clear:
Description: Clear all the entered data and reset the space utilization billing form.
Navigation: Click the Clear button to remove all current entries in the fields.
Generate:
Description: Generate the space utilization report based on the entered details.
Navigation: Click the Generate button to calculate and display the utilization report.
Average Space Occupied:
Description: This field automatically calculates the average space occupied based on all recorded values.
Navigation: The value (e.g., 130, 00, 10) is auto-filled as a calculated field. No manual input is required; it is derived as the average of the sum of all occupied values.
Packing
Pack for picked products to dispatch against Sales Order.
Select the WMSO No, products in the order are displayed in table below.
Enter Packed Quantity, Packaging Type, and Packing Material.
Update status as Completed after completing Packing.
Repacking
Re-packing in a Warehouse Management System (WMS) refers to the process of unpacking, reorganizing, and repackaging goods that were previously packed. This operation is typically triggered by the need to meet customer requirements, correct packaging errors, or adapt to changes in shipping methods or order consolidation.
Here is the meaning of the field for the Description along with Navigation for the fields
Order Number:
Description The Sales Order (SO) number associated with the re-packing process.
Navigation: This field is populated automatically after the sales order is picked and confirmed. The Order Number comes from the related sales order.
Assigned By:
Description The person who assigned the re-packing task.
Navigation: The system will automatically insert this value (e.g., DLI1001: Jack) when the task is assigned.
Assigned Date:
Description The date when the re-packing task was assigned.
Navigation: The user selects the assigned date manually using the calendar.
Assigned To:
Description The employee assigned to complete the re-packing task.
Navigation: This value comes automatically from the sales order after the picking process is complete (e.g., EXE1: Jack).
Product ID Name:
Description The product associated with the sales order that is being re-packed.
Navigation: The product ID is auto-populated from the sales order after picking (e.g., P2: Product-2).
Brand Name:
Description The brand name of the product being re-packed.
Navigation: This field is auto-filled from the sales order after the picking process is complete (e.g. Amul).
UOM (Unit of Measure):
Description The unit of measure for the product being re-packed (e.g., JAR).
Navigation: This value is auto-filled from the sales order after the picking process is complete.
Order Quantity:
Description The total quantity of the product in the sales order.
Navigation: This value is auto-filled based on the sales order after the picking process.
Picked Quantity:
Description The quantity of products picked for the order.
Navigation: This value is auto-filled based on the picking data.
Conversion Type:
Description The type of conversion, if applicable, for the re-packing process (e.g., weight conversion).
Navigation: The user will select the conversion type manually, depending on the specific re-packing process.
Re-Packed Quantity:
Description The quantity of products that have been re-packed.
Navigation: The user will manually enter the quantity of re-packed products.
Gain Weight/Loss/Gain:
Description The weight difference between the original packed quantity and the re-packed quantity, indicating whether there was a gain or loss during re-packing.
Navigation: The user manually enters this value to track any weight differences.
Packing Type:
Description The type of packing used during re-packing (e.g., mechanical, manual).
Navigation: The user selects the packing type from the available options.
Packing Material:
Description The material used for re-packing (e.g., plastic, cardboard).
Navigation: The user will manually enter the packing material.
Created Date:
Description The date when the re-packing record was created.
Navigation: The system automatically records the current date and time as the created date.
Start Date:
Description The date when the re-packing task started.
Navigation: The system automatically records the start date when the re-packing process begins.
Planned Completion Date:
Description The planned date for completing the re-packing task.
Navigation: The user manually enters the planned completion date using the calendar.
Filters
Order Number:
Description Select the Order Number for the re-packing task.
Navigation: This dropdown lists available sales orders, and the user can select the Order Number that corresponds to the re-packing task.
Employee:
Description Select the employee responsible for the re-packing task.
Navigation: This dropdown lists employees from the Executive Master, and the user selects the responsible employee.
Co-Packing
Co-packing, or contract packing, in a Warehouse Management System (WMS) refers to the process of assembling or repackaging products for promotional, retail, or distribution purposes. It often involves combining items from different sources into a single package, customizing product bundles, or preparing goods for retail display. Co-packing enhances product presentation, optimizes logistics, and helps meet specific marketing or operational goals.
Here is the meaning of the field for the Description along with Navigation for the fields
Order Number:
Description The Sales Order (SO) number associated with the co-packing process.
Navigation: This field is automatically populated from the sales order after the picking process is complete.
Assigned By:
Description The person who assigned the co-packing task.
Navigation: The system will insert the value automatically (e.g., DLI1001:Jack) when the task is assigned.
Assigned Date:
Description The date when the co-packing task was assigned.
Navigation: The user selects the assigned date manually using the calendar.
Assigned To:
Description The employee responsible for completing the co-packing task.
Navigation: This value is automatically populated from the sales order after the picking process is complete (e.g., EXE1:Jack).
Product ID Name:
Description The product associated with the sales order being co-packed.
Navigation: The product ID is auto-filled from the sales order after picking is complete (e.g., P2:Product-2).
Brand Name:
Description The brand name of the product being co-packed.
Navigation: This field is auto-filled from the sales order after the picking process is complete (e.g., Amul).
UOM (Unit of Measure):
Description The unit of measure for the product being co-packed (e.g., JAR).
Navigation: This value is auto-filled from the sales order after the picking process is complete.
Order Quantity:
Description The total quantity of the product in the sales order.
Navigation: This field is auto-filled based on the sales order after the picking process.
Picked Quantity:
Description The quantity of the product that has been picked for the order.
Navigation: This value is auto-filled from the picking data.
Re-Packing Quantity:
Description The quantity of the product to be co-packed.
Navigation: The user manually enters the quantity of products that need to be co-packed.
Packing Type:
Description The type of packing used during co-packing (e.g., mechanical).
Navigation: The user selects the packing type from the available options.
Packing Material:
Description The material used for co-packing (e.g., yes for a specific material type).
Navigation: The user manually enters the packing material.
Created Date:
Description The date when the co-packing record was created.
Navigation: The system automatically records the current date and time as the created date.
Start Date:
Description The date when the co-packing task started.
Navigation: The system automatically records the start date when the co-packing process begins.
Planned Completion Date:
Description The planned date for completing the co-packing task.
Navigation: The user manually enters the planned completion date using the calendar.
Filters
Order Number:
Description Select the Order Number for the co-packing task.
Navigation: This dropdown lists the available sales orders, and the user selects the Order Number that corresponds to the co-packing task.
Employee:
Description Select the employee responsible for the co-packing task.
Navigation: This dropdown lists employees from the Executive Master, and the user selects the responsible employee.
Labeling
Labeling in a Warehouse Management System (WMS) refers to the process of generating and affixing identifying labels to inventory items, packages, or pallets. These labels typically contain information such as product details, barcodes, batch numbers, and destination addresses. Proper labelling ensures seamless tracking, accurate identification, and efficient handling throughout the warehouse operations and supply chain.
Here is the meaning of the field for the Description along with Navigation for the fields
Order Number:
Description The Sales Order (SO) number associated with the labelling task.
Navigation: This value is automatically populated from the sales order after the picking process is complete.
Assigned By:
Description The person who assigned the labelling task.
Navigation: The system will automatically insert the value (e.g., DLI1001:Jack) when the task is assigned.
Assigned Date:
Description The date when the labelling task was assigned.
Navigation: The user selects the assigned date manually using the calendar.
Assigned To:
Description The employee responsible for completing the labelling task.
Navigation: This value is automatically populated from the sales order after the picking process is complete (e.g., EXE1:Jack).
Product ID Name:
Description The product associated with the sales order being labelled.
Navigation: The product ID is auto-filled from the sales order after picking is complete (e.g., P2:Milk).
Brand Name:
Description The brand name of the product being labelled.
Navigation: This field is auto-filled from the sales order after the picking process is complete (e.g., Amul).
Inventory Unit (UOM):
Description The unit of measurement for the product being labelled (e.g., JAR).
Navigation: This value is auto-filled from the sales order after the picking process is complete.
Quantity:
Description The total quantity of the product in the sales order.
Navigation: This field is auto-filled based on the sales order after the picking process.
Picked Quantity:
Description The quantity of the product that has been picked for the order.
Navigation: This value is auto-filled from the picking data.
Customer Confirmation:
Description Whether the customer has confirmed the product details for labelling.
Navigation: The user manually selects either "Yes" or "No."
Packing Type:
Description The type of packing used during labelling (e.g., mechanical).
Navigation: The user selects the packing type from the available options.
Packing Material:
Description The material used for packing during labelling
Navigation: The user manually enters the packing material.
Created Date:
Description The date when the labelling record was created.
Navigation: The system automatically records the current date and time as the created date.
Start Date:
Description The date when the labelling task started.
Navigation: The system automatically records the start date when the labelling process begins.
Planned Completion Date:
Description The planned date for completing the labelling task.
Navigation: The user manually enters the planned completion date using the calendar.
Filters
Order Number:
Description Select the Order Number for the labelling task.
Navigation: This dropdown lists the available sales orders, and the user selects the Order Number that corresponds to the labelling task.
Employee:
Description Select the employee responsible for the labelling task.
Navigation: This dropdown lists employees from the Executive Master, and the user selects the responsible employee.
Warehouse Layout
The layout in a Warehouse Management System (WMS) refers to the digital representation and organization of a physical warehouse's structure, operations, and workflows. It plays a crucial role in optimizing storage, inventory management, and operational efficiency.
Here is the meaning of the field for the Description along with Navigation for the fields
Filters
Product ID/Name:
Description: The unique identifier or name of the product stored in the warehouse. It helps in tracking and managing inventory items efficiently.
Navigation: Select the product from the dropdown list. The list is populated from the Product Master.
Supplier ID/Name:
Description: The unique identifier or name of the supplier providing the product. It helps to associate the product with its source.
Navigation: Select the supplier ID or name from the dropdown list, which is populated from the Supplier Master.
Serial Number:
Description: A unique number assigned to a specific inventory item for precise tracking and traceability.
Navigation: Select the serial number from the dropdown list, which is fetched from the Inventory.
Batch Number:
Description: A specific number assigned to a group of products manufactured together, used for quality control and traceability.
Navigation: Select the batch number from the dropdown list, which is retrieved from the Inventory.
Data Display
Zone Name:
Description: The name of the zone where the product is stored within the warehouse. A zone typically represents a section or area of the warehouse.
Navigation: This field is auto-filled and comes from the Zone Master. No manual input is required.
Rack Name:
Description: The name of the rack used to store products within a specific zone.
Navigation: This field is auto-filled and comes from the Rack Master. No manual input is required.
Level Name:
Description: The specific level of the rack where the product is stored.
Navigation: This field is auto-filled and comes from the Level Master. No manual input is required.
Column:
Description: The column identifier within the rack that indicates the precise storage location of the product.
Navigation: This field is auto-filled and comes from the Column Master. No manual input is required.
Locations
Quantity (Inventory Unit):
Description: The total quantity of the product available in the inventory for a specific location or batch.
Navigation: Enter the quantity manually in the Quantity (Inventory Unit) field.
Available Quantity:
Description: The quantity of the product currently available for use. It is calculated as: Quantity (Inventory Unit) - Reserved Quantity.
Navigation: This is an auto-calculated field. No manual input is required.
Reserved Quantity:
Description: The quantity of the product reserved for specific operations, such as dispatch or allocation to orders.
Navigation: Enter the reserved quantity manually in the Reserved Quantity field.
Batch Number:
Description: The unique batch identifier associated with the product, used for quality control, expiration tracking, or batch-specific operations.
Navigation: Enter the batch number manually in the Batch Number field.
Expiry Date:
Description: The expiration date of the product, used for managing perishable or time-sensitive inventory items.
Navigation: Enter the expiry date manually in the Expiry Date field.
Stock Value:
Description: The total monetary value of the inventory item, calculated using the formula: Quantity (Inventory Unit) × Weighted Average Cost Price.
Navigation: This is a formula-based field and is auto-calculated. No manual input is required.
Product Barcode
In a Warehouse Management System (WMS), product barcodes play a critical role in ensuring accurate tracking, inventory control, and efficient movement of goods throughout the warehouse. A barcode is essentially a visual representation of data that can be quickly scanned and read by barcode scanners, allowing warehouse staff to identify products quickly without needing to manually input information.
Here is the meaning of the field for the Description along with Navigation for the fields
Product ID/Name
Description:
The Product ID/Name refers to the unique identifier for the product (often a SKU or code) combined with the product name. This field ensures the correct product is selected from the product master database.
Navigation:
The user selects a product from a dropdown list populated by the product master database. This list is searchable, allowing users to find and select the correct product.
UOM (Unit of Measure)
Description:
The UOM field specifies how the product is measured or sold (e.g., jar, box, kilogram). It standardizes the measurement unit across the warehouse system.
Navigation:
The user selects the Unit of Measure from a dropdown list, which is populated with predefined UOM values from the system's parameters.
UPC/EAN Number
Description:
This field contains the UPC (Universal Product Code) or EAN (European Article Number), which is a unique barcode number assigned to the product for identification and tracking. It can be manually entered or automatically generated by the system.
Navigation:
The user can either manually enter the UPC/EAN number in the text field or allow the system to auto-generate it when the product details are saved.
Process Barcode
In a Warehouse Management System (WMS), barcode processing plays a significant role in streamlining warehouse operations by improving accuracy, efficiency, and speed. Barcodes act as a bridge between physical inventory and digital records, enabling automated tracking, data entry, and monitoring. Here's a breakdown of how barcodes are integrated into WMS and their impact.
Here is the meaning of the field for the Description along with Navigation for the fields
Process Barcode
Description:
The "Process" field allows the user to select a specific process (e.g., "Purchase Order") from a dropdown, which activates barcode processing for that process.
Navigation:
The user selects the desired process from the dropdown list to trigger barcode processing in the corresponding screen.
User Barcode
Barcodes are integral in modern warehouse management systems (WMS) because they streamline various operations and improve accuracy, speed, and efficiency. In a warehouse setting, user barcodes are typically assigned to individuals or specific roles to track their actions and access within the system.
Here is the meaning of the field for the Description along with Navigation for the fields
Process Options
Purchase Order
Description: User selects the "Purchase Order" process from the static dropdown list.
Navigation: The user selects "Purchase Order" from the dropdown list to trigger barcode processing for purchase order-related tasks.
Goods Receiving
Description: User selects the "Goods Receiving" process from the static dropdown list.
Navigation: The user selects "Goods Receiving" from the dropdown list to trigger barcode processing for receiving goods.
Putaway
Description: User selects the "Putaway" process from the static dropdown list.
Navigation: The user selects "Putaway" from the dropdown list to trigger barcode processing for storing received items in designated locations.
Sales Order
Description: User selects the "Sales Order" process from the static dropdown list.
Navigation: The user selects "Sales Order" from the dropdown list to trigger barcode processing for picking and packing items for sale.
Picking
Description: User selects the "Picking" process from the static dropdown list.
Navigation: The user selects "Picking" from the dropdown list to trigger barcode processing for item picking from inventory.
Shipment Order
Description: User selects the "Shipment Order" process from the static dropdown list.
Navigation: The user selects "Shipment Order" from the dropdown list to trigger barcode processing for preparing and shipping orders.
Invoice
Description: User selects the "Invoice" process from the static dropdown list.
Navigation: The user selects "Invoice" from the dropdown list to trigger barcode processing related to invoice creation or verification.
Replenishment
Description: User selects the "Replenishment" process from the static dropdown list.
Navigation: The user selects "Replenishment" from the dropdown list to trigger barcode processing for restocking inventory items.
Purchase Returns
Description: User selects the "Purchase Returns" process from the static dropdown list.
Navigation: The user selects "Purchase Returns" from the dropdown list to trigger barcode processing for handling returned purchase items.
Sales Returns
Description: User selects the "Sales Returns" process from the static dropdown list.
Navigation: The user selects "Sales Returns" from the dropdown list to trigger barcode processing for processing customer returns.
Warehouse Transfers
Description: User selects the "Warehouse Transfers" process from the static dropdown list.
Navigation: The user selects "Warehouse Transfers" from the dropdown list to trigger barcode processing for transferring goods between warehouse locations.
Inbound Capacity Planning
Description: User selects the "Inbound Capacity Planning" process from the static dropdown list.
Navigation: The user selects "Inbound Capacity Planning" from the dropdown list to trigger barcode processing for managing incoming stock based on available capacity.
Outbound Capacity Planning
Description: User selects the "Outbound Capacity Planning" process from the static dropdown list.
Navigation: The user selects "Outbound Capacity Planning" from the dropdown list to trigger barcode processing for managing outbound shipments based on available capacity.
Packing
Description: User selects the "Packing" process from the static dropdown list.
Navigation: The user selects "Packing" from the dropdown list to trigger barcode processing for packing items for shipment.
Repacking
Description: User selects the "Repacking" process from the static dropdown list.
Navigation: The user selects "Repacking" from the dropdown list to trigger barcode processing for repacking items for resale or shipment.
Co-packing
Description: User selects the "Co-packing" process from the static dropdown list.
Navigation: The user selects "Co-packing" from the dropdown list to trigger barcode processing for combining different products into a single package.
Labelling
Description: User selects the "Labelling" process from the static dropdown list.
Navigation: The user selects "Labelling" from the dropdown list to trigger barcode processing for labeling items or packages.
Internal Transfers
Description: User selects the "Internal Transfers" process from the static dropdown list.
Navigation: The user selects "Internal Transfers" from the dropdown list to trigger barcode processing for transferring items within the warehouse or company.
Inventory Adjustment
Description: User selects the "Inventory Adjustment" process from the static dropdown list.
Navigation: The user selects "Inventory Adjustment" from the dropdown list to trigger barcode processing for adjusting inventory counts.
Cycle Counting
Description: User selects the "Cycle Counting" process from the static dropdown list.
Navigation: The user selects "Cycle Counting" from the dropdown list to trigger barcode processing for periodic inventory checks.
Inventory
Description: User selects the "Inventory" process from the static dropdown list.
Navigation: The user selects "Inventory" from the dropdown list to trigger barcode processing for tracking and managing inventory levels.
Damaged Stock
Description: User selects the "Damaged Stock" process from the static dropdown list.
Navigation: The user selects "Damaged Stock" from the dropdown list to trigger barcode processing for handling and recording damaged stock.
Replacement Order
Description: User selects the "Replacement Order" process from the static dropdown list.
Navigation: The user selects "Replacement Order" from the dropdown list to trigger barcode processing for handling product replacements.
Note:
The dropdown list is static, and the options are filtered based on the user's role configuration. This ensures the user only sees relevant processes for their role.
Warehouse
The Warehouse Master is a critical module in inventory and supply chain management systems that facilitates the efficient handling and tracking of warehouses and their associated data. It acts as the backbone for storing and retrieving information necessary for inventory, order fulfillment, and logistical operations.
Here is the meaning of the field for the Description along with Navigation for the fields
Warehouse ID
Description: The unique identifier for the warehouse, used to distinguish it from others.
Navigation: Input the Warehouse ID manually in the Warehouse ID field.
Warehouse Name
Description: The name or label assigned to the warehouse for easy identification.
Navigation: Input the Warehouse Name manually in the Warehouse Name field.
Storage Type
Description: The category of storage available in the warehouse, such as Ambient (regular) or AC (air-conditioned).
Navigation: Choose the appropriate storage type from the Storage Type dropdown, populated dynamically from parameters.
Warehouse Type
Description: The functional category of the warehouse, e.g., Distribution Warehouse for supply chain operations or Customer Warehouse for client use.
Navigation: Choose the type from the Warehouse Type dropdown, populated statically.
Capacity
Description: The total storage capability of the warehouse, typically measured in units like square meters or volume.
Navigation: Input the value manually in the Capacity field.
Markup Percentage
Description: The percentage markup applied to costs related to warehouse operations for revenue calculation.
Navigation: Input the percentage manually in the Markup Percentage field.
Tax Exemption
Description: Indicates whether the warehouse is exempt from taxes (Yes or No).
Navigation: Choose the appropriate option from the Tax Exemption dropdown, populated statically.
Height
Description: The vertical dimension of the warehouse, measured in meters or feet.
Navigation: Input the value manually in the Height field.
PAN Number
Description: The Permanent Account Number (PAN) issued by tax authorities, identifying the warehouse entity for tax purposes.
Navigation: Input the PAN manually in the PAN Number field.
GST Number
Description: The Goods and Services Tax (GST) registration number for the warehouse for compliance with tax regulations.
Navigation: Input the GST number manually in the GST Number field.
Type
Description: Specifies the type of entity associated with the warehouse, such as ship To Addresses.
Navigation: Choose the type from the Type dropdown, populated statically.
Name
Description: A label or identifier for logistics associated with the warehouse.
Navigation: Input the name manually in the Name field.
Email
Description: The official email address for correspondence related to the warehouse.
Navigation: Input the email manually in the Email field.
Address
Description: The complete physical address of the warehouse, including street, locality, etc.
Navigation: Input the address manually in the Address field.
City
Description: The city where the warehouse is located.
Navigation: Input the city manually in the City field.
State
Description: The state or province in which the warehouse operates, selected from a predefined list.
Navigation: Choose the state from the State dropdown, populated dynamically from the State Master.
Pin
Description: The postal code or ZIP code for the warehouse location.
Navigation: Input the pin manually in the Pin field.
Phone Number
Description: The primary contact number for reaching the warehouse.
Navigation: Input the phone number manually in the Phone Number field.
Contact Name
Description: The name of the main point of contact for the warehouse.
Navigation: Input the name manually in the Contact Name field.
Country
Description: The country where the warehouse is situated, chosen from a predefined list.
Navigation: Choose the country from the Country dropdown, populated dynamically from parameters.
Default Address
Description: Specifies whether this address is the default one for the warehouse.
Navigation: Check the Default Address checkbox manually.
Organization ID/Name
Description: The identifier or name of the organization linked to the warehouse.
Navigation: Choose the organization from the Organization ID/Name dropdown, populated dynamically from the Organization Master.
Zone
A Zone Master is typically used in business management, logistics, or inventory systems to define, organize, and manage various geographical or operational zones within a business. These zones can relate to physical locations like warehouses, shipping areas, or regions for specific products, but they can also refer to logical divisions for system or organizational purposes. The purpose of a Zone Master is to simplify the allocation, tracking, and management of resources within different zones.
Here is the meaning of the field for the Description along with Navigation for the fields
Zone Name
Description: The name or label given to a specific area or zone within the warehouse or facility. It helps in identifying and organizing different zones for storage or operational purposes.
Navigation: Input the zone name manually in the Zone Name field.
Storage Type
Description: The type of storage environment provided in the zone. The options typically include Ambient (regular temperature) or AC (air-conditioned) to specify the kind of environment required for storing goods in that zone.
Navigation: Choose the appropriate storage type from the Storage Type dropdown, populated dynamically from parameters.
Supplier
Description: Select the supplier associated with the zone. Suppliers are typically identified by unique codes (e.g., S10001: Supplier 1, S10002: Supplier 2), and this field links a specific supplier to the warehouse zone.
Navigation: Choose the supplier from the Supplier dropdown, populated dynamically from the Supplier Master.
Capacity
Description: Enter the storage capacity of the zone, which refers to the total amount of space available in the zone for storing goods or products.
Navigation: Input the value manually in the Capacity field.
Height
Description: Enter the height of the zone in units, typically measured in meters or feet, which helps define the vertical space available for storage within the zone.
Navigation: Input the value manually in the Height field.
Width
Description: Enter the width of the zone in units, usually measured in meters or feet, which represents the horizontal space within the zone for storage.
Navigation: Input the value manually in the Width field.
X Coordinate
Description: Enter the X-axis coordinate for the zone's location, representing the horizontal position of the zone within the facility.
Navigation: Input the value manually in the X Coordinate field.
Y Coordinate
Description: Enter the Y-axis coordinate for the zone's location, representing the vertical position of the zone within the facility.
Navigation: Input the value manually in the Y Coordinate field.
Rack
A Rack Master is an integral component of warehouse or inventory management systems. It refers to the detailed record or master data of racks (or shelving units) used to organize and store goods, materials, or products in a warehouse or storage facility. The Rack Master ensures that the layout and structure of racks are efficiently managed, which helps streamline inventory tracking, optimize space utilization, and improve accessibility in warehouses.
Here is the meaning of the field for the Description along with Navigation for the fields
Rack Name
Description: Enter the name of the rack, which serves as the identifier for the specific rack in the warehouse or storage system.
Navigation: Input the rack name manually in the Rack Name field.
Zone Name
Description: Select the zone where the rack is located. Zones help in categorizing and organizing different areas within a warehouse.
Navigation: Choose the appropriate zone from the Zone Name dropdown, populated dynamically from the Zone Master.
Mode
Description: Select the rack's mode, which specifies the configuration or depth of the rack. Options include 1deep (single depth) and 2deep (double depth).
Navigation: Choose the mode from the Mode dropdown, populated statically.
Column X Coordinates
Description: Enter the X-axis coordinates for the columns in the rack, indicating the horizontal position of the columns within the rack.
Navigation: Input the coordinates manually in the Column X Coordinates field.
Column Y Coordinates
Description: Enter the Y-axis coordinates for the columns in the rack, indicating the vertical position of the columns within the rack.
Navigation: Input the coordinates manually in the Column Y Coordinates field.
Column Name
Description: Select the column name associated with the rack, which identifies the specific column in the rack structure. Options include C1 and C2.
Navigation: Choose the column name from the Column Name dropdown, populated dynamically from the Column Master.
Storage Type
Description: Select the storage type for the rack. This indicates the environmental conditions required for storage, such as Ambient (regular temperature) or AC (air-conditioned).
Navigation: Choose the appropriate storage type from the Storage Type dropdown, populated dynamically from parameters.
Capacity
Description: Enter the total storage capacity of the rack, which represents the amount of space available for storing goods or products.
Navigation: Input the value manually in the Capacity field.
Height
Description: Enter the height of the rack in units (e.g., meters), which defines the vertical space of the rack.
Navigation: Input the value manually in the Height field.
Width
Description: Enter the width of the rack in units (e.g., meters), which defines the horizontal space of the rack.
Navigation: Input the value manually in the Width field.
X Coordinate
Description: Enter the X-axis coordinate for the rack's location, indicating the horizontal position of the rack in the warehouse.
Navigation: Input the value manually in the X Coordinate field.
Y Coordinate
Description: Enter the Y-axis coordinate for the rack's location, indicating the vertical position of the rack in the warehouse.
Navigation: Input the value manually in the Y Coordinate field.
Column Direction
Description: Select the direction of the columns in the rack, which typically refers to whether the columns are oriented to the left, right, or other directions.
Navigation: Choose the direction from the Column Direction dropdown, populated statically.
Column
A Column Master is a fundamental component in data management systems, especially in databases, spreadsheets, and inventory or warehouse management systems. It is a predefined list or structure of columns that defines how data is organized, categorized, and referenced across different tables or records. The Column Master ensures uniformity, accuracy, and efficiency when managing and processing data in systems that require structured storage, retrieval, and analysis.
Here is the meaning of the field for the Description along with Navigation for the fields
Column Name
Description: Enter the name of the column, which serves as an identifier for the column in the rack or storage structure.
Navigation: Input the column name manually in the Column Name field.
Height
Description: Enter the height of the column in units (e.g., meters), which represents the vertical dimension or size of the column.
Navigation: Input the value manually in the Height field.
Width
Description: Enter the width of the column in units (e.g., meters), which defines the horizontal dimension or size of the column.
Navigation: Input the value manually in the Width field.
Level
A Level Master is a system or a component used to define and manage various levels within a structured environment, typically in hierarchical or categorization systems. It plays an essential role in organizing and standardizing data into different tiers or stages, ensuring smooth operations, easy management, and efficient data retrieval. Whether used in organizational structures, product classifications, or process workflows, the Level Master provides a clear framework for how data or entities relate to one another across different levels.
Here is the meaning of the field for the Description along with Navigation for the fields
Level Name
Description: Enter the name of the level, which serves as the identifier for a specific level in the storage system.
Navigation: Input the level name manually in the Level Name field.
Zone Name
Description: Select the zone where the level is located. Zones help in categorizing different areas within a warehouse. Options include ZONE1 and ZONE2.
Navigation: Choose the appropriate zone from the Zone Name dropdown, populated dynamically from the Zone Master.
Rack Name
Description: Select the rack associated with the level. The rack is the storage unit where goods are placed. Options include RACK1 and RACK2.
Navigation: Choose the rack name from the Rack Name dropdown, populated dynamically from the Rack Master.
Column Helpers
Description: Select the column(s) associated with the level. The columns in a rack are the individual vertical sections where items are stored. Options include C1, C2, and C3.
Navigation: Choose the column helper(s) from the Column Helpers dropdown, populated dynamically from the Column Master.
Storage Type
Description: Select the type of storage applicable to the level. This refers to the environment required for storage, such as Ambient (regular temperature) or AC (air-conditioned).
Navigation: Choose the appropriate storage type from the Storage Type dropdown, populated dynamically from parameters.
Capacity
Description: Enter the storage capacity of the level, which defines the total available storage space on that level.
Navigation: Input the value manually in the Capacity field.
Location
A Location Master is a centralized system or repository used to manage and define various physical or logical locations within an organization. It helps in organizing data or assets that are geographically or functionally spread across different places, ensuring efficient tracking, management, and access. In many industries, a Location Master is critical for managing warehouses, offices, stores, delivery points, or even digital environments like data centers or virtual locations.
Here is the meaning of the field for the Description along with Navigation for the fields
Location Name
Description: Enter the unique name for the location (e.g., Z1F1C1A001). This name serves as the identifier for the specific location within the warehouse.
Navigation: Input the location name manually in the Location Name field.
Zone Name
Description: Select the zone where the location is situated. This represents the broader area in the warehouse where the location is found. Options include ZONE1 and ZONE2.
Navigation: Choose the zone from the Zone Name dropdown, populated dynamically from the Zone Master.
Rack Name
Description: Select the rack associated with the location. The rack is the physical storage unit. Options include FLOOR1 and Level1.
Navigation: Choose the rack name from the Rack Name dropdown, populated dynamically from the Rack Master.
Level Name
Description: Select the level associated with the location. Levels represent the height or tier of storage within the rack or system. Options include A and B.
Navigation: Choose the level name from the Level Name dropdown, populated dynamically from the Level Master.
Storage Type
Description: Select the storage type for the location, indicating whether the storage environment is Ambient (regular temperature) or AC (air-conditioned).
Navigation: Choose the storage type from the Storage Type dropdown, populated dynamically from parameters.
Capacity
Description: Enter the storage capacity of the location, indicating how much space is available for storing goods.
Navigation: Input the value manually in the Capacity field.
Total Space
Description: Enter the total available space in the location, usually expressed in volume or area.
Navigation: Input the value manually in the Total Space field.
Total Space UOM
Description: Select the unit of measurement for the total space. Options include Cubic Feet.
Navigation: Choose the unit from the Total Space UOM dropdown, populated dynamically from parameters.
Usable Space
Description: Enter the usable space in the location, indicating the amount of space that is accessible and can be utilized for storage.
Navigation: Input the value manually in the Usable Space field.
Usable Space UOM
Description: Select the unit of measurement for usable space. Options include Cubic Feet.
Navigation: Choose the unit from the Usable Space UOM dropdown, populated dynamically from parameters.
Location Availability
Description: Indicate whether the location is currently available for use. Options include TRUE (available).
Navigation: Choose the value from the Location Availability dropdown.
Location Barcode
Description: Enter or scan the barcode associated with the location for identification purposes.
Navigation: Input the barcode manually in the Location Barcode field.
Column Name
Description: Select the column associated with the location, usually indicating the specific vertical storage section within the rack. Options include C1.
Navigation: Choose the column name from the Column Name dropdown, populated dynamically from the Column Master.
Position
Description: Select the position of the location within the structure, such as the relative position in the rack or area.
Navigation: Choose the value from the Position dropdown, populated dynamically.
Length
Description: Enter the length of the location, typically expressed in linear units.
Navigation: Input the value manually in the Length field.
Length UOM
Description: Select the unit of measurement for length. Options include Feet.
Navigation: Choose the unit from the Length UOM dropdown, populated dynamically from parameters.
Breadth
Description: Enter the breadth (width) of the location, typically expressed in linear units.
Navigation: Input the value manually in the Breadth field.
Breadth UOM
Description: Select the unit of measurement for breadth. Options include Feet.
Navigation: Choose the unit from the Breadth UOM dropdown, populated dynamically from parameters.
Height
Description: Enter the height of the location, typically expressed in linear units.
Navigation: Input the value manually in the Height field.
Height UOM
Description: Select the unit of measurement for height. Options include Feet.
Navigation: Choose the unit from the Height UOM dropdown, populated dynamically from parameters.
Weight
Description: Enter the maximum weight capacity of the location, indicating the total weight it can safely hold.
Navigation: Input the value manually in the Weight field.
Weight UOM
Description: Select the unit of measurement for weight. Options include KG.
Navigation: Choose the unit from the Weight UOM dropdown, populated dynamically from parameters.
Max Dimension
Description: Enter the maximum allowable dimension of the location, which might refer to the total size (length x breadth x height) allowed for storage.
Navigation: Input the value manually in the Max Dimension field.
Max Dimension UOM
Description: Select the unit of measurement for the maximum dimension. Options include Cubic Feet.
Navigation: Choose the unit from the Max Dimension UOM dropdown, populated dynamically from parameters.
Location Space Status
Description: Indicate the current space status of the location. Options include Partially Available, Completely Available, and Unavailable.
Navigation: Choose the value from the Location Space Status dropdown.
Location Merge
Description: Specify whether the location can be merged with another location. Options include Yes.
Navigation: Choose the value from the Location Merge dropdown.
Allowable Max Dimension
Description: Enter the allowable maximum dimension for the location, which might be a limit for the dimensions of items to be stored in that location.
Navigation: Input the value manually in the Allowable Max Dimension field.
Allowable Max Dimension UOM
Description: Select the unit of measurement for allowable maximum dimension. Options include Cubic Feet.
Navigation: Choose the unit from the Allowable Max Dimension UOM dropdown, populated dynamically from parameters.
Allowable Weight
Description: Enter the allowable weight for the location, which defines the maximum weight items can have for that location.
Navigation: Input the value manually in the Allowable Weight field.
Allowable Weight UOM
Description: Select the unit of measurement for allowable weight. Options include KG.
Navigation: Choose the unit from the Allowable Weight UOM dropdown, populated dynamically from parameters.
Usable Space Check
Description: Indicate whether the usable space meets requirements. Options include Yes.
Navigation: Choose the value from the Usable Space Check dropdown.
Weight Check
Description: Indicate whether the weight meets requirements. Options include Yes.
Navigation: Choose the value from the Weight Check dropdown.
Max Dimension Check
Description: Indicate whether the dimensions meet requirements. Options include Yes.
Navigation: Choose the value from the Max Dimension Check dropdown.
Block Location
Description: Indicate whether the location is blocked. A blocked location may not be available for storage. Options include No.
Navigation: Choose the value from the Block Location dropdown.
Product
The "Product Master" feature is a centralized system for managing and maintaining comprehensive details about all products within a business. It serves as a repository for key information related to each product, such as product IDs, descriptions, categories, pricing, and more. By using the Product Master, businesses can ensure that their product data is consistent, up-to-date, and easily accessible across various departments, such as inventory management, sales, procurement, and order fulfillment.
Here is the meaning of the field for the Description along with Navigation for the fields
Product ID
Description: A unique identifier for the product, typically used for tracking and inventory purposes.
Navigation: Enter the unique Product ID manually in the Product ID field.
Product Name
Description: The name of the product, which helps in identifying it.
Navigation: Input the product name manually in the Product Name field.
Product Description
Description: A brief description of the product, such as its key features, size, or weight.
Navigation: Input the Product Description manually in the Product Description field.
Product Configuration
Description: The configuration details of the product, such as any specific models or variants.
Navigation: Input the configuration details manually in the Product Configuration field.
DFS Code
Description: A unique code associated with the product for specific categorization or internal tracking.
Navigation: Enter the DFS Code manually in the DFS Code field.
HSN Code
Description: The Harmonized System Nomenclature code that classifies the product for tax purposes.
Navigation: Input the HSN Code manually in the HSN Code field.
UPC/EAN Number
Description: The Universal Product Code or European Article Number used for product identification and scanning.
Navigation: Enter the UPC/EAN Number manually in the UPC/EAN Number field.
Product Class
Description: The classification of the product (e.g., Class 1, Class 2) based on type or category.
Navigation: Input the Product Class manually in the Product Class field.
Product Category Name
Description: The primary category to which the product belongs (e.g., Chemicals, Electronics).
Navigation: Choose the category from a dropdown list.
Product Category 1/2/3
Description: Additional categories that the product can be classified under (e.g., Sub-categories).
Navigation: Select from dropdown options like Amul, Ceramica.
Average Cost Price
Description: The average cost price for producing or acquiring the product.
Navigation: Enter the cost manually in the Average Cost Price field.
Sale Price
Description: The price at which the product is sold to customers.
Navigation: Input the sale price manually in the Sale Price field.
Breadth
Description: The width of the product, typically in numeric format.
Navigation: Input the breadth manually in the Breadth field.
Breadth UOM
Description: The unit of measurement for the breadth of the product (e.g., Feet, Inches).
Navigation: Select from the dropdown options (e.g., Feet).
Batch Number
Description: The batch or lot number for the product, used for tracking manufacturing or expiration details.
Navigation: Enter the batch number manually in the Batch Number field.
Currency
Description: The currency used for pricing the product (e.g., INR, USD).
Navigation: Choose from the dropdown list (e.g., INR, USD).
Brand Names
Description: The brand associated with the product.
Navigation: Select from dropdown options (e.g., Amul, Ceramica).
Dispatch Instruction
Description: Special instructions for dispatching or shipping the product (e.g., packaging instructions).
Navigation: Enter dispatch details manually in the Dispatch Instruction field.
Expiry Flag
Description: Indicates whether the product has an expiration date or not.
Navigation: Input the expiry flag manually (Yes/No) in the Expiry Flag field.
Invoice Type
Description: The type of invoice to be used for transactions (e.g., GRN).
Navigation: Select from the dropdown list (e.g., GRN).
UOM Conversion Availability
Description: Indicates if unit of measurement (UOM) conversion is available for the product.
Navigation: Choose from static options like Yes.
Height UOM
Description: The unit of measurement for the height of the product (e.g., Feet, Inches).
Navigation: Choose from the dropdown options (e.g., Feet).
Inventory Unit
Description: The unit used for inventory tracking (e.g., NOS, PCS).
Navigation: Choose from the dropdown list options fetched from Parameters.
Lead Time
Description: The amount of time required to produce or receive the product before it is ready for sale or shipping.
Navigation: Input the lead time manually in the Lead Time field.
Length
Description: The length of the product in numeric format.
Navigation: Input the length manually in the Length field.
Length UOM
Description: The unit of measurement for the length of the product (e.g., Feet, Inches).
Navigation: Choose from the dropdown list options fetched from Parameters.
Max Dimension
Description: The maximum dimension (size) of the product, used for storage or shipping purposes.
Navigation: Input the max dimension manually in the Max Dimension field.
Max Dimension UOM
Description: The unit of measurement for the maximum dimension (e.g., Cubic Feet).
Navigation: Choose from the dropdown options fetched from Parameters.
Merge Type
Description: Indicates whether products can be merged or not (e.g., identical, different).
Navigation: Select from static options like "Different."
MOQ (Minimum Order Quantity)
Description: The minimum quantity that must be ordered for the product.
Navigation: Enter the MOQ manually in the MOQ field.
Package Type
Description: The type of packaging for the product (e.g., carton, shrink wrap).
Navigation: Select from the dropdown options fetched from Parameters.
Pallet Quantity
Description: The number of products per pallet.
Navigation: Input the quantity manually in the Pallet Quantity field.
Location Total Space
Description: The total space required for storing the product in the warehouse or location.
Navigation: Input the space requirement manually in the Location Total Space field.
Location Weight
Description: The weight capacity of the storage location.
Navigation: Input the weight manually in the Location Weight field.
Pallet Size
Description: The size of the pallet used for storing or transporting the product (e.g., 10x30 feet).
Navigation: Select from the dropdown options (e.g., 10x30).
Picking Direction
Description: The method for product picking (e.g., FIFO - First In, First Out).
Navigation: Select from static options like FIFO or LIFO.
Picking Unit
Description: The unit used for picking the product (e.g., NOS, PCS).
Navigation: Select from the dropdown list options fetched from Parameters.
Purchase Price
Description: The price at which the product is purchased from the supplier.
Navigation: Enter the purchase price manually in the Purchase Price field.
Product Merge
Description: Indicates whether the product can be merged with other similar products.
Navigation: Input manually in the Product Merge field (e.g., Yes/No).
Quality Check
Description: Specifies whether the product requires a quality check before being approved for sale.
Navigation: Input manually in the Quality Check field (Yes/No).
Reorder Point
Description: The inventory level at which new stock of the product should be ordered.
Navigation: Input the reorder point manually in the Reorder Point field.
Receiving Instruction
Description: Any specific instructions related to receiving the product.
Navigation: Enter details in the Receiving Instruction field manually.
Receiving Unit
Description: The unit of measurement used for receiving the product (e.g., NOS, PCS).
Navigation: Choose from the dropdown list options fetched from Parameters.
Serial Number Check
Description: Indicates whether serial number tracking is required for the product.
Navigation: Select from static dropdown options (Yes/No).
Shelf Life
Description: The product's shelf life in numeric format, indicating the time period it remains usable.
Navigation: Input the shelf life manually in the Shelf Life field.
Shipment Unit
Description: The unit of measurement used for shipping the product (e.g., KG).
Navigation: Choose from the dropdown options fetched from Parameters.
Shipping Code
Description: A code related to the shipping of the product.
Navigation: Input the Shipping Code manually in the Shipping Code field.
Status
Description: The current status of the product (e.g., Active, Discontinued).
Navigation: Choose from the dropdown options (e.g., Active).
Tax Code
Description: The tax classification code used for the product.
Navigation: Input the Tax Code manually in the Tax Code field.
Unit Cost
Description: The cost of one unit of the product, used for accounting and pricing purposes.
Navigation: Input the unit cost manually in the Unit Cost field.
Weight
Description: The weight of the product in the chosen unit of measure.
Navigation: Input the weight manually in the Weight field.
Weight UOM
Description: The unit of measurement for the weight (e.g., KG, LBS).
Navigation: Choose from the dropdown options.
Volume
Description: The volume of the product, which may be required for shipping or storage calculations.
Navigation: Input the volume manually in the Volume field.
Volume UOM
Description: The unit of measurement for the volume (e.g., Cubic Feet, Liters).
Navigation: Choose from the dropdown options.
Pricing Method
Description: Choose the pricing method for the product (e.g., Standard Price, Cost-Plus Pricing).
Navigation: Select the pricing method from a static dropdown list.
Purchase Tax
Description: Select the tax category for purchases (e.g., GST:18, IGST:9, CGST:9).
Navigation: Choose from the dropdown list options fetched from the Tax Master.
Sales Tax
Description: Specify the tax category for sales (e.g., GST:18, IGST:9, CGST:9).
Navigation: Choose from the dropdown list options fetched from the Tax Master.
Block Inventory
Description: Indicate whether the inventory for this product is blocked (e.g., Yes or No).
Navigation: Input manually in the Block Inventory field.
Markup
Description: Enter the markup percentage or value that will be applied to the product's cost price.
Navigation: Input the markup value manually in the Markup field.
Markup Type
Description: Select the type of markup applied to the product (e.g., Percentage or Fixed Value).
Navigation: Choose from static dropdown options (e.g., Percentage).
Source Warehouses
Description: Specify the source warehouse(s) for the product, which could include identifiers for multiple warehouses (e.g., W11:WWW1, W22:WWW2).
Navigation: Select from the dropdown list options fetched from the Warehouse Master.
Supplier
The "Supplier Master" feature is a central repository that stores detailed information about the suppliers with whom a business conducts transactions. It serves as the primary data source for managing supplier-related information such as supplier IDs, names, contact details, payment terms, and other essential attributes. By maintaining an organized Supplier Master, businesses can ensure efficient procurement processes, accurate supplier data, and better supplier relationship management.
Here is the meaning of the field for the Description along with Navigation for the fields
Supplier ID
Description: Enter a unique identifier for the supplier. This ID is used to reference the supplier across modules.
Navigation: Input the Supplier ID manually in the "Supplier ID" text field. Example: S10001.
Supplier Name
Description: Provide the full name of the supplier.
Navigation: Input the Supplier Name manually in the "Supplier Name" text field. Example: Supplier 1.
GST Number
Description: Specify the supplier's GST (Goods and Services Tax) number.
Navigation: Input the GST number manually in the "GST" text field. Example: SGT111G81.
Business Head Name
Description: Provide the name of the business head for the supplier.
Navigation: Input the Business Head Name manually in the "Business Head Name" text field. Example: Janardhan.
Business Head Number
Description: Enter the contact number of the business head.
Navigation: Input the Business Head Number manually in the "Business Head Number" text field. Example: 919191919.
Business Head Email
Description: Provide the email address of the business head.
Navigation: Input the email manually in the "Business Head Email" text field. Example: [email protected].
SPOC Name
Description: Enter the name of the supplier's Single Point of Contact (SPOC).
Navigation: Input the SPOC Name manually in the "SPOC Name" text field. Example: Lokesh.
SPOC Number
Description: Provide the contact number of the SPOC.
Navigation: Input the SPOC Number manually in the "SPOC Number" text field. Example: 918191919.
SPOC Email
Description: Enter the email address of the SPOC.
Navigation: Input the email manually in the "SPOC Email" text field. Example: [email protected].
PAN Number
Description: Provide the supplier's PAN (Permanent Account Number) for financial transactions.
Navigation: Input the PAN manually in the "PAN Number" text field. Example: PAN19991.
Bank Name
Description: Enter the name of the supplier's bank.
Navigation: Input the Bank Name manually in the "Bank Name" text field. Example: SBI.
Account Number
Description: Specify the supplier's bank account number.
Navigation: Input the Account Number manually in the "Account Number" text field. Example: 1919191919.
Account Holder Name
Description: Enter the name of the bank account holder.
Navigation: Input the Account Holder Name manually in the "Account Holder Name" text field. Example: Janardhan.
Account Type
Description: Specify the type of bank account (e.g., Salary, Savings).
Navigation: Input the Account Type manually in the "Account Type" text field. Example: Salary.
IFSC Code
Description: Provide the IFSC code of the bank branch.
Navigation: Input the IFSC Code manually in the "IFSC Code" text field. Example: SBIN00019.
Bank Address
Description: Enter the address of the supplier's bank.
Navigation: Input the Bank Address manually in the "Bank Address" text field. Example: Gudur.
Supplier Type
Description: Indicate the type of supplier (e.g., Others).
Navigation: Select the Supplier Type from the dropdown list in the "Supplier Type" field. Example: Others.
Days Required to Supply
Description: Specify the number of days required for the supplier to supply goods.
Navigation: Input the days manually in the "Days Required to Supply" text field. Example: 10.
Lead Time
Description: Enter the lead time in days required for order processing or delivery.
Navigation: Input the lead time manually in the "Lead Time" text field. Example: 10.
Credit Period
Description: Specify the credit period in days offered by the supplier.
Navigation: Input the credit period manually in the "Credit Period" text field. Example: 10.
Terms of Payment
Description: Indicate the payment terms agreed upon with the supplier.
Navigation: Select the terms from the dropdown list in the "Terms of Payment" field. Example: Monthly.
Currency
Description: Specify the currency for transactions with the supplier.
Navigation: Select the currency from the dropdown list in the "Currency" field. Example: INR.
Rate
Description: Enter the rate for goods or services.
Navigation: Input the rate manually in the "Rate" text field. Example: 10.
UOM
Description: Specify the Unit of Measurement (UOM).
Navigation: Select the UOM from the dropdown list in the "UOM" field. Example: Feet.
Contract Start Date
Description: Enter the starting date of the contract.
Navigation: Input the date manually in the "Contract Start Date" field. Example: 30-11-2024.
Contract End Date
Description: Enter the ending date of the contract.
Navigation: Input the date manually in the "Contract End Date" field. Example: 30-11-2024.
Address Type
Description: Indicate the address type (e.g., Ship To Addresses).
Navigation: Select the type from the dropdown list in the "Type" field.
Name
Description: Enter the supplier's name for the address.
Navigation: Input the name manually in the "Name" text field. Example: Customer2.
Email
Description: Provide the email address for the supplier's address.
Navigation: Input the email manually in the "Email" text field. Example: [email protected].
Address
Description: Specify the full address of the supplier.
Navigation: Input the address manually in the "Address" text field. Example: 1-1911.
Default Address
Description: Mark this address as the default for the supplier.
Navigation: Check the box manually in the "Default Address" field.
Customer
The "Customer Master" feature is a centralized system for managing and storing comprehensive details about all customers with whom a business interacts. It serves as the primary database for customer-related information such as customer IDs, names, contact details, billing and shipping addresses, and payment terms. The Customer Master ensures that businesses can maintain consistent, accurate, and up-to-date customer records, which are essential for streamlined sales, customer service, and order fulfillment processes.
Here is the meaning of the field for the Description along with Navigation for the fields
Customer ID:
Description: A unique identifier for the customer. This ID is used to reference the customer across different modules in the system.
Navigation: Enter the Customer ID in the "Customer ID" text field. Example: SU003.
Customer Name:
Description: The full name of the customer.
Navigation: Input the Customer Name in the "Customer Name" text field. Example: Janardhan Logistics.
Customer Type:
Description: Identifies the type of customer (e.g., Others, Plant, Warehouse).
Navigation: Select the Customer Type from the dropdown list in the "Customer Type" field. Example: Warehouse.
Lead Time:
Description: Specifies the number of days required for processing or delivering an order.
Navigation: Enter the lead time in the "Lead Time" text field. Example: 10.
Latitude:
Description: The latitude coordinate for the customer's location.
Navigation: Enter the latitude in the "Latitude" text field. Example: 10.
Longitude:
Description: The longitude coordinate for the customer's location.
Navigation: Enter the longitude in the "Longitude" text field. Example: 10.
Credit Period:
Description: The number of days of credit extended to the customer.
Navigation: Enter the credit period in the "Credit Period" text field. Example: 10.
GST Number:
Description: The customer's GST (Goods and Services Tax) number for tax purposes.
Navigation: Enter the GST number in the "GST" text field. Example: GST1000001.
PAN Number:
Description: The customer's PAN (Permanent Account Number) used for financial transactions.
Navigation: Enter the PAN number in the "PAN Number" text field. Example: PAN19991.
Markup Percentage:
Description: The markup percentage applied to the customer's pricing.
Navigation: Enter the markup percentage in the "Markup Percentage" text field. Example: 10.
Currency:
Description: The currency type used in transactions with the customer.
Navigation: Select the currency type from the dropdown list in the "Currency" field. Example: INR.
Discount Percentage:
Description: The percentage discount applicable to the customer.
Navigation: Enter the discount percentage in the "Discount Percentage" text field. Example: 10.
SPOC Name:
Description: The name of the customer's Single Point of Contact (SPOC).
Navigation: Enter the SPOC Name in the "SPOC Name" text field. Example: Janardhan Logistics.
SPOC Phone Number:
Description: The contact phone number for the customer's SPOC.
Navigation: Enter the SPOC Phone Number in the "SPOC Phone Number" text field. Example: 995678900.
SPOC Email:
Description: The email address of the SPOC.
Navigation: Enter the SPOC Email in the "SPOC Email" text field. Example: [email protected].
Bank Name:
Description: The name of the customer's bank.
Navigation: Enter the Bank Name in the "Bank Name" text field. Example: SBI.
Account Number:
Description: The bank account number of the customer.
Navigation: Enter the Account Number in the "Account Number" text field. Example: 1819191991.
Account Holder Name:
Description: The name of the customer's bank account holder.
Navigation: Enter the Account Holder Name in the "Account Holder Name" text field. Example: Janardhan.
Account Type:
Description: The type of bank account (e.g., Salary, Savings).
Navigation: Enter the Account Type in the "Account Type" text field. Example: Salary.
IFSC Code:
Description: The IFSC (Indian Financial System Code) of the customer's bank branch.
Navigation: Enter the IFSC Code in the "IFSC Code" text field. Example: SBIN10091.
Bank Address:
Description: The physical address of the customer's bank.
Navigation: Enter the Bank Address in the "Bank Address" text field. Example: Gudur.
Terms of Payment:
Description: Specifies the agreed-upon payment terms with the customer.
Navigation: Select the Terms of Payment from the dropdown list in the "Terms of Payment" field. Example: Monthly.
Address Type:
Description: The type of address for the customer (e.g., shipping address, billing address).
Navigation: Select the Address Type from the dropdown list in the "Address Type" field.
Name:
Description: The name of the customer's address.
Navigation: Enter the name in the "Name" text field. Example: Janardhan Logistics.
Email:
Description: The customer's email address.
Navigation: Enter the Email in the "Email" text field. Example: [email protected].
Address:
Description: The full address of the customer.
Navigation: Enter the full address in the "Address" text field. Example: 1-23/2.
City:
Description: The city where the customer is located.
Navigation: Enter the City name in the "City" text field. Example: Nellore.
State:
Description: The state where the customer is located.
Navigation: Select the State from the dropdown list in the "State" field. Example: AP.
PIN Code:
Description: The postal PIN code for the customer's location.
Navigation: Enter the PIN Code in the "PIN" text field. Example: 524406.
Country:
Description: The country in which the customer is located.
Navigation: Select the Country from the dropdown list in the "Country" field. Example: INDIA.
Default Address:
Description: Specifies whether this address should be set as the default address for the customer.
Navigation: Check the box in the "Default Address" field to indicate this address as the default.
Product by Supplier
The "Product by Supplier" section allows users to define and manage the products provided by different suppliers. This feature is essential for maintaining accurate product and supplier relationships, ensuring that the right products are associated with the correct suppliers in your system. It helps streamline procurement processes, track product availability, and manage inventory based on supplier-specific data.
Here is the meaning of the field for the Description along with Navigation for the fields
Supplier ID/Name:
Description: The "Supplier ID/Name" field allows the user to select the supplier ID or name associated with the product. This identifies the supplier from whom the product is being sourced.
Navigation: The user will select the supplier from a dropdown list. The list is populated from the Supplier Master and contains values like "S10001: Supplier 1" and "S10002: Supplier 2."
Product ID/Name:
Description: The "Product ID/Name" field enables the user to select the product ID or name related to the transaction or order. This helps link the product to the supplier and the order.
Navigation: The user will select the product from a dropdown list. The list is fetched from the Product Master and contains product IDs along with their descriptions, like "MLX039000038: 4.20MM MINI-FIT FEMALE CRIMP TIN/REEL" and "MLX039000040: 4.20MM MINI-FIT MALE CRIMP TIN/REEL."
Product Description:
Description: The "Product Description" field allows the user to provide additional details or a brief description of the product, such as packaging size or specifications.
Navigation: The user will enter the product description manually in a text field. For example, "100-500 gm" for the weight range of the product.
MOQ (Minimum Order Quantity):
Description: The "MOQ" field specifies the minimum order quantity required for the product. This ensures that the user orders at least the specified minimum number of items.
Navigation: The user will enter the MOQ manually in a text field. The value will be numeric (e.g., "10").
Lead Time:
Description: The "Lead Time" field specifies the time required to process and deliver the product. It is an important factor in order planning and inventory management.
Navigation: The user will enter the lead time manually in a text field. The value will be numeric (e.g., "7" for 7 days).
Receiving Unit:
Description: The "Receiving Unit" field specifies the unit of measurement in which the product will be received (e.g., by number or weight). This helps in tracking the quantity of goods received.
Navigation: The user will select the receiving unit from a dropdown list. The list is fetched from the Parameters and contains options like "NOS" (Number of pieces) and "PCS" (Pieces).
Price:
Description: The "Price" field specifies the price of the product per unit. This helps in calculating the total cost of the order.
Navigation: The user will enter the price manually in a text field. The value will be a numeric (float) value, such as "10.5" (representing the price per unit).
Currency:
Description: The "Currency" field specifies the currency used for the product's price. This helps in ensuring that the pricing is correctly tracked according to the specified currency.
Navigation: The user will select the currency from a dropdown list. The list is fetched from the Parameters and contains values like "INR" (Indian Rupee) and "DOLLAR" (US Dollar).
Brand Names:
Description: The "Brand Names" field allows the user to select the brand associated with the product. This helps identify the product's brand and distinguish it from other products.
Navigation: The user will select the brand name from a dropdown list. The list is fetched from the Parameters and contains options like "Amul" and "Ceramic."
Product by Customer
The "Product by Customer" feature is designed to manage and track products associated with specific customers. This functionality enables businesses to maintain detailed records of products purchased by each customer, providing a comprehensive view of customer preferences, purchasing patterns, and product requirements. By linking products to customers, organizations can ensure accurate order fulfillment, track product performance by customer, and optimize their sales and inventory strategies.
Here is the meaning of the field for the Description along with Navigation for the fields
Customer ID/Name:
Description: The "Customer ID/Name" field allows the user to select the customer ID or name associated with the transaction or product. It helps identify the customer in the system.
Navigation: The user will select the customer from a dropdown list. The list is populated dynamically from the Customer Master and contains values such as "SU002: Janardhan Logistics" and "C1009: Vinay Logistics."
Product ID/Name:
Description: The "Product ID/Name" field enables the user to select the product ID or name related to the transaction or order. This helps link the product to the customer or order.
Navigation: The user will select the product from a dropdown list, which is populated from the Product Master. It contains product IDs along with descriptions, like "MLX039000038: 4.20MM MINI-FIT FEMALE CRIMP TIN/REEL" and "MLX039000040: 4.20MM MINI-FIT MALE CRIMP TIN/REEL."
Brand Names:
Description: The "Brand Names" field allows the user to select the brand associated with the product. This helps specify which brand the selected product belongs to.
Navigation: The user will select the brand name from a dropdown list. The list is fetched from the Parameters and contains options like "Amul" and "Ceramic."
MOQ (Minimum Order Quantity):
Description: The "MOQ" field refers to the minimum order quantity required for the product. This ensures that the user orders at least the specified minimum number of items.
Navigation: The user will enter the MOQ manually in a text field. The value is typically a numeric (float) value, such as "1," depending on the product.
Lead Time:
Description: The "Lead Time" field specifies the time required to process and deliver the product. It is an important factor in order planning and management.
Navigation: The user will enter the lead time manually in a text field. The value entered will be a numeric (float) value, such as "1," which represents the lead time in a given unit (e.g., days).
Receiving Unit:
Description: The "Receiving Unit" field specifies the unit of measurement in which the product will be received. This helps in tracking the quantity of goods received.
Navigation: The user will select the receiving unit from a dropdown list. The list is populated from the Parameters and contains options like "NOS" (Number of pieces) and "PCS" (Pieces).
Markup:
Description: The "Markup" field defines the additional cost or profit margin added to the base price of the product. It helps calculate the final price.
Navigation: The user will enter the markup value manually in a text field. The value is typically a numeric (float) value, such as "1" (representing the markup amount).
Markup Type:
Description: The "Markup Type" field allows the user to specify the method used to apply the markup. This could either be based on a fixed amount or a percentage of the product's cost.
Navigation: The user will select the markup type from a dropdown list. The list contains static options like "Amount" (for a fixed value) and "Percentage" (for a percentage-based markup).
Putaway Strategy
The "Put away Strategy" feature allows businesses to define and manage how inventory is stored within a warehouse or storage facility. Put away strategies are crucial for optimizing space utilization, improving inventory accessibility, and ensuring efficient material handling. By organizing inventory based on specific criteria, businesses can enhance warehouse operations, reduce retrieval times, and maintain better control over stock levels.
Here is the meaning of the field for the Description along with Navigation for the fields
Put away Strategy Name:
Description: The name of the put away strategy defines the method or approach used for storing inventory in the warehouse. It could be a specific method such as a "first-in-first-out" (FIFO) or "random" strategy used to optimize storage and retrieval.
Navigation: User will enter the strategy name manually in the text field (e.g., "PUT_1").
Zone Name:
Description: The zone name refers to a specific area or section within a warehouse or storage facility where products are stored according to certain strategies. This field links the put away strategy to a particular zone in the warehouse, helping to organize product placement efficiently.
Navigation: User will select the zone from the dropdown list. The list is fetched from the Zone Master and contains values like "ZONE1" and "ZONE2."
Sequence Number:
Description: The sequence number indicates the order in which the put away strategy should be applied within the warehouse. It allows for prioritization and management of multiple strategies by assigning a number, with lower values typically indicating higher priority.
Navigation: User will enter the sequence number manually in the text field (numeric value, e.g., "1").
Picking Strategy
The "Picking Strategy" feature is an essential component of warehouse management that defines how inventory is selected and retrieved from storage locations for order fulfillment. An effective picking strategy optimizes order picking processes, increases picking accuracy, reduces labor costs, and improves overall warehouse efficiency. It ensures that products are picked in the most efficient manner, based on order requirements, product types, and warehouse layout.
Here is the meaning of the field for the Description along with Navigation for the fields
Picking Strategy Name:
Description: The "Picking Strategy Name" is where the user enters a name to uniquely identify the picking strategy. This name is a label used to refer to the strategy being configured (e.g., "PIC_1").
Navigation: The user will manually type the strategy name into a text field. For example, they might enter a name like "PIC_1" or any other unique identifier for the strategy.
Picking Strategy Type:
Description: The "Picking Strategy Type" defines the method or approach used for picking. It helps categorize the strategy as either picking individual items (e.g., "EACH") or picking items in bulk (e.g., "BULK").
Navigation: The user will select the picking strategy type from a dropdown list. The list contains predefined options like "EACH" and "BULK," and the user selects one of these options.
Zone Name:
Description: The "Zone Name" refers to the specific zone in the warehouse or system associated with the picking strategy. A zone typically represents a designated area for inventory management (e.g., "ZONE1," "ZONE2").
Navigation: The user will select the zone from a dropdown list. The list is dynamically populated from the Zone Master data, which contains values like "ZONE1" or "ZONE2," allowing the user to choose the relevant zone.
Sequence Number:
Description: The "Sequence Number" indicates the position or priority of the picking strategy within a sequence of strategies. It helps order the strategies in the system (e.g., "1" for the first strategy in the sequence).
Navigation: The user will manually input the sequence number in a text field, entering a numeric value (e.g., "1"). This determines the order in which the strategy is executed.
Product Strategy
The "Product Strategy" feature is designed to streamline the management and optimization of products within a warehouse or distribution system. It focuses on defining how products are categorized, stored, and handled based on specific business goals and operational requirements. A well-developed product strategy enables businesses to manage product flow more efficiently, improve inventory control, and enhance order fulfillment processes.
Here is the meaning of the field for the Description along with Navigation for the fields
Product Category Name:
Description: The "Product Category Name" field is used to select the product category that is associated with the strategy. This helps classify the product into a specific category for better organization and management.
Navigation: The user will select the product category from a dropdown list. The list includes static options like "All Drinks" and "Power Beverage," from which the user can choose the appropriate category.
Put away Strategy Name:
Description: The "Put away Strategy Name" refers to the strategy used for storing or placing the product in the warehouse after it is received. This strategy helps define the optimal storage location for the product.
Navigation: The user will select the put away strategy from a dropdown list. The list is dynamically fetched from the Put away Strategy master and contains options like "PUT_1" and "PUT_2," which the user can select based on their needs.
Picking Strategy Name:
Description: The "Picking Strategy Name" defines the strategy for selecting and picking products from the warehouse. It helps identify the appropriate picking method for the product.
Navigation: The user will select the picking strategy from a dropdown list. The list is dynamically populated from the Picking Strategy master and contains values like "PIC_1" and "PIC_2" for the user to choose from.
Picking Strategy Type:
Description: The "Picking Strategy Type" field specifies the type or method of picking. It determines how products will be picked from the warehouse, either individually (e.g., "EACH") or in bulk (e.g., "BULK").
Navigation: The user will select the picking strategy type from a dropdown list. The list contains static options like "EACH" and "BULK," allowing the user to choose the appropriate picking method.
UOM Conversion
The "UOM (Unit of Measurement) Conversion Master" feature is essential for managing and converting different units of measurement used across various products in a warehouse or inventory system. It provides a systematic approach to handle multiple UOMs (e.g., pieces, kilograms, liters) and ensures that product quantities are accurately converted between different measurements units for consistent inventory management, pricing, and order fulfillment.
Here is the meaning of the field for the Description along with Navigation for the fields
Product ID:
Description: The "Product ID" field is used to select the product that will be associated with the Unit of Measure (UOM) conversion. The selected product will be the one for which the UOM conversion is applied.
Navigation: The user will select the product ID from a dropdown list. This list is dynamically populated from the Product Master and contains product IDs along with their descriptions, such as "MLX039000038: 4.20MM MINI-FIT FEMALE CRIMP TIN/REEL" and "MLX039000040: 4.20MM MINI-FIT MALE CRIMP TIN/REEL."
Unit Conversion From:
Description: The "Unit Conversion From" field specifies the unit of measure (UOM) that the user is converting from. This is the original measurement unit that will be converted.
Navigation: The user will select the unit of measure (UOM) from which the conversion will be made. The list is fetched from the Parameters and contains values like "NOS" (Number of pieces) and "PCS" (Pieces), which the user can choose from.
Unit Conversion To:
Description: The "Unit Conversion To" field defines the unit of measure (UOM) that the user is converting to. This is the desired target unit for the conversion.
Navigation: The user will select the unit of measure (UOM) to which the conversion will be made. Like the "Unit Conversion From" field, this list is fetched from the Parameters and contains values like "NOS" and "PCS."
Conversion Factor:
Description: The "Conversion Factor" field specifies the numerical value that defines the ratio for converting between the two selected units of measure (UOMs). This factor determines how much of one UOM equals the other.
Navigation: The user will manually enter the conversion factor in the text field as a float value (e.g., "1," "2.5," etc.), depending on the required conversion ratio.
Replenishment
Replenishment is the process of ensuring that inventory levels in picking or forward-picking locations are sufficiently stocked to fulfill customer orders efficiently. It is a critical operation that bridges inventory movement between storage and picking areas, ensuring smooth and uninterrupted order fulfillment.
Here is the meaning of the field for the Description along with Navigation for the fields
Product
Description: The product to be replenished. This field determines which product stock will be refilled.
Navigation: Select the product from the Product dropdown list populated from the Product Master.
Example: P1: FRUITY
Product ID (Auto-generated)
Description: A unique identifier for the selected product. It helps in distinguishing between different products.
Navigation: This field is auto-generated and cannot be edited. It appears automatically when a product is selected.
Example: P1
Product Name (Auto-generated)
Description: The name of the selected product. This provides clarity on the selected product.
Navigation: This field is auto-generated and cannot be edited. It appears automatically when a product is selected.
Example: FRUITY
Area Replenishment Allow
Description: Indicates whether replenishment is allowed for the specified area. This setting controls the area's replenishment eligibility.
Navigation: Use the Area Replenishment Allow checkbox to enable or disable replenishment for the area.
Location Name
Description: The location where the product will be replenished. This helps in directing replenishment to the correct area.
Navigation: Select the location from the Location Name dropdown list populated from the Location Master.
Example: LOC 1, LOC 2
Vehicle
Vehicles refer to equipment, machines, or systems used for the transportation and handling of goods within the warehouse. These vehicles are essential for facilitating the efficient movement of inventory across various warehouse zones, including receiving, storage, picking, packing, and shipping areas.
Here is the meaning of the field for the Description along with Navigation for the fields
Vehicle Number
Description: The unique identifier assigned to each vehicle. It helps in tracking and referencing the vehicle within the system.
Navigation: Input the vehicle number manually in the Vehicle Number field. The expected data type is a string, and the length should not exceed 100 characters.
Vehicle Name
Description: The name or description of the vehicle, which may include details such as the vehicle's make, model, or any other identifying features.
Navigation: Input the vehicle name manually in the Vehicle Name field. The expected data type is a string.
Type of Vehicle
Description: Defines the classification of the vehicle, such as "Normal," "Container," or other vehicle types used for transportation.
Navigation: Input the vehicle type manually in the Type of Vehicle field. The expected data type is a string.
Registration State
Description: The state or region where the vehicle is registered. Typically a two-letter state code (e.g., "AP") used to identify the vehicle's registration location.
Navigation: Input the registration state code (e.g., "AP") manually in the Registration State field. The expected data type is a string.
Chassis Number
Description: The unique chassis identification number of the vehicle, which is used to authenticate and identify the vehicle.
Navigation: Input the chassis number manually in the Chassis Number field. The expected data type is an integer.
Vehicle Capacity
Description: The maximum weight or volume the vehicle can carry. This helps in understanding the vehicle's load capacity.
Navigation: Input the vehicle capacity manually in the Vehicle Capacity field. The expected data type is an integer.
Equipment ID/Name
Description: The ID or name of any equipment linked to the vehicle, such as a container or trailer. This helps in associating specific equipment with the vehicle.
Navigation: Choose the equipment ID or name from the dropdown list, which is populated from the Equipment Master. The expected data type is a string.
Equipment Type
Description: The type of equipment linked to the vehicle (e.g., LTL for Less Than Truckload), auto-generated based on the selected equipment ID.
Navigation: The equipment type will be auto-generated (e.g., "LTL") based on the equipment selected.
No of Shifts
Description: The number of shifts the vehicle operates within a day. This field determines how often the vehicle is used on a daily basis.
Navigation: Input the number of shifts manually in the No of Shifts field. The expected data type is an integer.
Hours per Shift
Description: The number of hours the vehicle operates during each shift. This is used to calculate the daily operational time for the vehicle.
Navigation: Input the hours per shift manually in the Hours per Shift field. The expected data type is an integer.
Day Capacity
Description: The vehicle's operational capacity for a single day, which is auto-generated based on the number of shifts and hours per shift.
Navigation: The Day Capacity will be auto-generated, typically calculated as No of Shifts × Hours per Shift.
No of Days per Week
Description: The number of days the vehicle operates each week, indicating the vehicle's weekly availability.
Navigation: Input the number of days per week manually in the No of Days per Week field. The expected data type is an integer.
Weekly Capacity
Description: The total operational capacity of the vehicle over a week, automatically calculated from the day capacity and the number of days the vehicle operates.
Navigation: The Weekly Capacity will be auto-generated, calculated as Day Capacity × No of Days per Week.
Utilization
Description: The utilization rate for the vehicle, expressed as a percentage, showing how effectively the vehicle is used.
Navigation: Input the utilization rate manually in the Utilization field. The expected data type is an integer.
Efficiency
Description: The efficiency rate of the vehicle, typically shown as a percentage, reflecting how well the vehicle performs relative to its expected capacity.
Navigation: Input the efficiency rate manually in the Efficiency field. The expected data type is an integer.
Sequence Number
Description: A unique number assigned to each vehicle for ordering or identification purposes.
Navigation: Input the sequence number manually in the Sequence Number field. The expected data type is an integer.
Owner
Description: The name of the individual or organization that owns the vehicle.
Navigation: Input the owner's name manually in the Owner field. The expected data type is a string.
Driver Name
Description: The name of the driver assigned to the vehicle. This is used for identification and contact purposes.
Navigation: Input the driver's name manually in the Driver Name field. The expected data type is a string.
Contact No
Description: The contact number of the driver, used for communication or emergencies.
Navigation: Input the driver's contact number manually in the Contact No field. The expected data type is an integer.
Rate
Description: The rate associated with the vehicle, often referring to the cost per hour or per day for using the vehicle.
Navigation: Input the rate manually in the Rate field. The expected data type is an integer.
Equipment
Equipment refers to the tools, machinery, and systems used to handle, move, store, and manage inventory within the warehouse. These assets are integral to optimizing warehouse operations and are often integrated with or managed by the WMS to enhance productivity, accuracy, and safety.
Here is the meaning of the field for the Description along with Navigation for the fields
Equipment ID
Description: A unique identifier assigned to each piece of equipment. It ensures that every equipment item can be individually recognized and tracked within the system.
Navigation: Input the Equipment ID manually in the Equipment ID field. The expected data type is a string.
Equipment Name
Description: The name or title of the equipment, which serves as a reference or description for easy identification.
Navigation: Input the equipment name manually in the Equipment Name field. The expected data type is a string.
Equipment ID Name
Description: This is a combination of the Equipment ID and Equipment Name, providing a comprehensive identifier that includes both a unique code and the name of the equipment.
Navigation: The Equipment ID Name will be auto-generated (e.g., E100: Equip).
Length
Description: The physical length measurement of the equipment. It helps determine how much space the equipment occupies or fits in.
Navigation: Input the length manually in the Length field. The expected data type is a float.
Length UOM (Unit of Measurement)
Description: The unit used to measure the equipment's length (e.g., centimeters, inches). It ensures that the length is measured using a standard unit.
Navigation: Choose the unit of measurement (e.g., CM) from the dropdown list. The list is populated from the Parameters.
Equipment Type
Description: Specifies the category or classification of the equipment (e.g., forklift, truck, etc.). This helps organize equipment into types for easier management.
Navigation: Choose the equipment type (e.g., LTL) from the dropdown list. The list is populated from the Parameters.
Height
Description: The vertical measurement of the equipment. It is used to assess the equipment's overall size and the space it will require.
Navigation: Input the height manually in the Height field. The expected data type is a float.
Height UOM (Unit of Measurement)
Description: The unit used to measure the height of the equipment (e.g., centimeters, inches). It ensures consistency in measurement.
Navigation: Choose the unit of measurement (e.g., CM) from the dropdown list. The list is populated from the Parameters.
Volume
Description: The three-dimensional space occupied by the equipment, typically used for storage or transportation planning.
Navigation: Input the volume manually in the Volume field. The expected data type is a float.
Volume UOM (Unit of Measurement)
Description: The unit of measurement for the equipment's volume (e.g., cubic centimeters, cubic meters).
Navigation: Choose the unit of measurement (e.g., CM³) from the dropdown list. The list is populated from the Parameters.
Weight
Description: The mass of the equipment, an important parameter for load management and transportation.
Navigation: Input the weight manually in the Weight field. The expected data type is a float.
Weight UOM (Unit of Measurement)
Description: The unit used to measure the equipment's weight (e.g., kilograms, pounds).
Navigation: Choose the unit of measurement (e.g., KG) from the dropdown list. The list is populated from the Parameters.
Width
Description: The horizontal measurement of the equipment. Used to assess how much width the equipment occupies in a space.
Navigation: Input the width manually in the Width field. The expected data type is a float.
Width UOM (Unit of Measurement)
Description: The unit used to measure the equipment's width (e.g., centimeters, inches).
Navigation: Choose the unit of measurement (e.g., CM) from the dropdown list.
No of Shifts
Description: The number of shifts during which the equipment operates within a given period (e.g., daily or weekly).
Navigation: Input the number of shifts manually in the No of Shifts field. The expected data type is an integer.
Hours Per Shift
Description: The number of hours the equipment operates in each shift. It determines the total operational time.
Navigation: Input the hours per shift manually in the Hours Per Shift field. The expected data type is an integer.
Day Capacity
Description: The total capacity or operational time of the equipment per day, calculated by multiplying the number of shifts by the hours per shift.
Navigation: The day capacity will be auto-generated (e.g., No. of shifts × hours per shift).
No of Days Per Week
Description: The number of days the equipment is expected to operate during a week.
Navigation: Input the number of days per week manually in the No of Days Per Week field. The expected data type is an integer.
Rate/Hr
Description: The hourly rate for utilizing the equipment, typically used for billing or cost estimation.
Navigation: Input the rate per hour manually in the Rate/Hr field. The expected data type is an integer.
Weekly Capacity
Description: The total operational capacity of the equipment in a week, auto-calculated by multiplying the number of days per week by the hours per shift.
Navigation: The weekly capacity will be auto-generated (e.g., No. of days per week × hours per shift).
Utilization
Description: The utilization rate of the equipment, typically expressed as a percentage, showing how much the equipment is being used relative to its total available time.
Navigation: Input the utilization rate manually in the Utilization field. The expected data type is an integer.
Efficiency
Description: The efficiency rate of the equipment, typically expressed as a percentage, which indicates how effectively the equipment performs compared to its potential.
Navigation: Input the efficiency rate manually in the Efficiency field. The expected data type is a float.
Sequence Number
Description: A unique identifier used to order or sort the equipment within a list or system, allowing for easy reference.
Navigation: Input the sequence number manually in the Sequence Number field. The expected data type is an integer.
Executives
Executives refer to the managerial or supervisory roles responsible for overseeing and coordinating warehouse operations, ensuring that the system and processes function efficiently and align with organizational goals. These individuals bridge the gap between warehouse staff and higher-level management, leveraging the capabilities of the WMS to make data-driven decisions and optimize operations.
Here is the meaning of the field for the Description along with Navigation for the fields
Add Details
Description: Indicate whether additional details about the executive should be provided or not. Checking the box allows extra fields or information to be entered for the executive.
Navigation: Check the checkbox to add details for the executive.
Executive ID
Description: This is the unique identifier assigned to each executive. It is used to differentiate between different executives in the system.
Navigation: Input the executive ID manually in the Executive ID field. The expected data type is a string.
First Name
Description: This is the first name of the executive, which helps in identifying and addressing the executive.
Navigation: Input the first name manually in the First Name field. The expected data type is a string.
Last Name
Description: This is the last name of the executive. Together with the first name, it forms the full name used for identification.
Navigation: Input the last name manually in the Last Name field. The expected data type is a string.
Executive ID Name
Description: This field combines the Executive ID and the First Name and Last Name of the executive to create a full name identifier.
Navigation: The executive ID name will be auto-generated based on the Executive ID and the First Name and Last Name (e.g., 101: Sirish S).
Address
Description: This field contains the full address of the executive, including street, city, and any other relevant details.
Navigation: Input the address manually in the Address field. The expected data type is a string.
City
Description: This field captures the city where the executive resides or works, assisting with geographical identification.
Navigation: Input the city manually in the City field. The expected data type is a string.
Phone Number
Description: This is the contact phone number of the executive, used for communication purposes.
Navigation: Input the phone number manually in the Phone Number field. The expected data type is varchar.
Email ID
Description: The email address used for official communication with the executive.
Navigation: Input the email address manually in the Email ID field. The expected data type is a string.
Pin
Description: The postal or pin code associated with the executive's address, used for location identification.
Navigation: Input the pin code manually in the Pin field. The expected data type is an integer.
Country
Description: This field captures the country where the executive is located, assisting in geographical identification.
Navigation: Select the country from the dropdown list, which is populated from the Parameters table. The expected data type is a string.
State
Description: This field captures the state where the executive is located. It helps narrow down the location of the executive.
Navigation: Select the state from the dropdown list, which is populated from the Column Master. The expected data type is a string.
Work Types
Description: This field refers to the type of work assigned to the executive (e.g., admin, management). It helps define the executive's role in the organization.
Navigation: Choose the work type from the dropdown list, which is populated from the Static Dropdown list. The expected data type is a string.
No Of Shifts
Description: This field specifies how many shifts the executive works during the day. It defines the working schedule.
Navigation: Input the number of shifts manually in the No Of Shifts field. The expected data type is an integer.
Hours Per Shift
Description: This field defines how many hours the executive works in each shift, helping to determine the length of the workday.
Navigation: Input the hours per shift manually in the Hours Per Shift field. The expected data type is an integer.
Day Capacity
Description: This field auto-generates the total capacity or work output the executive can handle in a single day, based on the number of shifts and hours per shift.
Navigation: The day capacity will be auto-generated based on the number of shifts and hours per shift.
No Of Days Per Week
Description: This field specifies how many days the executive works in a week. It defines the executive's weekly working schedule.
Navigation: Input the number of days per week manually in the No Of Days Per Week field. The expected data type is an integer.
Weekly Capacity
Description: This field auto-generates the total capacity or work output the executive can handle in a week, based on the day capacity and number of days worked per week.
Navigation: The weekly capacity will be auto-generated based on the day capacity and number of days per week.
Utilization
Description: The utilization rate of the executive, expressed as a percentage, represents how effectively the executive's time is being utilized.
Navigation: Input the utilization rate manually in the Utilization field. The expected data type is an integer.
Login Time
Description: The time at which the executive logs into the system or starts their work for the day.
Navigation: Select the login time using the calendar selection tool.
Logout Time
Description: The time at which the executive logs out or ends their work for the day.
Navigation: Select the logout time using the calendar selection tool.
Efficiency
Description: This field represents the executive's efficiency rate, typically expressed as a percentage, reflecting their ability to complete tasks effectively.
Navigation: Input the efficiency rate manually in the Efficiency field. The expected data type is an integer.
Sequence Number
Description: This is a sequential identifier for the executive, which helps in organizing or tracking executives.
Navigation: Input the sequence number manually in the Sequence Number field. The expected data type is an integer.
Rate/Hr.
Description: This field specifies the rate paid per hour for the executive's work. It is used to calculate the compensation for their services.
Navigation: Input the rate per hour manually in the Rate/Hr field. The expected data type is an integer.
Executive User ID
Description: The Executive User ID is auto-generated based on the Executive ID and is used to uniquely identify the executive in the system.
Navigation: The Executive User ID will be auto-generated based on the Executive ID.
Executive Password
Description: This is the password that the executive uses to log into their account in the system.
Navigation: Input the executive's password manually in the Executive Password field.
Bill of Resources
Bill of Resources refers to a detailed breakdown of all the resources—materials, labor, equipment, and time—required to execute a specific warehouse operation or fulfill a process. It is similar to a Bill of Materials (BOM) in manufacturing but is tailored for warehouse and supply chain operations.
Here is the meaning of the field for the Description along with Navigation for the fields
Product ID/Name
Description: This field represents the identification or name of a product. It's used to select a specific product in the system.
Navigation: Choose the product ID or name from the dropdown list. The list is populated from the Product Master table.
Product ID
Description: A unique identifier for each product in the system, typically alphanumeric. It helps distinguish different products.
Navigation: The Product ID will be auto-generated based on the selected product. It will appear after you select the product name.
Product Name
Description: The name assigned to a product for easy identification. It could be the product's brand name or a descriptive name.
Navigation: The Product Name is auto-generated based on the selected product. It will appear automatically once you choose the product ID.
Product Image
Description: A visual representation linked to the product. This helps in easily identifying the product visually.
Navigation: The Product Image will be auto-generated based on the selected product ID and is typically linked to the product in the system.
Inventory Unit
Description: This field refers to the unit of measurement used to track the product in inventory, such as boxes, kilograms, liters, or pieces.
Navigation: The Inventory Unit is auto-generated based on the selected product. It will appear after choosing the product from the list.
Resource Unit
Description: Similar to Inventory Unit, but refers specifically to the unit used for resources related to the product, like packaging or handling units.
Navigation: This will be auto-generated based on the product selection from the Product Master.
Equipment's
Description: Indicates the quantity of equipment required for transporting or handling the product. Equipment might include tools, machinery, or devices.
Navigation: Input the quantity of equipment manually in the Equipment's field. The expected data type is an integer (e.g., 5 forklifts).
Executives
Description: This field indicates the number of executives (or workers) required for transporting or handling the product.
Navigation: Input the number of executives manually in the Executives field. The expected data type is an integer.
Vehicles
Description: Represents the number of vehicles required for transporting the product. This could be trucks, vans, or other transport vehicles.
Navigation: Input the number of vehicles manually in the Vehicles field. The expected data type is an integer.
Capacity Unit
Description: This refers to the unit of measurement for capacity (e.g., weight, volume, or count). It tells how much of the product can fit into a particular unit (e.g., container or vehicle).
Navigation: Choose the unit of measurement for the capacity from the dropdown list, which is populated from the Parameters table.
Quantity
Description: The total amount or number of the product available or required. This field is used for inventory or ordering purposes.
Navigation: Input the quantity manually in the Quantity field. The expected data type is an integer (e.g., 100 pieces).
Sequence Number
Description: The order or position of a product in a list or bill of resources. This helps in organizing and prioritizing products during operations.
Navigation: Input the sequence number manually in the Sequence Number field. The expected data type is an integer (e.g., 1, 2, 3).
Transporter
A transporter refers to an individual, organization, or system responsible for the movement of goods between locations. This includes the transfer of materials within the warehouse (intra-warehouse transport) and the shipment of goods to external destinations (outbound logistics). Transporters are a critical link in the supply chain, enabling the efficient flow of inventory from suppliers to warehouses and ultimately to customers.
Here is the meaning of the field for the Description along with Navigation for the fields
Transporter ID:
Description: A unique identifier assigned to each transporter, used to distinguish one from another in the system.
Navigation: Enter the Transporter ID manually (e.g., T100). This ID is used to track and identify the transporter in the system.
Transporter Name:
Description: The name of the transporter, which can be an individual or a company responsible for shipping.
Navigation: Enter the name of the transporter manually (e.g., Transporter Ltd.) in the corresponding text field.
Transporter ID/Name:
Description: A concatenated field showing both the Transporter ID and the Transporter Name for quick reference. This is auto-generated once the Transporter ID and Name are provided.
Navigation: This field is automatically generated after the Transporter ID and Name are entered. It displays the transporter as "T100: Transporter Ltd."
Address:
Description: The complete physical address of the transporter, which can include street, city, state, and country.
Navigation: Enter the transporter's address manually (e.g., 123 Main Street, Hyderabad) in the provided text field.
Country:
Description: The country in which the transporter is located or based.
Navigation: Select the country (e.g., India) from a dropdown list populated with available country options.
State:
Description: The state or region within the country where the transporter operates.
Navigation: Enter the state manually (e.g., Telangana) or choose it from a dropdown list populated with available options.
City:
Description: The specific city or town where the transporter is based.
Navigation: Enter the city manually (e.g., Hyderabad) in the corresponding text field.
Phone Number:
Description: The phone number for the transporter, used for direct communication.
Navigation: Enter the phone number (e.g., 8888866666) manually into the provided text field.
Email ID:
Description: The email address used to contact the transporter for coordination and official communication.
Navigation: Enter the transporter's email ID (e.g., [email protected]) manually in the provided text field.
Pin:
Description: The postal or ZIP code of the transporter's address, used for delivery and correspondence purposes.
Navigation: Enter the postal PIN code (e.g., 500038) manually in the provided field.
SPOC Name:
Description: The name of the Single Point of Contact (SPOC) responsible for communication with the transporter.
Navigation: Enter the name of the SPOC (e.g., Raj) manually in the text field.
SPOC Number:
Description: The phone number of the SPOC, for direct communication regarding transport issues.
Navigation: Enter the SPOC's phone number (e.g., 998989878) manually in the provided field.
SPOC Email ID:
Description: The email address of the SPOC for communication.
Navigation: Enter the email ID of the SPOC (e.g., [email protected]) manually in the text field.
Bank Name:
Description: The name of the bank with which the transporter holds an account.
Navigation: Enter the bank name (e.g., State Bank of India) manually in the corresponding text field.
Account Number:
Description: The unique bank account number for the transporter, used for financial transactions.
Navigation: Enter the account number (e.g., 54321) manually in the field provided.
Account Holder Name:
Description: The name of the person or company that owns the bank account for the transporter.
Navigation: Enter the name of the account holder (e.g., Raj) manually.
Account Type:
Description: The type of bank account (e.g., savings, current) used by the transporter for financial transactions.
Navigation: Enter the account type (e.g., Savings) manually in the provided text field.
IFSC Code:
Description: The Indian Financial System Code (IFSC) assigned to the transporter's bank branch for electronic transfers.
Navigation: Enter the IFSC code (e.g., SBIN0001234) manually in the corresponding field.
Bank Address:
Description: The address of the transporter's bank branch.
Navigation: Enter the bank address (e.g., Hyderabad Branch) manually in the text field.
PAN:
Description: The Permanent Account Number (PAN) issued to the transporter for tax identification purposes.
Navigation: Enter the PAN (e.g., ABCDE1234F) manually in the corresponding field.
ABC-XYZ Class
Here is the meaning of the field for the Description along with Navigation for the fields
Class Name:
Description: The name or identifier assigned to a specific class or category within the system. It helps to categorize items or data under a particular classification.
Navigation: Enter the class name manually (e.g., A) to specify the class for the selected type.
Type:
Description: Specifies the category or classification type that the class belongs to. This can represent a group such as ABC, XYZ, etc., to define the classification type.
Navigation: Select the type (e.g., ABC) from a pre-populated dropdown list of available types.
Class Description:
Description: Provides additional details or context about the class. It is used to explain the purpose or characteristics of the class to offer more insight.
Navigation: Enter the class description (e.g., "This is for type A") manually, offering more context to the class.
Value:
Description: Represents a numeric or qualitative value assigned to the class. This could be a quantity, price, or any measurable attribute associated with the class.
Navigation: Input the value manually (e.g., 10) to associate a specific numerical or qualitative value with the class type.
Organization
Organization refers to the structure and configuration of the warehouse and its operational entities. This includes the warehouse itself, its departments, teams, locations, and roles that are involved in the movement and management of goods within the system. The organization component in a WMS ensures that all aspects of the warehouse are aligned, well-coordinated, and functioning efficiently, allowing for smooth operations and inventory management.
Here is the meaning of the field for the Description along with Navigation for the fields
Organization ID:
Description: A unique identifier for the organization in the system.
Navigation: Input the Organization ID (e.g., O1001) manually. This ID will be used to distinguish the organization from others in the system.
Organization Name:
Description: The official name of the organization.
Navigation: Input the Organization Name (e.g., ORG1) manually. This is used to refer to the organization by its legal or registered name.
Organization ID/Name:
Description: A combination of Organization ID and Organization Name, auto-generated for clarity and consistency.
Navigation: This field auto-populates after entering the Organization ID and Name (e.g., O1001:ORG1). It is read-only and ensures both identifiers are consistent.
Parent Organization:
Description: The larger organization to which the current organization is subordinate.
Navigation: Select the Parent Organization (e.g., ORG 1: INDIA) from the dropdown list, populated from the Organization Master. This field helps establish the hierarchical structure.
Contact Name:
Description: The name of the main point of contact within the organization.
Navigation: Input the Contact Name (e.g., Raj) manually. This is the person responsible for communications with the system.
Email ID:
Description: The email address associated with the organization.
Navigation: Input the Email ID (e.g., [email protected]) manually. This email is used for correspondence and notifications related to the organization.
Phone Number:
Description: The contact phone number for the organization.
Navigation: Input the Phone Number (e.g., 9999955555) manually. This phone number is used for direct contact with the organization.
Operational Unit:
Description: Indicates whether the organization is a part of operations (operational unit) in the system.
Navigation: Check the checkbox if the organization is an operational unit. The default value is TRUE, indicating it is operational.
Address:
Description: The physical location of the organization.
Navigation: Input the Address (e.g., HYD) manually. This address is used for shipping, billing, and other logistical purposes.
Country:
Description: The country where the organization is based.
Navigation: Choose the Country (e.g., INDIA) from the dropdown list, populated from the Column Master. This indicates the country of operations.
State:
Description: The state in which the organization is located.
Navigation: Choose the State (e.g., AP) from the dropdown list, populated from the Column Master. This field helps narrow down the geographical location.
City:
Description: The city in which the organization operates.
Navigation: Input the City (e.g., HYD) manually. This provides further specification to the organization's location.
Pin Code:
Description: The postal code for the organization's address.
Navigation: Input the Pin code (e.g., 500038) manually. This helps with the accurate location identification for deliveries and correspondence.
GST Number:
Description: The Goods and Services Tax number assigned to the organization.
Navigation: Input the GST Number (e.g., 12121) manually. This number is used for tax purposes in India.
PAN Number:
Description: The Permanent Account Number assigned to the organization by the Income Tax Department in India.
Navigation: Input the PAN Number (e.g., GTBSPB2145Q) manually. This is required for tax filing and financial transactions in India.
TAX
Tax management refers to the handling and application of various taxes (such as sales tax, value-added tax (VAT), excise duty, or import/export duties) during the warehousing and distribution processes. Tax management within a WMS is essential for ensuring that goods stored, picked, packed, or shipped are in compliance with the applicable tax regulations in different regions, countries, or even local jurisdictions. The system supports seamless calculation, collection, and reporting of taxes across different phases of the supply chain, helping businesses avoid legal complications and optimize their tax operations.
Here is the meaning of the field for the Description along with Navigation for the fields
Country:
Description: This field specifies the country for which the tax details are being configured. It helps in identifying the location to which the tax rules apply.
Navigation: Choose the Country (e.g., INDIA) from the dropdown list. The list is populated from the Parameters.
State:
Description: This field defines the state within the country where the tax details are being entered. The tax rules might vary based on the state, and this field helps associate the tax data with the correct state.
Navigation: Choose the State (e.g., SMALLWARE) from the dropdown list. The list is populated from the State Master.
HSN Code:
Description: The HSN (Harmonized System of Nomenclature) code is a unique identifier used for categorizing goods and services for taxation purposes. It is required for accurate tax classification and reporting.
Navigation: Enter the HSN Code (e.g., H1) manually. This field is used to store the HSN code for the selected country and state.
Tax Name:
Description: This field allows you to define the name of the tax (e.g., GST). It is essential for identifying the tax applied to the specific country and state.
Navigation: Enter the Tax Name (e.g., GST) manually. This field stores the name of the tax for the selected country and state.
Tax Percentage:
Description: This field defines the percentage rate of the tax. It indicates the amount or proportion of the tax to be applied to the taxable value.
Navigation: Enter the Tax Percentage (e.g., 10.1) manually. This field stores the tax percentage for the selected country and state.
Product Category Group
Product Category Grouping refers to the classification of products into specific groups or categories based on common characteristics, such as type, usage, handling requirements, or sales patterns. This classification enables more efficient warehouse operations, including storage, picking, packing, and inventory control. By grouping similar products together, a WMS can optimize inventory management, streamline workflows, and enhance order fulfillment processes.
Here is the meaning of the field for the Description along with Navigation for the fields
Product Category Name:
Description: This field specifies the main product category for the group. It helps classify and group products under a broader category, such as "ALL DRINKS" or any other major classification.
Navigation: Choose the Product Category Name (e.g., ALL DRINKS) from the dropdown list. The list is populated from the Parameters.
Sub Category-1:
Description: This field allows you to select the first subcategory under the main product category. It helps further classify the products within the category.
Navigation: Choose the Sub Category-1 (e.g., SMALLWARE) from the dropdown list. The list is populated from the Parameters.
Sub Category-2:
Description: This field allows you to select the second subcategory under the main product category. It provides an additional level of categorization for more detailed classification.
Navigation: Choose the Sub Category-2 (e.g., Poultry) from the dropdown list. The list is populated from the Parameters.
Sub Category-3:
Description: This field allows you to select the third subcategory under the main product category. It further breaks down the products into a more granular classification.
Navigation: Choose the Sub Category-3 (e.g., Butter) from the dropdown list. The list is populated from the Parameters.
State
State refers to the various statuses or conditions that an inventory item, order, or warehouse process can be in at any given time. These states are essential for tracking the flow of goods, managing warehouse operations, and ensuring the efficient execution of tasks. The concept of state helps the WMS monitor the progress of inventory items, orders, shipments, and other warehouse activities as they move through different stages of fulfillment.
Here is the meaning of the field for the Description along with Navigation for the fields
Country:
Description: The Country field represents the nation in which the state is located. It serves as a higher-level geographical classification, grouping states under a specific country.
Navigation: Choose the Country (e.g., INDIA) from the dropdown list. The list is populated from the Parameters.
State Name:
Description: The State Name field represents the specific state within the selected country. It is used to define the geographical region for the country.
Navigation: Manually enter the State Name (e.g., AP) for the selected country.
Goods Receiving
A Goods Receiving Report is a critical document in warehouse management that records the details of items received into a warehouse. It serves as an official acknowledgment that goods have been delivered to the warehouse, and it is essential for tracking inventory, verifying deliveries, and maintaining accurate records. In a Warehouse Management System (WMS), the GRR plays an important role in streamlining and automating warehouse operations, ensuring smooth goods receipt, and ensuring the accuracy of inventory levels.
Here is the meaning of the field for the Description along with Navigation for the fields
Order Type
Description: Identifies the type of order (e.g., Purchase Order).
Navigation: Select the order type from the dropdown list (fetched from a static list).
Supplier ID/Name
Description: The supplier's unique identifier or name (e.g., "S1:RAJ").
Navigation: Choose the supplier ID/name from the dropdown list (fetched from the Supplier Master).
Product ID/Name
Description: The unique identifier or name of the product being received (e.g., "P1:PRO1").
Navigation: Select the product ID/name from the dropdown list (fetched from the Product Master).
Customer Supplier Name
Description: The name of the customer or supplier (e.g., "KRISHNA").
Navigation: Choose the customer/supplier name from the dropdown list (fetched from the GRN screen).
Customer Supplier Address
Description: The address associated with the customer or supplier (e.g., "HYD").
Navigation: Select the customer/supplier address from the dropdown list (fetched from the GRN screen).
GRN From
Description: The starting date for the Goods Receipt Note (GRN).
Navigation: Manually select the start date from the calendar.
GRN To
Description: The ending date for the Goods Receipt Note (GRN).
Navigation: Manually select the end date from the calendar.
Goods Receiving Values
Description: Indicates whether to include price details for generating the report (e.g., TRUE/FALSE).
Navigation: Check the checkbox to include price details when generating the report.
Download Icon
Description: An icon for downloading the generated data in Excel format.
Navigation: Click on the Download icon to export the data to Excel.
PDF Icon
Description: An icon for downloading the generated data in PDF format.
Navigation: Click on the PDF icon to export the data to PDF.
Putaway
The Put away Report in a Warehouse Management System is a critical tool that guides the warehouse staff in efficiently storing incoming goods in designated locations within the warehouse. It helps ensure that products are moved to the correct storage areas, optimizing space utilization, improving inventory accuracy, and speeding up retrieval times for future orders.
Here is the meaning of the field for the Description along with Navigation for the fields
Order Type
Description: Defines the type of order (e.g., Purchase order) associated with the putaway process.
Navigation: Select the Order Type from a dropdown list, which is populated from a static dropdown list containing predefined order types.
Supplier
Description: Refers to the Supplier ID/Name (e.g., "S1:RAJ") providing the goods for putaway.
Navigation: Select the Supplier from a dropdown list, which is populated from the Supplier Master database.
Assigned
Description: Specifies the executive or person responsible for the putaway task (e.g., "E1:RAJESH").
Navigation: Select the Assigned Executive from a dropdown list, which is populated from the Executive Master database.
Zone
Description: Indicates the storage zone where the goods are to be placed (e.g., "ZONE 1").
Navigation: Select the Zone from a dropdown list, which is populated from the Zone Master database.
Rack
Description: Refers to the specific rack within the selected zone where the goods will be placed (e.g., "RACK 1").
Navigation: Select the Rack from a dropdown list, which will display only the racks available in the selected zone.
Level
Description: Specifies the level or storage position within the selected rack (e.g., "Location 1").
Navigation: Select the Level from a dropdown list, which is populated with locations mapped to the selected Zone and Rack.
Location
Description: Identifies the specific location within the selected rack where the goods are to be placed (e.g., "LEVEL 1").
Navigation: Select the Location from a dropdown list, which will display locations mapped to the selected Rack.
Created From
Description: Specifies the start date for the report or filtering criteria (e.g., "12/1/2024").
Navigation: Manually select the Created From date from the calendar widget.
Created To
Description: Specifies the end date for the report or filtering criteria (e.g., "12/1/2024").
Navigation: Manually select the Created To date from the calendar widget.
Status
Description: Indicates whether the report should include status-related data for generating the putaway report (e.g., TRUE/FALSE).
Navigation: Select the checkbox to include the status details in the report for processing putaway data.
Download Icon
Description: Allows the user to download the generated putaway report in Excel format.
Navigation: Click on the Download icon to export the report to an Excel file.
PDF Icon
Description: Allows the user to download the generated putaway report in PDF format.
Navigation: Click on the PDF icon to export the report to a PDF file.
Putaway History
The Putaway History Report in a Warehouse Management System (WMS) is an essential tool that tracks the history of putaway activities within the warehouse. It provides a detailed record of when goods were received, where they were placed, and the personnel responsible for their storage. This report plays a key role in ensuring the efficient management of warehouse operations, inventory control, and traceability.
Here is the meaning of the field for the Description along with Navigation for the fields
Order Type
Description: Specifies the type of order related to the putaway process, such as Purchase Order, which defines the source of the goods being put away.
Navigation: Select the Order Type from a dropdown list, which is populated from a static dropdown list containing predefined order types (e.g., Purchase Order, Transfer Order).
Order Number
Description: The Order Number is a unique identifier for the purchase or transfer order related to the goods being put away.
Navigation: Select the Order Number from a dropdown list, which is populated with existing order numbers from the Purchase Order Master.
Supplier
Description: Identifies the supplier of the goods being put away. This could be the supplier's ID or name (e.g., "E1:RAJESH").
Navigation: Select the Supplier from a dropdown list, which is populated from the Supplier Master.
Customer
Description: Represents the customer or client associated with the goods. It could be the name or identifier of the customer. In some cases, it may also represent an internal classification, such as a storage zone assigned to a customer.
Navigation: Select the Customer from a dropdown list, which is populated from the Customer Master.
Warehouse
Description: Specifies the warehouse where the goods are being stored or placed. This helps in tracking the physical location of goods within different facilities.
Navigation: Select the Warehouse from a dropdown list, which is populated from the Warehouse Master.
Zone
Description: Refers to the storage zone within the warehouse where the goods will be placed, such as Zone 1 or Zone 2. Zones are often used to group products by type, size, or frequency of use.
Navigation: Select the Zone from a dropdown list, which is populated from the Zone Master.
Location
Description: Specifies the location or specific storage area within the chosen zone where the goods will be stored. For example, Location 1 within Zone 1.
Navigation: Select the Location from a dropdown list, which will display only the locations available in the selected Zone (populated from the Location Master).
Employee
Description: Refers to the employee or warehouse executive responsible for the putaway task (e.g., "E1:RAJESH"). This helps track who performed the putaway activity.
Navigation: Select the Employee from a dropdown list, which is populated from the Executive Master.
Download Icon
Description: An icon that allows the user to download the generated Putaway History Report in Excel format.
Navigation: Click the Download icon to export the data to an Excel file for offline use, analysis, or sharing.
PDF Icon
Description: An icon that enables the user to download the Putaway History Report in PDF format for easy viewing, printing, or sharing.
Navigation: Click the PDF icon to export the data to a PDF file for offline use, viewing, or distribution.
GRN Stage Transaction
The GRN (Goods Receipt Note) Stage Transaction Report in a Warehouse Management System (WMS) is a critical tool that provides a detailed account of all goods receipt transactions at various stages of the receiving process. The GRN is a key document in the warehouse receiving process that records the receipt of goods from suppliers, and the GRN Stage Transaction Report helps track the flow of goods as they progress through different stages, from receipt to putaway.
Here is the meaning of the field for the Description along with Navigation for the fields
Order Type
Description: Represents the type of order related to the goods receipt process, such as Purchase Order. It is used to classify the type of transaction being recorded in the GRN report.
Navigation: Select the Order Type from a dropdown list, which is populated with predefined values from a static dropdown list (e.g., Purchase Order).
Supplier
Description: Identifies the supplier providing the goods. This could include supplier IDs or names (e.g., "E1: RAJESH").
Navigation: Select the Supplier from a dropdown list, which is populated from the Supplier Master database.
Customer Supplier Name
Description: Represents the name of the customer's supplier, often referring to the third-party vendor or distributor handling the goods.
Navigation: Select the Customer Supplier Name from a dropdown list, which is populated from the GRN screen data.
Customer's Supplier Address
Description: The address of the customer's supplier (e.g., "HYD" for Hyderabad). This is important for tracking where goods are coming from and for shipping or compliance purposes.
Navigation: Select the Customer's Supplier Address from a dropdown list, populated from the GRN screen data.
Product
Description: Specifies the product being received, including product ID and name (e.g., "P1:FRUITY"). It helps identify the specific goods related to the GRN stage transaction.
Navigation: Select the Product from a dropdown list, populated from the Product Master.
Status
Description: Represents the status of the GRN transaction (e.g., Pending, Completed, All). This helps filter records based on their stage in the receiving process.
Navigation: Select the Status using radio buttons (e.g., All, Pending, Completed). The user will manually select the appropriate status to filter the report.
GRN From
Description: Specifies the start date for the GRN report, helping filter the data by date range. The field allows the user to select a start date for when the goods receipt occurred.
Navigation: Select the GRN From date manually from a calendar pop-up, indicating the starting date of the report.
GRN To
Description: Specifies the end date for the GRN report. It allows filtering of the report based on a date range, helping users view the data for a specific period.
Navigation: Select the GRN To date manually from a calendar pop-up, indicating the end date for the report.
Download Icon
Description: An icon used for downloading the generated GRN Stage Transaction report in Excel format. This is useful for offline use or further data analysis.
Navigation: Click the Download icon to export the report to an Excel file.
PDF Icon
Description: An icon used for downloading the generated GRN Stage Transaction report in PDF format. This is ideal for easy viewing, printing, or sharing the report.
Navigation: Click the PDF icon to export the report to a PDF file.
GRN Stage Summary
The GRN Stage Summary Report in a Warehouse Management System is a high-level summary that provides a snapshot of all goods receipt transactions processed through various stages in the warehouse. This report aggregates key data about goods received, suppliers, orders, and the status of the GRN process. It serves as a management tool that allows warehouse managers, procurement teams, and other stakeholders to quickly assess the progress and status of goods receipt transactions, identify bottlenecks, and ensure smooth warehouse operations.
Here is the meaning of the field for the Description along with Navigation for the fields
Product
Description: This field represents the product being tracked in the GRN (Goods Receipt Note) process. It includes the Product ID (e.g., "P1:Product 1") and helps in identifying the goods that have been received. The user can filter the report based on specific products.
Navigation: Select the Product from a dropdown list, which is populated from the Product Master database. The list will display the available products, and the user will choose the relevant product for the report.
Status
Description: This field represents the status of the GRN transaction. Common status options might include "All," "Pending," "Completed," or "In Progress." The status helps filter the report based on the current stage of the goods receipt process.
Navigation: Select the Status using radio buttons (e.g., "All," "Pending," "Completed"). The user will manually choose the status that fits the report's desired focus.
Download Icon
Description: An icon used to download the generated GRN Stage Summary report in Excel format. This allows the user to save the data locally for further analysis, offline use, or sharing with stakeholders.
Navigation: Click the Download icon to export the report data to an Excel file format.
PDF Icon
Description: An icon used to download the generated GRN Stage Summary report in PDF format. This is ideal for creating a printable version of the report or for sharing with others who may need the data in a non-editable format.
Navigation: Click the PDF icon to export the report data to a PDF file format.
GRN Summary
The GRN Summary in a Warehouse Management System is a crucial report that provides a consolidated overview of all goods receipt transactions that have been processed through the warehouse. This summary report serves as a tool for tracking and managing the flow of goods from suppliers into the warehouse, ensuring that items are correctly received, recorded, and processed.
Here is the meaning of the field for the Description along with Navigation for the fields
Order Type
Description: This field represents the type of order related to the goods receipt process, such as Purchase Order. It is used to classify the transaction in the GRN summary.
Navigation: Select the Order Type from a dropdown list, which is populated with predefined values (e.g., Purchase Order) from a static dropdown list.
Supplier
Description: This field identifies the supplier providing the goods. It can include the supplier's ID or name (e.g., "E1:RAJESH") and helps link the GRN with specific suppliers.
Navigation: Select the Supplier from a dropdown list, populated from the Supplier Master database.
Product
Description: Represents the product being tracked in the GRN summary report. The product can be identified by its Product ID and name (e.g., "P1:FRUITY").
Navigation: Select the Product from a dropdown list, populated from the Product Master database.
Serial Number
Description: This field represents the serial number of the product being received. It is particularly useful for products that require serial number tracking.
Navigation: Select the Serial Number from a dropdown list, populated from the GRN screen data based on products being received.
Serial Number Configuration
Description: This button allows the user to choose whether to generate the GRN summary serial number-wise. If the user needs to see details about each serial number, they will click "Yes." After clicking "Yes," the serial number data will appear in the dropdown and the associated table.
Navigation: Click the Serial Number Configuration button. If the user selects "Yes," the Serial Number dropdown and corresponding data table will become available for viewing and further analysis.
GRN Summary Values
Description: A checkbox that, when selected, enables the inclusion of price details in the GRN summary report. This is useful for financial tracking or analysis of the cost of goods received.
Navigation: Select the checkbox to include price details in the generated report.
GRN From
Description: Specifies the start date for the GRN report. This allows the user to filter records based on the start date of goods receipt transactions.
Navigation: Select the GRN From date manually from the calendar pop-up to indicate the beginning date for the report.
GRN To
Description: Specifies the end date for the GRN report. This allows the user to filter records based on the end date of the goods receipt transactions.
Navigation: Select the GRN To date manually from the calendar pop-up to indicate the end date for the report.
Status
Description: This field allows users to filter the GRN transactions based on their status (e.g., "All," "Pending," "Completed"). It helps to view only specific transactions based on their current status in the receiving process.
Navigation: Select the Status using radio buttons (e.g., "All," "Pending," "Completed"). The user will manually choose the appropriate status to filter the report.
Download Icon
Description: An icon used to download the generated GRN Summary report in Excel format. This is useful for offline use or further data analysis.
Navigation: Click the Download icon to export the report data to an Excel file format.
PDF Icon
Description: An icon used to download the generated GRN Summary report in PDF format. This is ideal for creating a printable version of the report or for sharing with others in a non-editable format.
Navigation: Click the PDF icon to export the report data to a PDF file format.
GRN History
The Goods Receipt Note (GRN) History Report is a critical tool in the Warehouse Management System (WMS) that helps track and manage the history of goods receipt transactions. It provides a detailed record of all goods received, from their initial receipt through to the final processing stage. This report is particularly useful for auditing, traceability, and operational analysis.
Here is the meaning of the field for the Description along with Navigation for the fields
Order Type
Description: Represents the type of order associated with the goods receipt transaction, such as "Purchase Order". This field classifies the transaction type and helps filter the data accordingly.
Navigation: Select the Order Type from a dropdown list, which is populated from a static dropdown list (e.g., "Purchase Order").
Product
Description: Specifies the product associated with the GRN history. This could include a product ID and name (e.g., "P1:FRUITY") to help identify the product for the report.
Navigation: Select the Product from a dropdown list, populated with data from the Product Master.
Category
Description: Represents the category of products for filtering the GRN history (e.g., "ALL DRINKS"). This helps group and filter the GRN report based on product categories.
Navigation: Select the Category from a dropdown list, which is populated from predefined categories or parameters.
Supplier
Description: Identifies the supplier from which the goods were received. This field helps filter the GRN history by a specific supplier (e.g., "E1:RAJESH").
Navigation: Select the Supplier from a dropdown list, which is populated from the Supplier Master.
Region
Description: Specifies the region or location associated with the supplier (e.g., "HYD" for Hyderabad). This helps filter the report based on geographic regions.
Navigation: Select the Region from a dropdown list, which is populated from the selected supplier's cities in the Supplier Master.
Customers Supplier Name
Description: Represents the name of the customer's supplier, often referring to a third-party vendor or distributor. This field helps identify specific suppliers associated with customer transactions.
Navigation: Select the Customer Supplier Name from a dropdown list, populated from the GRN screen data.
Date Filter
Description: Defines the date range for the GRN history report, such as "Last 6 months". This helps filter the data based on a specific time period.
Navigation: Select the Date Filter from a dropdown list, which provides predefined options like "Last 6 months", "Last 12 months", etc.
Customer's Supplier Address
Description: The address of the customer's supplier (e.g., "HYD" for Hyderabad). This is important for tracking where the goods are coming from and for addressing or compliance purposes.
Navigation: Select the Customer's Supplier Address from a dropdown list, populated from the GRN screen data.
Download Icon
Description: An icon used for downloading the generated GRN history report in Excel format. This is useful for offline use or further data analysis.
Navigation: Click on the Download icon to export the report to an Excel file.
PDF Icon
Description: An icon used for downloading the generated GRN history report in PDF format. This is ideal for viewing, printing, or sharing the report in a portable format.
Navigation: Click on the PDF icon to export the report to a PDF file.
Inventory Summary
The Inventory Summary Report in a Warehouse Management System (WMS) offers an overview of the current stock levels across various warehouse locations, providing a consolidated view of all inventory items within the system. This report is crucial for warehouse managers, inventory controllers, and supply chain teams to monitor the quantity, status, and movement of goods, enabling better decision-making, resource allocation, and inventory planning.
Here is the meaning of the field for the Description along with Navigation for the fields
Warehouse
Description: Represents the specific warehouse from which the inventory summary report will be generated. It helps to filter data based on the warehouse location (e.g., "RACK 1").
Navigation: Select the Warehouse from a dropdown list, populated from the Warehouse Master.
Zone
Description: Refers to a specific zone within the warehouse where the inventory is stored. Zones are generally used to organize inventory into logical groups (e.g., "ZONE 1").
Navigation: Select the Zone from a dropdown list, populated from the Zone Master.
Rack
Description: Specifies the rack within the selected zone for which the inventory report is needed. A rack is a physical structure where products are stored (e.g., "RACK 1").
Navigation: Select the Rack from a dropdown list, populated from the Location Master, filtered by the selected zone.
Level
Description: Represents the storage level within the rack where the product is stored (e.g., "LEVEL 1"). This further helps in narrowing down the location within the rack.
Navigation: Select the Level from a dropdown list, populated from the Level Master, filtered by the selected rack.
Location
Description: Refers to the exact location within the warehouse where the inventory is stored (e.g., "LOCATION 1"). This helps pinpoint the exact spot of inventory.
Navigation: Select the Location from a dropdown list, populated from the Location Master, filtered by the selected level.
Product
Description: Specifies the product for which the inventory summary is being generated. This could include product IDs and names (e.g., "P1: PRODUCT 1").
Navigation: Select the Product from a dropdown list, populated from the Product Master.
From (Date)
Description: Defines the starting date for the inventory report, filtering the data to only include records from this date onward (e.g., "12/1/2024").
Navigation: Select the From Date manually from a calendar pop-up.
To (Date)
Description: Defines the ending date for the inventory report, filtering the data to only include records up to this date (e.g., "12/1/2024").
Navigation: Select the To Date manually from a calendar pop-up.
Download Icon
Description: An icon used for downloading the generated inventory summary report in Excel format. This allows for offline analysis or sharing.
Navigation: Click the Download icon to export the data to Excel.
PDF Icon
Description: An icon used for downloading the generated inventory summary report in PDF format. Ideal for viewing, printing, or sharing in a standard portable format.
Navigation: Click the PDF icon to export the data to PDF.
Inventory
The Inventory Report in a Warehouse Management System (WMS) provides an in-depth overview of the stock levels, product movements, and inventory health across a warehouse or a set of warehouses. It serves as a key tool for warehouse managers, inventory controllers, and logistics teams to track inventory in real-time, manage stock levels, and optimize storage operations.
Here is the meaning of the field for the Description along with Navigation for the fields
Product
Description: Represents the product for which inventory information is being queried. This can include the product ID and name (e.g., "P1:FRUITY").
Navigation: Select the Product from a dropdown list, populated from the Product Master.
Category
Description: Represents the category to which the product belongs (e.g., "ALL DRINKS"). It is used to filter products based on their category.
Navigation: Select the Category from a dropdown list, populated from predefined parameters or categories.
Zone
Description: Specifies the zone within the warehouse where the inventory is stored (e.g., "RACK 1"). This helps in filtering inventory based on storage location.
Navigation: Select the Zone from a dropdown list, populated from the Zone Master.
Expiry Date From
Description: Specifies the start date for filtering inventory based on the product's expiry date. It helps focus on products that are set to expire within a specific range.
Navigation: Select the Expiry Date From manually using the calendar pop-up.
Expiry Date To
Description: Specifies the end date for filtering inventory based on the product's expiry date. This allows users to filter products expiring by the specified end date.
Navigation: Select the Expiry Date To manually using the calendar pop-up.
Product Description
Description: Provides additional descriptive information about the product (e.g., "P1: PRODUCT 1"). It helps in identifying products more clearly.
Navigation: Select the Product Description from a dropdown list, populated from the Product Master.
Supplier
Description: Represents the supplier providing the product (e.g., "E1:RAJESH"). This is important for tracking where products are sourced.
Navigation: Select the Supplier from a dropdown list, populated from the Supplier Master.
Batch Number
Description: Refers to the batch number associated with the product (e.g., "B100"). It helps track inventory by specific batch, often used for traceability.
Navigation: Select the Batch Number from a dropdown list, populated from the Inventory data.
Created Date From
Description: Specifies the start date for filtering inventory records based on when they were created in the system.
Navigation: Select the Created Date From manually using the calendar pop-up.
Created Date To
Description: Specifies the end date for filtering inventory records based on when they were created in the system.
Navigation: Select the Created Date To manually using the calendar pop-up.
Rack Name
Description: Specifies the rack within the warehouse where the product is stored (e.g., "RACK 1"). It helps narrow down the inventory query to a specific rack.
Navigation: Select the Rack Name from a dropdown list, populated from the available racks within the selected zone.
Location Name
Description: Refers to the specific location within the warehouse where the product is stored (e.g., "Location 1"). It further narrows the search to the exact location of the inventory.
Navigation: Select the Location Name from a dropdown list, populated from the available locations mapped to the selected zone, rack, and level.
Serial Number
Description: Refers to the serial number of the product for more precise tracking (e.g., "S1"). This field is particularly useful for serialized products.
Navigation: Select the Serial Number from a dropdown list, populated from the Inventory data.
MFG Date From
Description: Specifies the start date for filtering inventory based on the manufacturing date of the products. This helps track when the products were produced.
Navigation: Select the MFG Date From manually using the calendar pop-up.
MFG Date To
Description: Specifies the end date for filtering inventory based on the manufacturing date of the products.
Navigation: Select the MFG Date To manually using the calendar pop-up.
Download Icon
Description: An icon used for downloading the generated inventory report in Excel format, suitable for offline analysis or further data manipulation.
Navigation: Click the Download icon to export the data to Excel.
PDF Icon
Description: An icon used for downloading the generated inventory report in PDF format. Ideal for sharing or printing in a fixed, portable format.
Navigation: Click the PDF icon to export the data to PDF.
Cycle Counting
The Cycle Counting Report in a Warehouse Management System (WMS) is a critical tool for ongoing inventory accuracy and management. It helps organizations ensure that stock levels in the warehouse are correct and match the actual inventory. Unlike traditional annual physical inventories, cycle counting is an ongoing process where a subset of inventory items is counted on a regular basis throughout the year.
Here is the meaning of the field for the Description along with Navigation for the fields
Warehouse
Description: Represents the specific warehouse where the cycle count is being performed (e.g., "W1: WAREHOUSE 1"). It helps filter the report based on the selected warehouse.
Navigation: Select the Warehouse from a dropdown list, populated from the Warehouse Master.
Zone
Description: Represents the warehouse zone within which the cycle counting is being performed (e.g., "ZONE 1"). This helps narrow down the scope of inventory counts based on zones within the warehouse.
Navigation: Select the Zone from a dropdown list, populated from the Zone Master.
Rack
Description: Refers to the specific rack within the selected warehouse zone where the product is stored (e.g., "RACK 1"). This allows filtering based on rack location.
Navigation: Select the Rack from a dropdown list, populated from the Rack Master.
Level
Description: Represents the level within the rack where the product is stored (e.g., "LEVEL 1"). This helps to further narrow down the location of the product within the rack.
Navigation: Select the Level from a dropdown list, populated from the Level Master.
Location
Description: Refers to the exact location within the warehouse where the inventory is being counted (e.g., "LOCATION 1"). This is used to filter the cycle count data by location.
Navigation: Select the Location from a dropdown list, populated from the Location Master.
Product
Description: Represents the product being counted in the cycle counting process (e.g., "P1:FRUITY"). This helps filter the cycle counting report by the specific product.
Navigation: Select the Product from a dropdown list, populated from the Product Master.
Confirmed By
Description: Specifies the executive or user who confirmed the cycle count (e.g., "E1:RAJESH"). This helps track who performed the final validation of the cycle count.
Navigation: Select the Confirmed By from a dropdown list, populated from the Executive Master.
Counter User
Description: Represents the executive or user who physically performed the cycle count (e.g., "E1:RAJESH"). This helps track the person responsible for conducting the inventory count.
Navigation: Select the Counter User from a dropdown list, populated from the Executive Master.
Submit From
Description: Specifies the start date for the cycle count, allowing users to filter records based on the date the count was submitted (e.g., "12/1/2024").
Navigation: Select the Submit From date manually using the calendar pop-up.
Submit To
Description: Specifies the end date for the cycle count, allowing users to filter records based on the date the count was submitted (e.g., "12/1/2024").
Navigation: Select the Submit To date manually using the calendar pop-up.
Download Icon
Description: An icon used for downloading the generated cycle counting report in Excel format. This is useful for offline analysis or further data manipulation.
Navigation: Click the Download icon to export the data to Excel.
PDF Icon
Description: An icon used for downloading the generated cycle counting report in PDF format. This is ideal for sharing, printing, or viewing the report in a portable format.
Navigation: Click the PDF icon to export the data to PDF.
Inventory Adjustments
Inventory Adjustments in a Warehouse Management System (WMS) refer to the process of manually or automatically modifying the inventory records to reflect changes in stock levels. These adjustments are made to correct discrepancies between the actual physical inventory and the system's recorded data. The need for inventory adjustments arises due to various factors such as stock damage, theft, misplacement, administrative errors, and regular stock-taking processes like cycle counting.
Here is the meaning of the field for the Description along with Navigation for the fields
Product
Description: Specifies the product for which inventory adjustments are being tracked. This could be an individual product ID or name (e.g., "P1:Fruity").
Navigation: Select the Product from a dropdown list, which is populated from the Product Master.
Created From
Description: The start date for filtering inventory adjustments. It indicates the beginning of the date range during which the inventory adjustments were made.
Navigation: Select the Created From date manually using the calendar pop-up to choose the starting date for filtering.
Created To
Description: The end date for filtering inventory adjustments. It indicates the end of the date range during which the inventory adjustments were made.
Navigation: Select the Created To date manually using the calendar pop-up to choose the ending date for filtering.
Download Icon
Description: An icon that allows the user to download the generated inventory adjustments report in Excel format. This is useful for offline review or data manipulation.
Navigation: Click the Download icon to export the report data to Excel.
PDF Icon
Description: An icon that allows the user to download the generated inventory adjustments report in PDF format. This is useful for viewing or sharing the report in a standardized format.
Navigation: Click the PDF icon to export the report data to PDF.
Inventory By Location
The Inventory by Location Report in a Warehouse Management System (WMS) is a critical tool that provides detailed insights into the quantity, status, and distribution of inventory across various storage locations within a warehouse or across multiple warehouse sites. This report is designed to help warehouse managers, inventory controllers, and supply chain teams track the availability and movement of products at a granular level, providing transparency and enabling more efficient inventory management.
Here is the meaning of the field for the Description along with Navigation for the fields
Product
Description: Specifies the product for which the inventory by location is being tracked. The user can select a specific product ID or name (e.g., "P1: Fruity").
Navigation: Select the Product from a dropdown list, populated from the Product Master.
Category
Description: Specifies the category of the product (e.g., "ALL DRINKS"). It helps group products into specific categories for better filtering and reporting.
Navigation: Select the Category from a dropdown list, populated with predefined values, such as those available in the Parameters.
Product Type
Description: Defines the type of product, such as "Finished Product," "Raw Material," etc. This categorization helps in filtering inventory based on the type of product.
Navigation: Select the Product Type from a dropdown list, populated with static predefined values such as "Finished Product."
Warehouse
Description: Refers to the specific warehouse where the inventory is stored (e.g., "W1: WAREHOUSE 1").
Navigation: Select the Warehouse from a dropdown list, populated from the Warehouse Master.
Zone
Description: Refers to the specific zone within the warehouse where the product is stored (e.g., "Z1: ZONE 1").
Navigation: Select the Zone from a dropdown list, populated from the Zone Master.
Rack
Description: Specifies the rack where the product is stored within the selected zone (e.g., "RACK 1").
Navigation: Select the Rack from a dropdown list, populated from the Rack Master, based on the selected zone.
Location
Description: Specifies the exact location within the warehouse where the product is stored (e.g., "LOCATION 1").
Navigation: Select the Location from a dropdown list, populated from the Location Master. The available options will depend on the selected warehouse, zone, and rack.
Download Icon
Description: An icon used to download the generated inventory by location report in Excel format.
Navigation: Click the Download icon to export the data to Excel.
PDF Icon
Description: An icon used to download the generated inventory by location report in PDF format. This is useful for viewing or sharing the report in a fixed format.
Navigation: Click the PDF icon to export the data to PDF.
Inventory By Product
The Inventory by Product Report in a Warehouse Management System (WMS) is a key tool that provides detailed insights into the quantity, availability, and movement of products within a warehouse or across multiple warehouse locations. This report focuses on inventory levels organized by individual product IDs or product categories, allowing warehouse managers, inventory controllers, and supply chain teams to track stock at a granular level.
Here is the meaning of the field for the Description along with Navigation for the fields
Product
Description: A unique identifier for the product from the product master list. The user can select the product from a dropdown list that is populated from the Product Master.
Navigation: The user selects the product from a dropdown list, which fetches values from the Product Master table.
Product Type
Description: This indicates whether the product is a finished product, raw material, or semi-finished product. It is a predefined list of options (e.g., "Finished product").
Navigation: The user selects from a static dropdown list. The dropdown list is populated with predefined values that do not change dynamically, meaning it is not linked to any other table but is statically defined in the application.
Category
Description: The category of the product, which can be used to filter and group products (e.g., "ALL DRINKS"). The list is dynamic and can vary based on the available parameters or categories in the system.
Navigation: The user selects from a dropdown list, which fetches values dynamically from available parameters or categories.
Supplier
Description: A unique identifier or name of the supplier, selected from the Supplier Master table. The supplier could be an external entity or an internal supplier within the system.
Navigation: The user selects from a dropdown list, which fetches values from the Supplier Master table.
Batch Number
Description: The batch number uniquely identifies a set of products that were produced or received together. This helps track the products for quality control, recall, or inventory control.
Navigation: The user selects from a dropdown list, which is populated from existing inventory data (the batch numbers already in the system).
Serial Number
Description: The serial number is unique to each product, enabling detailed tracking (e.g., for warranties, repairs, or recalls). It is a unique identifier within the batch.
Navigation: The user selects from a dropdown list, which is populated from the existing inventory data (the serial numbers already in the system).
Zone
Description: A predefined area or zone in the warehouse where the product is stored. The zone may represent a physical location (e.g., Zone 1, Zone 2) or a logical grouping (e.g., cold storage).
Navigation: The user selects from a dropdown list, which fetches values from the Zone Master table.
Download Icon
Description: Clicking this icon will trigger the download of the current data displayed (likely an inventory report or product list) into an Excel file.
Navigation: The user clicks the Download icon, which prompts the system to download the data as an Excel file.
PDF Icon
Description: Clicking this icon will trigger the download of the current data displayed (likely an inventory report or product list) into a PDF file.
Navigation: The user clicks the PDF icon, which triggers the generation and download of the data as a PDF file.
Inventory Transaction
The Inventory by Transaction Report in a Warehouse Management System (WMS) provides a comprehensive overview of inventory movements and adjustments over time, organized by individual transactions. This report tracks all inventory-related activities, such as receipts, shipments, stock adjustments, and transfers, offering insights into how inventory is changing within the warehouse. By focusing on transaction-level details, it helps warehouse managers, inventory controllers, and financial teams analyze the history and impact of every inventory movement.
Here is the meaning of the field for the Description along with Navigation for the fields
Transaction Type
Description: This field indicates the type of inventory transaction being performed (e.g., "GOODS RECEIVING").
Navigation: User selects from a predefined dropdown list.
Order ID
Description: This field is used to select the specific order ID associated with the transaction (e.g., a Purchase Order number like "PO90").
Navigation: User selects an order ID from a dynamic dropdown, which filters based on the transaction type.
Transaction From
Description: This field allows the user to select the start date of the transaction.
Navigation: User manually selects a date using the calendar pop-up.
Transaction To
Description: This field allows the user to select the end date of the transaction.
Navigation: User manually selects a date using the calendar pop-up.
Warehouse
Description: This field indicates the warehouse where the transaction is occurring.
Navigation: User selects from a dropdown list populated from the warehouse master data.
Zone
Description: This field indicates the zone within the selected warehouse where the transaction is occurring.
Navigation: User selects from a dropdown list populated from the zone master data.
Rack
Description: This field indicates the specific rack in the selected zone where the transaction is occurring.
Navigation: User selects from a dropdown list populated from the rack master data.
Location
Description: This field indicates the specific location within the rack or zone for the transaction.
Navigation: User selects from a dropdown list populated from the location master data.
Product
Description: This field allows the user to select the product associated with the transaction (e.g., a specific product like "P1: Fruity").
Navigation: User selects from a dropdown list populated from the product master data.
Supplier
Description: This field allows the user to select the supplier related to the transaction (e.g., "S1: RAJ").
Navigation: User selects from a dropdown list populated from the supplier master data.
Customer
Description: This field allows the user to select the customer associated with the transaction (e.g., "C1: NEHA").
Navigation: User selects from a dropdown list populated from the customer master data.
Download Icon
Description: This icon allows the user to download the generated transaction data as an Excel file.
Navigation: User clicks the "Download" icon to initiate the download.
PDF Icon
Description: This icon allows the user to download the generated transaction data as a PDF.
Navigation: User clicks the "PDF" icon to initiate the download.
Inventory Transaction Details
The Inventory Transaction Details Report in a Warehouse Management System (WMS) provides a comprehensive, detailed record of every individual inventory transaction that occurs within the warehouse. This includes all types of inventory movements such as receipts, shipments, transfers, adjustments, and returns. By focusing on the specifics of each transaction—such as product details, quantities, transaction dates, and related user actions—the report allows warehouse managers, inventory controllers, and financial teams to track and analyze the complete history of inventory movements.
Here is the meaning of the field for the Description along with Navigation for the fields
Transaction Type
Description: This field represents the type of inventory transaction that is being recorded. In this case, "GOODS RECEIVING" refers to receiving goods into inventory from a supplier.
Navigation: User selects the transaction type from a static dropdown list (e.g., "GOODS RECEIVING").
Order ID
Description: This field captures the unique identifier for the order related to the transaction (e.g., "PO90" for Purchase Order). It links the transaction to a specific order.
Navigation: User selects an order ID from a dropdown list that dynamically filters based on the selected transaction type (e.g., purchase orders will show if "GOODS RECEIVING" is selected).
Transaction From
Description: This field indicates the start date of the transaction. It helps define the period during which the inventory transaction takes place.
Navigation: User manually selects the start date using a calendar pop-up interface.
Transaction To
Description: This field indicates the end date of the transaction. It marks the period when the inventory transaction is completed.
Navigation: User manually selects the end date using a calendar pop-up interface.
Warehouse
Description: This field specifies the warehouse where the inventory transaction will take place (e.g., "W1: WAREHOUSE 1").
Navigation: User selects the warehouse from a dropdown list populated from the warehouse master data.
Zone
Description: This field defines the specific zone within the selected warehouse where the transaction will occur (e.g., "ZONE 1").
Navigation: User selects the zone from a dropdown list populated from the zone master data.
Rack
Description: This field identifies the rack within the selected zone where the transaction will take place (e.g., "RACK 1").
Navigation: User selects the rack from a dropdown list populated from the rack master data.
Location
Description: This field represents the exact location within the selected rack or zone where the transaction will be processed (e.g., "LOCATION 1").
Navigation: User selects the location from a dropdown list populated from the location master data.
Product
Description: This field specifies the product involved in the transaction (e.g., "P1: Fruity"). It links the transaction to a specific product in the inventory.
Navigation: User selects the product from a dropdown list populated from the product master data.
Supplier
Description: This field represents the supplier from whom the goods are being received (e.g., "S1: RAJ").
Navigation: User selects the supplier from a dropdown list populated from the supplier master data.
Customer
Description: This field represents the customer to whom the goods might be linked, especially in the case of goods being received for a specific order.
Navigation: User selects the customer from a dropdown list populated from the customer master data.
Download Icon
Description: This icon allows the user to download the generated transaction data in an Excel format.
Navigation: User clicks on the "Download" icon to download the data in an Excel spreadsheet.
PDF Icon
Description: This icon allows the user to download the generated transaction data in a PDF format for reporting purposes.
Navigation: User clicks on the "PDF" icon to download the data in PDF format.
Open Sales Order
The Open Sales Order Report in a Warehouse Management System (WMS) provides a detailed view of all active or unfulfilled sales orders currently in the warehouse system. This report is crucial for tracking the status and progress of sales orders from the point of order creation to fulfillment. It lists all open (unshipped) sales orders, allowing warehouse managers, sales teams, and inventory planners to monitor pending orders, allocate resources effectively, and ensure timely order fulfillment.
Here is the meaning of the field for the Description along with Navigation for the fields
Order Type
Description: This field defines the type of order, such as "Purchase Order" or another predefined order type. It indicates what kind of order the user is working with.
Navigation: User selects the order type from a static dropdown list (e.g., "Purchase Order"). The list is predefined and fixed.
Customer
Description: This field allows the user to select the customer associated with the order. It could be a customer ID or name (e.g., "C1:NEHA").
Navigation: User selects the customer from a dropdown list populated from the customer master data. The list displays all available customers, and the user can select one.
Expected Delivery From
Description: This field represents the start date of the expected delivery window for the sales order. It marks when the order is expected to start being delivered.
Navigation: User selects the start date from a calendar pop-up interface. The user will manually choose the date from the calendar.
Expected Delivery To
Description: This field represents the end date of the expected delivery window for the sales order. It indicates when the delivery of the order is expected to be completed.
Navigation: User selects the end date from a calendar pop-up interface. The user will manually choose the date from the calendar.
Product
Description: This field allows the user to select the product(s) related to the sales order (e.g., "P1: Fruity"). The product selected will be tied to the order details.
Navigation: User selects the product from a dropdown list populated from the product master data. The list will include all available products, and the user can select the appropriate one.
Download Icon
Description: This icon allows the user to download the sales order details as an Excel file. The file will contain all the data related to the order, such as customer details, product, and delivery dates.
Navigation: User clicks the "Download" icon to trigger the download of the generated order data in Excel format.
PDF Icon
Description: This icon allows the user to download the sales order details as a PDF file. The PDF will typically contain a more formatted version of the order data for reporting or presentation purposes.
Navigation: User clicks the "PDF" icon to trigger the download of the generated order data in PDF format.
Picking
The Picking Report in a Warehouse Management System (WMS) is an essential tool that provides detailed instructions for warehouse staff to efficiently pick products for customer orders. This report is critical for optimizing the picking process, ensuring that the right products are selected in the right quantities, and are correctly prepared for packing and shipping.
Here is the meaning of the field for the Description along with Navigation for the fields
Order Type
Description: This field specifies the type of order being processed (e.g., "Sales Order"). It helps identify whether the picking process is related to sales orders or other types of orders.
Navigation: User selects the order type from a static dropdown list (e.g., "Sales Order"). The list is predefined and fixed.
Customer
Description: This field allows the user to select the customer related to the order for picking (e.g., "C1: NEHA"). It links the picking process to a specific customer’s order.
Navigation: User selects the customer from a dropdown list populated from the customer master data. The list shows all available customers, and the user can select one.
Assigned
Description: This field specifies the executive (e.g., "E1: RAJESH") responsible for performing the picking process. It assigns the task to a specific person or team.
Navigation: User selects the executive from a dropdown list populated from the executive master data. The list includes all available executives or personnel.
Zone
Description: This field defines the specific warehouse zone (e.g., "ZONE 1") where the picking task will occur. It helps narrow down the picking area within the warehouse.
Navigation: User selects the zone from a dropdown list populated from the zone master data. The dropdown will show all available zones.
Rack
Description: This field specifies the rack (e.g., "RACK 1") within the selected zone where the items to be picked are stored. It narrows the location further within the zone.
Navigation: User selects the rack from a dropdown list, which is dynamically populated based on the selected zone. Only racks mapped to the selected zone will be displayed.
Level
Description: This field refers to the specific level or shelf (e.g., "Location 1") within the selected rack. It helps pinpoint the exact location within the rack for the picking task.
Navigation: User selects the level from a dropdown list, which is dynamically populated based on the selected zone, rack, and level mappings.
Location
Description: This field refers to a specific location (e.g., "LEVEL 1") within the selected rack and level. It narrows down the location to the exact place where the item is stored for picking.
Navigation: User selects the location from a dropdown list, which is dynamically populated based on the selected rack and level mappings.
Created From
Description: This field indicates the start date for the picking task. It helps define the time range for which the picking order is relevant.
Navigation: User selects the start date from a calendar pop-up interface, which allows manual date selection.
Created To
Description: This field indicates the end date for the picking task. It marks the period by which the picking process is expected to be completed.
Navigation: User selects the end date from a calendar pop-up interface, which allows manual date selection.
Status
Description: This field indicates whether the picking process is active or complete. The checkbox is used to filter or generate reports based on the task’s status (e.g., "TRUE" for active).
Navigation: User checks the checkbox to mark the status as active. If the checkbox is selected, it may trigger the generation of a report with price details or other related information.
Download Icon
Description: This icon allows the user to download the picking task details as an Excel file. It can include information like orders, customers, assigned executives, locations, and status.
Navigation: User clicks the "Download" icon to download the generated picking data in Excel format.
PDF Icon
Description: This icon allows the user to download the picking task details as a PDF file. The PDF may be used for reporting, printing, or sharing in a formal format.
Navigation: User clicks the "PDF" icon to download the generated picking data in PDF format.
Picking History
The Picking History report provides a comprehensive record of all completed picking activities within the warehouse. This historical data is essential for analyzing picking performance, tracking order fulfillment accuracy, and identifying trends or areas for improvement in warehouse operations.
Here is the meaning of the field for the Description along with Navigation for the fields
Order Type
Description: Specifies the type of order for the picking history, such as a "Sales order" or other types like stock orders, transfer orders, etc.
Navigation: The user will select the order type from a static dropdown list. This list is predefined and will show available order types for the user to choose from.
Order Number
Description: Refers to the unique identifier for the sales order. This allows the user to track the picking activity associated with a specific order.
Navigation: The user will select the order number from a dropdown list. The list will be populated based on the available sales orders, ensuring that the user can select a specific order number from the system.
Product
Description: Identifies the product being picked for the order. This could include product names or SKUs.
Navigation: The user will select the product from a dropdown list, which is populated from the product master data. The list will show all products available for selection in the warehouse.
Customer
Description: Refers to the customer for whom the picking is being performed. This field helps track the order fulfillment for specific customers.
Navigation: The user will select the customer from a dropdown list, which is populated from the customer master. This list includes all customers in the system, allowing the user to select a customer by their ID or name.
Supplier
Description: Identifies the supplier associated with the products in the picking activity. This helps to trace the origin of the product being picked.
Navigation: The user will select the supplier from a dropdown list, populated from the supplier master data. The dropdown will display all suppliers available in the system for selection.
Warehouse
Description: Refers to the warehouse where the picking took place. This field helps track which warehouse the picking activity is associated with.
Navigation: The user will select the warehouse from a dropdown list, populated from the warehouse master. The list shows all warehouses available in the system, and the user will select the relevant warehouse for the picking activity.
Zone
Description: Indicates the specific zone within the warehouse from where the product was picked. The zone could refer to different sections or areas in the warehouse (e.g., Aisle 1, Zone A).
Navigation: The user will select the zone from a dropdown list, which is populated from the zone master data. The dropdown will show available zones, which are typically organized based on the warehouse layout.
Location
Description: Refers to the precise location within the selected zone where the product was picked (e.g., a specific shelf, bin, or area within a zone).
Navigation: The user will select the location from a dropdown list, which is filtered based on the previously selected zone. This ensures that the locations available are relevant to the selected zone.
Employee
Description: Identifies the employee (or team) responsible for performing the picking activity. This helps in tracking individual or team performance in the picking process.
Navigation: The user will select the employee from a dropdown list, populated from the employee or executive master data. The list will include all available employees who are assigned to picking tasks.
Download Icon
Description: Allows the user to download the picking history data in Excel format. This feature provides a way to export the generated report for further analysis or sharing.
Navigation: The user clicks on the "Download" icon to initiate the download of the picking history data in Excel format. This will generate an Excel file containing the filtered picking history report.
PDF Icon
Description: Allows the user to download the picking history data in PDF format. This format is useful for printing, sharing with external parties, or archiving.
Navigation: The user clicks on the "PDF" icon to generate and download the picking history report in PDF format. This will allow the user to save or print the report in a professional, easy-to-read format.
Shipment
The Shipment Report in a Warehouse Management System (WMS) is a critical tool for managing and tracking the shipping process of goods from the warehouse to customers or other destinations. This report provides detailed information about orders that are ready for shipment, including product details, shipping addresses, delivery dates, and tracking information. It plays an essential role in ensuring that goods are shipped accurately, on time, and to the correct destinations.
Here is the meaning of the field for the Description along with Navigation for the fields
Order Type
Description: This field defines the type of order being processed for shipment. For example, "Sales Order" indicates that the shipment is linked to a customer sales order.
Navigation: User selects the order type from a static dropdown list (e.g., "Sales Order"). This list is predefined and fixed.
Customer
Description: This field allows the user to select the customer who placed the order and is receiving the shipment. It is typically linked to customer records (e.g., "CUS1: SUMANTH").
Navigation: User selects the customer from a dropdown list populated from the customer master data. The list shows available customers, and the user can choose one.
Product
Description: This field specifies the product(s) being shipped. It links the shipment to a particular product (e.g., "P1: Fruity).
Navigation: User selects the product from a dropdown list populated from the product master data. The list shows available products, and the user can choose one.
Product Category
Description: This field allows the user to filter products by category (e.g., "ALL DRINKS"). It helps the user select a broader group of related products for shipment.
Navigation: User selects a product category from a dropdown list populated with predefined categories (e.g., "ALL DRINKS"). The list is predefined in the system.
Customer's Customer Name
Description: This field specifies the name of the customer's customer who will be receiving the shipment. It is typically used for cases where the business is handling shipments for third-party recipients.
Navigation: User selects the customer's customer name from a dropdown list, which is populated from the sales or shipment screen data.
Customer's Customer Address
Description: This field indicates the address of the customer's customer (e.g., "HYD") for delivery purposes. It is useful in multi-tier distribution scenarios.
Navigation: User selects the address from a dropdown list populated from the sales or shipment screen data.
Dispatch From
Description: This field represents the start date for the shipment dispatch. It marks when the goods will start being shipped.
Navigation: User selects the start date from a calendar pop-up. This date represents when the dispatch process begins.
Dispatch To
Description: This field represents the end date for the shipment dispatch. It marks the expected completion date for the shipment.
Navigation: User selects the end date from a calendar pop-up. This date represents when the shipment is expected to be completed.
Shipment Order Values
Description: This checkbox allows the user to include or exclude the price details when generating the shipment report. If checked, the report will include shipment order values.
Navigation: User checks the checkbox to indicate that shipment order values should be included in the report. This is typically used for generating financial or shipping reports that require pricing details.
Download Icon
Description: This icon allows the user to download the shipment details as an Excel file. The Excel file will typically include shipment data such as customer name, product, dispatch dates, and values.
Navigation: User clicks the "Download" icon to generate and download the shipment data in Excel format.
PDF Icon
Description: This icon allows the user to download the shipment details as a PDF file. The PDF version is typically used for printing or sharing in a formal format.
Navigation: User clicks the "PDF" icon to generate and download the shipment data in PDF format.
Shipment Order
The Shipment Order Report in a Warehouse Management System (WMS) is a comprehensive report that provides detailed information about the orders that are scheduled for shipment from the warehouse to the customers. This report helps warehouse managers and logistics teams monitor, track, and manage the shipment of goods. It includes vital details such as order numbers, product information, quantities, shipment statuses, and shipping methods.
Here is the meaning of the field for the Description along with Navigation for the fields
Order Type
Description: This field indicates the type of order being processed (e.g., "Sales Order"). It helps identify whether the order is a sales order, a purchase order, or other types of orders.
Navigation: User selects the order type from a static dropdown list (e.g., "Sales Order"). The list is predefined and fixed, showing available order types for selection.
Customer
Description: This field represents the customer who placed the order and is receiving the shipment (e.g., "CUS1: SUMANTH"). It links the shipment order to a specific customer.
Navigation: User selects the customer from a dropdown list populated from the customer master data. The list will show all customers, and the user can choose one.
Product
Description: This field specifies the product being shipped (e.g., "P1: Fruity"). It ties the shipment to a particular product in the system.
Navigation: User selects the product from a dropdown list populated from the product master data. The list includes available products, and the user can select the relevant one.
Dispatch From
Description: This field indicates the start date for the shipment. It represents when the shipment is expected to begin.
Navigation: User manually selects the start date from a calendar pop-up interface. This date indicates the shipment dispatch initiation.
Dispatch To
Description: This field specifies the end date for the shipment. It indicates the expected completion date for the shipment.
Navigation: User manually selects the end date from a calendar pop-up interface. This date marks when the shipment is expected to be completed.
Serial Number Configuration
Description: This field allows the user to choose whether to generate the shipment with serial numbers for each product. If set to "YES," it enables the serial number generation feature, which will show serial numbers in a dropdown or table.
Navigation: User clicks the button (labeled "NO") to toggle between "YES" or "NO" to configure serial numbers. When set to "YES," serial number data will be available in a serial number dropdown or in a table format, depending on the system setup.
Download Icon
Description: This icon allows the user to download the shipment order details in an Excel file format. The file will contain information related to the order, such as customer, product, dispatch dates, and serial number (if configured).
Navigation: User clicks the "Download" icon to download the generated shipment order data in Excel format.
PDF Icon
Description: This icon allows the user to download the shipment order details in a PDF file format. The PDF version of the order can be used for formal documentation, reporting, or printing.
Navigation: User clicks the "PDF" icon to generate and download the shipment order data in PDF format.
Shipment History
The Shipment History Report in a Warehouse Management System (WMS) is a vital tool used to track and analyze the historical shipping data of goods. This report provides a detailed account of past shipments, including their statuses, shipping methods, delivery timelines, and other critical information. It serves as a comprehensive record of all shipments that have been processed through the warehouse, helping warehouse managers, logistics teams, and even customers trace the full shipping history of products.
Here is the meaning of the field for the Description along with Navigation for the fields
Order Type
Description: This field indicates the type of order being referenced in the shipment history (e.g., "Sales Order"). It helps identify whether the shipment history pertains to sales orders or other order types.
Navigation: User selects the order type from a static dropdown list (e.g., "Sales Order"). The list is predefined and fixed, showing all available order types.
Product
Description: This field represents the product(s) related to the shipment history. It ties the history to a specific product (e.g., "P1: Fruity").
Navigation: User selects the product from a dropdown list populated from the product master data. The list displays all available products, and the user can select the one relevant to the history.
Category
Description: This field allows the user to filter the shipment history based on product category (e.g., "ALL DRINKS"). The category provides a way to group products into larger categories.
Navigation: User selects the product category from a dropdown list, which is populated with predefined categories (e.g., "ALL DRINKS"). The list is generated based on the system's parameters.
Customer
Description: This field represents the customer who placed the order and whose shipment history is being viewed (e.g., "CUS1: SUMANTH").
Navigation: User selects the customer from a dropdown list populated from the customer master data. The list shows all available customers, and the user can choose the one whose shipment history they want to view.
Customer's Customer Name
Description: This field specifies the name of the customer's customer, especially in cases where a business is handling shipments for third-party recipients (e.g., "KRISHNA").
Navigation: User selects the customer's customer name from a dropdown list, populated from sales or shipment screen data.
Customer's Customer Address
Description: This field indicates the address of the customer's customer (e.g., "HYD"). It helps identify the delivery address for the historical shipments.
Navigation: User selects the address from a dropdown list populated from sales or shipment screen data.
Region
Description: This field specifies the region (e.g., "HYD") where the customer resides or where the shipment history is relevant. This allows filtering by geographic location.
Navigation: User selects the region from a dropdown list populated from the customer master data based on the selected customer's city or region.
Date Filter
Description: This field allows the user to filter the shipment history by a specific time period (e.g., "Last 6 months"). It defines the window for the shipment history being reviewed.
Navigation: User selects the desired time filter from a static dropdown list (e.g., "Last 6 months"). The list includes predefined time ranges to choose from.
Download Icon
Description: This icon allows the user to download the shipment history details as an Excel file. The Excel file will typically include order data, product information, customer details, and shipment history for the selected filters.
Navigation: User clicks the "Download" icon to trigger the download of the generated shipment history data in Excel format.
PDF Icon
Description: This icon allows the user to download the shipment history details as a PDF file. The PDF version is useful for reporting or formal documentation.
Navigation: User clicks the "PDF" icon to trigger the download of the generated shipment history data in PDF format.
Space Utilization
The Space Utilization Report in a Warehouse Management System (WMS) is a critical tool for optimizing the use of available storage space within a warehouse. This report provides insights into how efficiently the warehouse space is being utilized, helping warehouse managers and logistics teams identify underused or overused areas and make data-driven decisions to enhance storage capacity and operational efficiency.
Here is the meaning of the field for the Description along with Navigation for the fields
Warehouse
Description: This field specifies the warehouse where the space utilization data is being recorded or viewed (e.g., "W1: UTL"). It identifies which warehouse the user is working with.
Navigation: User selects the warehouse from a dropdown list populated from the warehouse master data. The list includes available warehouses, and the user selects one based on their requirements.
Zone
Description: This field refers to the specific zone within the selected warehouse. Zones are typically used to organize the warehouse into areas (e.g., "ZONE 1") for better space management.
Navigation: User selects the zone from a dropdown list populated from the zone master data. The list will show all zones in the chosen warehouse, and the user can select the one they need.
Location
Description: This field specifies the location within the chosen zone (e.g., "LOC-1"). It allows for more precise identification of a specific storage area within the zone.
Navigation: User selects the location from a dropdown list populated from the location master data. The list will only show locations that are valid within the selected zone, ensuring that the user picks an appropriate location.
Rack
Description: This field identifies the specific rack within the chosen location (e.g., "RACK 1"). It allows users to define the storage area within the location in more detail.
Navigation: User selects the rack from a dropdown list populated from the rack master data. The list will show racks that are mapped to the selected location, ensuring that the user selects the correct rack.
Supplier
Description: This field represents the supplier associated with the space utilization data (e.g., "S1: KRISHNA"). It links the warehouse space usage to a specific supplier.
Navigation: User selects the supplier from a dropdown list populated from the supplier master data. The list includes available suppliers, and the user selects the relevant one based on their records.
Download Icon
Description: This icon allows the user to download the space utilization data in Excel format. The Excel file will typically include warehouse, zone, location, rack, and supplier information, along with utilization details.
Navigation: User clicks the "Download" icon to download the generated space utilization data in Excel format.
PDF Icon
Description: This icon allows the user to download the space utilization data in PDF format. This format is useful for reporting or sharing formal records.
Navigation: User clicks the "PDF" icon to download the generated space utilization data in PDF format.
Location Availability
The Location Availability Report in a Warehouse Management System (WMS) provides detailed information about the available storage locations in the warehouse. This report helps warehouse managers track which storage locations are occupied, which are available for new inventory, and how the current layout is being utilized in real-time or over a specified period.
Here is the meaning of the field for the Description along with Navigation for the fields
Location Type
Description: This field defines the type of location for which availability is being checked. The type could be used to distinguish between different location categories (e.g., storage area, staging area, etc.).
Navigation: The user selects the location type from a predefined dropdown list. The list will be static, showing all available location types for the user to choose from.
Location
Description: This field refers to a specific location within the selected zone and rack (e.g., "LOC-1"). It helps identify the storage or operational area within the warehouse.
Navigation: User selects the location from a dropdown list that is populated based on the selected zone and rack. Only locations mapped to the chosen zone and rack will appear in the dropdown list, ensuring relevant data selection.
Zone
Description: This field indicates the specific zone within the warehouse (e.g., "ZONE 1"). The zone helps in organizing the warehouse into different areas for better space management and availability tracking.
Navigation: User selects the zone from a dropdown list populated from the zone master data. The available zones are filtered based on the selected product and supplier. After selecting the product and supplier, the zone list is filtered to show only the zones mapped to the selected supplier.
Rack
Description: This field refers to a specific rack within the selected zone (e.g., "RACK 1"). It helps narrow down the location within the zone for more precise tracking of space availability.
Navigation: After the user selects a zone, the available racks will be filtered and shown in the dropdown list based on the selected zone. The user will then choose the relevant rack.
Product
Description: This field represents the product for which location availability is being checked (e.g., "P1: FRUITY"). The product selection helps determine the availability of storage space for that specific product.
Navigation: User selects the product from a dropdown list populated from the product master data. The list shows all products available in the system for the user to choose from.
Location Type (Received) Supplier
Description: This field identifies the supplier associated with the location where goods are being received (e.g., "S1: RAJ"). It helps track the location availability specifically for the selected supplier's products.
Navigation: User selects the supplier from a dropdown list populated from the supplier master data. The list will show suppliers who are mapped to the relevant products, zones, or locations.
Download Icon
Description: This icon allows the user to download the location availability data in Excel format. The Excel file will include all the details such as location, zone, rack, product, and supplier information, as well as the availability data.
Navigation: User clicks the "Download" icon to generate and download the location availability data in Excel format.
PDF Icon
Description: This icon allows the user to download the location availability data in PDF format. This format is useful for printing, sharing reports, or keeping a formal record of location availability.
Navigation: User clicks the "PDF" icon to generate and download the location availability data in PDF format.
Overall Dashboard
The Overall Dashboard provides a comprehensive overview of warehouse operations, displaying key metrics and counts for various order types and processes. This centralized view helps managers quickly assess operational status and make informed decisions.
Dashboard Components and Their Descriptions
Order Counts
Purchase Orders: Displays count of open purchase orders
Sales Returns: Shows count of open sales return orders
Warehouse Transfers: Displays count of open warehouse transfer orders
Sales Orders: Shows count of open sales orders
Purchase Returns: Displays count of open purchase return orders
Warehouse Transfer Returns: Shows count of open warehouse return orders
Incoming Operations
Incoming Purchase Orders: Displays details of open purchase orders
Incoming Sales Returns: Shows details of open sales return orders
Warehouse Transfers: Displays destination warehouse open order details
Outgoing Operations
Outgoing Shipments: Shows details of open shipment orders
Outgoing Purchase Returns: Displays open purchase return order details
Outgoing Shipment Transfers: Shows open warehouse transfer order details
Warehouse Processes
Put Away: Displays counts of complete and incomplete put away tasks
Picking: Shows counts of complete and incomplete picking tasks
Sales Analytics
Sales Summary: Displays counts of open sales orders and open purchase return orders
Top Selling Product: Shows details of the most sold product
Space Utilization
It shows individual zone wise completely available, partially available and unavailable location count and over all warehouse wise irrespective of zone also displaying.
Inventory Dashboard
The Inventory Dashboard provides a comprehensive overview of stock levels, product status, and inventory metrics, enabling efficient inventory management and decision-making.
Dashboard Components and Their Descriptions
Expiry Products
Displays count of expired products in inventory
ExpiredProducts requiring immediate attention
Total Inventory Quantity
Shows sum of all product inventory quantities
Total StockComplete inventory overview
Top Products in Inventory
Displays most received products with available quantities
High VolumeFrequently stocked items
Stock in Inventory
Shows available quantities with product details
Detailed ViewComplete stock information
Sales Analytics
The Sales Analytics report provides detailed insights into sales performance across different dimensions including sales orders, regions, customers/suppliers/warehouses, products, and categories.
Here are the different types of sales analytics reports available:
Sales order Wise
Description: By the selection of user, it displays, Customer order Quantity (if type = Sales order it consider delivery date) and Dispatch Quantity (if type= Shipment order it consider dispatch date)
Region Wise
Description: By the selection of user, it displays, Customer order Quantity (if type = Sales order it consider delivery date) and Dispatch Quantity (if type= Shipment order it consider dispatch date) along with region
Customer/Supplier/Warehouse
Description: By the selection of user, it displays, Customer order Quantity (if type = Sales order it consider delivery date) and Dispatch Quantity (if type= Shipment order it consider dispatch) along with Customer
Product Wise
Description: By the selection of user, it displays, Customer order Quantity (if type = Sales order it consider delivery date) and Dispatch Quantity (if type= Shipment order it consider dispatch) along with product
Category wise
Description: By the selection of user, it displays, Customer order Quantity (if type = Sales order it consider delivery date) and Dispatch Quantity (if type= Shipment order it consider dispatch) along with Category
Purchase Analytics
The Purchase Analytics report provides detailed insights into purchase performance across different dimensions including purchase orders, products, categories, regions, and suppliers/customers/warehouses.
Here are the different types of purchase analytics reports available:
Purchase Order wise
Description: By the selection of Filters, it displays (if type= order, it consider ETA date and display order Quantity, If Type=Receive, it considers GRN date and received Quantity and it type= Return, it Consider GRN date and Displays Return Quantity).
Product wise
Description: By the selection of Filters, it displays (if type= order, it consider ETA date and display order Quantity, If Type=Receive, it considers GRN date and received Quantity and it type= Return, it Consider GRN date and Displays Return Quantity) along with Product details.
Category wise
Description: By the selection of Filters, it displays (if type= order, it consider ETA date and display order Quantity, If Type=Receive, it considers GRN date and received Quantity and it type= Return, it Consider GRN date and Displays Return Quantity) along with Category.
Region wise
Description: By the selection of Filters, it displays (if type= order, it consider ETA date and display order Quantity, If Type=Receive, it considers GRN date and received Quantity and it type= Return, it Consider GRN date and Displays Return Quantity) along with region details.
Supplier/Customer/Warehouse wise
Description: By the selection of Filters, it displays (if type= order, it consider ETA date and display order Quantity, If Type=Receive, it considers GRN date and received Quantity and it type= Return, it Consider GRN date and Displays Return Quantity) along with customer details.
Employee
The Employee Dashboard provides visibility into various warehouse operations performed by employees, showing the status and progress of different tasks.
Here are the different operational metrics available in the Employee Dashboard:
Put away
Description: By the selection of filters, it shows Incomplete, Complete and in Process count details.
Internal transfers
Description: By the selection of filters, it shows Complete, Approved, In process count and Created count details.
Picking
Description: By the selection of filters, it shows Incomplete, Complete and in Process count details.
Packing
Description: By the selection of filters, it shows Incomplete, Complete and in Process count details.
Re-Packing
Description: By the selection of filters, it shows Incomplete, Complete and in Process count details.
Co-Packing
Description: By the selection of filters, it shows Incomplete, Complete and in Process count details.
Labelling
Description: By the selection of filters, it shows Incomplete, Complete and in Process count details.
Daily Operations
The Daily Operations dashboard provides comprehensive visibility into all warehouse activities, tracking the progress and status of each operational process from inbound to outbound.
Here are the different operational metrics available in the Daily Operations dashboard:
Inbound Operations
Unloading: By the selection of filters, system should display unloading count
Inbound quality check: By the selection of filters, system should display Inbound quality check count
Purchaser order: By the selection of filters, system should display Purchase order count
Goods receiving: By the selection of filters, system should display Goods Receiving count
Put away completed: By the selection of filters, system should display Putaway complete count
Released For Unload Count: It Displays, Gate IN and Not started Unloading Count from Inward Gate Entry Screen.
In Unload Count: It Displays, Gate IN and Started Unloading Count From Inward Gate Entry Screen.
Released For Quality Check Count: It Displays, Gate IN and Unloading Completed and Not Started Quality Check Count From Inward Gate Entry Screen.
In Quality Check Count: It Displays, Gate IN and Unloading Completed and Started Quality Check Count From Inward Gate Entry Screen.
Released For Grn Count: It Displays, Gate IN and Unloading Completed and Completed Quality Check and Not Started GRN Count from Inward Gate Entry Screen.
In Grn Count: It Displays, Gate IN and Unloading Completed and Completed Quality Check and Started GRN Count from Inward Gate Entry Screen
Release for Putaway Count: It Displays, Created Put away Count.
In Put away Count: It Displays, Started Put away Count.
Outbound Operations
Sales order Picking complete: By the selection of filters, system should display Picking complete count
Outbound quality check: By the selection of filters, system should display Outbound quality check count
Packing: By the selection of filters, system should display Packing count
Re-packing: By the selection of filters, system should display Re-Packing count
Co-packing: By the selection of filters, system should display Co-Packing count
Labelling: By the selection of filters, system should display Labelling count
Shipment order: By the selection of filters, system should display Shipment order count
Loading: By the selection of filters, system should display Loading count
Release For Picking Count: It displays, Created Picking Records Count
In Picking Count: It Displays, Started Picking records Count
Released for Outward Quality Check Count
In Outward Quality Check Count: It Displays, Started Quality check Records count
Released For Packing Count
In Packing Count: It Displays, Started Packing Records count
Released For Re-Packing Count
In Re-Packing Count: It Displays, Started Re-Packing Records Count
Released For Co-Packing Count
In Co packing Count: It Displays, Started Co-Packing Records Count
Released For Labeling Count
In Labeling Count: It Displays, Started Labelling Records Count
Released For Shipment Orders Count
Released For Load Count: It displays, Gate In Records count From Outward Gate Entry screen
In Load Count: It Displays, gate in and Load Started Records Count.
Parameters
In the context of a Warehouse Management System (WMS), parameters refer to configurable settings or variables that control the behavior and functionality of the system to suit the specific needs of a warehouse or business. These parameters play a critical role in ensuring that the WMS operates efficiently and aligns with the operational workflows and requirements of the organization.
Here is the meaning of the field for the Description along with Navigation for the fields
Storage Type
Description: This field defines the type of storage for the warehouse, indicating whether the products will be stored in cold or warm conditions.
Navigation: Enter the storage type manually in the Storage Type field (e.g., Cold or Warm).
Category
Description: This field defines the main category for the items in the warehouse, such as All Drinks or Frozen.
Navigation: Input the category manually in the Category field (e.g., All Drinks, Frozen).
Sub Category 1
Description: This field specifies the first subcategory for classification, such as cheese or dairy products.
Navigation: Input the subcategory manually in the Sub Category 1 field (e.g., Cheese, Dairy).
Sub Category 2
Description: This field specifies the second level of subcategory, typically further classifying products within the primary category.
Navigation: Enter the subcategory manually in the Sub Category 2 field (e.g., Cheese, Dairy).
Sub Category 3
Description: This field allows classification of products under a third level of subcategory. Use this for finer product differentiation.
Navigation: Input the subcategory manually in the Sub Category 3 field (e.g., Cheese, Dairy).
Brand Configuration
Description: This field specifies the brand associated with the products, such as Amul or Ceramic.
Navigation: Enter the brand name manually in the Brand Configuration field (e.g., Amul, Ceramic).
Cross Docking Mapping
Description: Cross docking is a logistics practice where incoming shipments are directly transferred to outgoing shipments. This field links the cross-docking mapping ID to the system.
Navigation: Select the appropriate mapping code from the Cross Docking Mapping dropdown list, which will be fetched from the location master.
Return Zone Mapping
Description: Defines the return zone mapping, specifying the location where returned goods will be sent.
Navigation: Select the return zone code from the Return Zone Mapping dropdown list, which is fetched from the zone master.
Zone Space Utilization
Description: This field defines the percentage or amount of space utilized in the warehouse zone. It's represented as a floating-point value.
Navigation: Enter the space utilization value manually in the Zone Space Utilization field (e.g., 70.5).
Image Configurations
Description: Specifies the configuration for handling images in the system, such as options for goods receiving and purchase orders.
Navigation: Select the desired image configuration manually in the Image Configurations checkbox list (e.g., Goods receiving, Purchase order).
Source Warehouse Configurations
Description: Defines the configuration of the source warehouse. It may specify a warehouse and its related properties, such as a specific address or identifier.
Navigation: Select the source warehouse configuration manually in the Source Warehouse Config checkbox list (e.g., w11:www1), which will be fetched from the warehouse master.
Shipment Time Slot
Description: This field specifies the scheduled time slot for the shipment.
Navigation: Enter the time slot manually in the Shipment Time Slot field (e.g., 10:00 AM to 12:00 PM).
Payment Mode
Description: Defines the method of payment used in transactions, such as cash, credit, or other payment types.
Navigation: Enter the payment mode manually in the Payment Mode field (e.g., Cash).
Pallet Size
Description: Defines the size of the pallet, typically represented in dimensions, that will be used for storage and transportation.
Navigation: Enter the pallet size manually in the Pallet Size field (e.g., 1040).
Country
Description: Specifies the country in which the warehouse operations are taking place.
Navigation: Enter the country code manually in the Country field (e.g., INDIA, USA).
Currency
Description: Specifies the currency used for financial transactions in the warehouse management system, such as INR or USD.
Navigation: Enter the currency code manually in the Currency field (e.g., INR, DOLLAR).
Equipment Type
Description: Defines the type of equipment used for storage or transportation, such as a 20 feet container or other types of containers.
Navigation: Enter the equipment type manually in the Equipment Type field (e.g., 20 feet container).
Units
Description: Specifies the unit of measurement for items in the warehouse, such as number of pieces (PCS), kilograms (KG), or other units.
Navigation: Enter the unit manually in the Units field (e.g., NOS, PCS, KG).
Terms of Payments
Description: Specifies the payment terms for transactions, such as monthly or yearly payment cycles.
Navigation: Enter the payment terms manually in the Terms of Payments field (e.g., Monthly, Yearly).
Packing Type
Description: Specifies the type of packing used for products, such as carton, crate, or other packaging types.
Navigation: Enter the packing type manually in the Packing Type field (e.g., Carton).
Roles
Description: Specifies the roles associated with users in the system, such as role_user or role_client, which define access permissions and responsibilities.
Navigation: Enter the role manually in the Roles field (e.g., role_user, role_client).
Terms and Conditions for PO
Description: Specifies the terms and conditions for purchase orders, such as storage or handling requirements.
Navigation: Enter the terms and conditions manually in the Terms and Conditions for PO field (e.g., Stored at cool temperature).
Terms and Conditions for SO
Description: Specifies the terms and conditions for sales orders, detailing any relevant policies or conditions.
Navigation: Enter the terms and conditions manually in the Terms and Conditions for SO field (e.g., Stored at cool temperature).
Terms and Conditions for Invoice
Description: Specifies the terms and conditions associated with invoices, including payment deadlines, discounts, or other relevant conditions.
Navigation: Enter the terms and conditions manually in the Terms and Conditions for Invoice field (e.g., Stored at cool temperature).
Login Text
Description: This field holds the text shown on the login page, explaining the purpose and features of the WMS system, such as warehouse operations and AI/ML predictions.
Navigation: Enter the login text manually in the Login Text field.
Home Text
Description: This field holds the introductory text for the home page, providing details about warehouse management and the system's features, such as receiving, packing, and order assembly.
Navigation: Enter the home page text manually in the Home Text field.
Logo
Description: This field allows the upload of the logo image for the warehouse management system, typically used for branding purposes.
Navigation: Upload the logo manually in the Logo field from the local system.
Picking Location Allocation Type
Description: This field allows the user to select the method for allocating picking locations, either manually or automatically.
Navigation: Click the Picking Location Allocation Type button to select the allocation method.
Receive Location Allocation Type
Description: Specifies the method for allocating receiving locations in the warehouse, either manual or automatic.
Navigation: Click the Receive Location Allocation Type button to select the allocation method.
Return Location Allocation Type
Description: Defines the allocation method for return locations in the warehouse, either manual or automatic.
Navigation: Click the Return Location Allocation Type button to select the allocation method.
Serial Number Configuration
Description: Defines how serial numbers are configured in the system, either manually or automatically.
Navigation: Click the Serial Number Configuration button to select the configuration method.
Sales Order with Inventory
Description: This field determines if the sales order includes inventory details, either manually or automatically.
Navigation: Click the Sales Order with Inventory button to configure the setting.
Third Party Customer Configuration
Description: This field defines the configuration for third-party customers in the warehouse management system. It allows the user to set up the necessary parameters for managing external customers.
Navigation: Click the Third Party Customer Configuration button to select whether the configuration is manual or automatic.
Barcode Configuration
Description: This field specifies the configuration for barcodes, which are used for inventory management and tracking in the warehouse. The user can choose whether barcode generation is manual or automatic.
Navigation: Click the Barcode Configuration button to configure the barcode settings.
Auto Putaway Configuration
Description: Defines the configuration for automatically putting away items in the warehouse based on pre-set rules or algorithms.
Navigation: Click the Auto Putaway Configuration button to set whether the putaway process is manual or automatic.
GRN Invoice Confirmation
Description: This field specifies whether the Goods Receipt Note (GRN) invoice confirmation process is done manually or automatically. It helps in confirming the receipt of goods based on the invoice.
Navigation: Click the GRN Invoice Confirmation button to set the confirmation method as manual or automatic.
Picking Generation Configuration
Description: This field specifies the method for generating picking orders in the warehouse, either manually or automatically.
Navigation: Click the Picking Generation Configuration button to select whether the picking order generation is manual or automatic.
Shipment Generation Configuration
Description: Defines how shipment orders are generated in the system, either manually or automatically, based on preset rules and configurations.
Navigation: Click the Shipment Generation Configuration button to set the shipment generation method.
Product By Supplier
Description: This field allows the configuration of products by their respective suppliers. It helps to manage the relationship between products and suppliers for more efficient supply chain operations.
Navigation: Click the Product By Supplier button to configure the product-supplier relationships, either manually or automatically.
Sales Order Table View
Description: This field defines how the sales order table is displayed in the system, with options for manual or automatic configurations based on the data view settings.
Navigation: Click the Sales Order Table View button to choose the configuration method for displaying sales order tables.
Copy Customer to Supplier
Description: This field allows for the copying of customer information to suppliers, making the setup of supplier details easier when they align with customer information.
Navigation: Click the Copy Customer to Supplier button to copy the information.
GRN Manual Upload Configuration
Description: This field allows for the configuration of manual uploads for Goods Receipt Notes (GRN). This is useful when uploading GRN data manually from external systems.
Navigation: Click the GRN Manual Upload Configuration button to set up the manual upload process.
Putaway Quality Check Configuration
Description: Specifies the configuration for quality checks during the putaway process, ensuring that the items meet the necessary quality standards before being stored.
Navigation: Click the Putaway Quality Check Configuration button to enable manual or automatic quality checks during the putaway process.
Picking Quality Check Configuration
Description: Defines the configuration for quality checks during the picking process, ensuring that the items picked from the warehouse meet quality standards.
Navigation: Click the Picking Quality Check Configuration button to enable manual or automatic quality checks during the picking process.
Space Utilization Conversion Unit Configuration
Description: This field defines how space utilization is managed and converted within the warehouse, allowing for the configuration of space efficiency and storage optimization.
Navigation: Click the Space Utilization Conversion Unit Configuration button to select the conversion method for space utilization, either manually or automatically.
Process Groups
The Process Groups section allows administrators to assign specific process groups to different roles within the Warehouse Management System.
Here are the steps to assign process groups to roles:
Select the role from the dropdown list
List of process groups are displayed with check list
Select the check the process groups to be assigned to that role
Click on Update button to save
Process Permissions
The Process Permissions section allows administrators to assign specific process permissions to different roles within the Warehouse Management System.
Here are the steps to assign process permissions to roles:
Select the role from the dropdown list
List of process groups with process names are displayed with check list
Select the check the process to be assigned to that role
Click on Update button to save
KPI Configuration
The KPI Configuration section allows administrators to assign specific Key Performance Indicators (KPIs) to different roles within the Warehouse Management System.
Here are the steps to configure KPIs for roles:
Select the role from the dropdown list
List of process names and KPI names are displayed with checkboxes
Check the KPI names to be assigned to that role
Click the Update button to save the configuration
Report Configuration
The Report Configuration section allows system administrators to manage and assign report access permissions to different user roles within the Warehouse Management System.
Follow these steps to configure report permissions:
Select Role: Choose the desired role from the dropdown list
View Reports: The system displays a list of process names with their associated reports in a checklist format
Assign Reports: Check the boxes for the report names you want to assign to the selected role
Save Changes: Click the Update button to save your configuration
Note: Only users with administrator privileges can access and modify report configurations.
Master Configuration
The Master Configuration section allows administrators to assign specific system permissions and access rights to different user roles within the Warehouse Management System.
Configuration Steps
1
Select Role
Choose the appropriate role from the dropdown list to configure permissions
2
View Master List
The system displays a comprehensive list of process names and master names with checkboxes
3
Assign Permissions
Select the checkboxes corresponding to the master names you want to assign to the selected role
4
Save Configuration
Click the "Update" button to save your permission assignments for the selected role
Important Notes:
Changes take effect immediately after updating
Only users with administrator privileges can access this configuration
Review all selections before saving changes
User Configurations
Enter User profile and contact details.
Here are the steps to configure user details:
Enter User profile and contact details.
Click on Save option. Record displayed in user configuration table.
Click on Clear option, to clear entered details in the panels.
Edit and delete options are available at Action column in data table.
Warehouse Configuration
Warehouse configuration in a Warehouse Management System (WMS) refers to the process of setting up and customizing the WMS to align with the unique operational needs, workflows, and requirements of a specific warehouse. This configuration ensures that the system accurately reflects the physical layout, processes, inventory types, and operational rules of the warehouse. Proper warehouse configuration is essential for optimizing warehouse performance, improving inventory accuracy, and streamlining operations.
Here is the meaning of the field for the Description along with Navigation for the fields:
User ID
Description: Select the user details for warehouse configuration. This identifies the user for whom the configuration is being set.
Navigation: Choose the User ID from the dropdown list, which will display available user IDs (e.g., J100:JACK). Users will select the appropriate user from the list.
Organization ID
Description: Select the organization to associate with the warehouse configuration. This defines which organization the user belongs to.
Navigation: Choose the Organization ID from the dropdown list, which will display available organizations (e.g., ORG1:Data Labs India). Users will select the organization from the list.
Warehouse ID/Name
Description: Select the warehouse ID and name associated with the selected organization. This identifies which warehouse the user will work with.
Navigation: Choose the Warehouse ID/Name from the dropdown list. The warehouses displayed will be linked to the selected organization (e.g., WH001:Warehouse1).
Default Warehouse ID/Name
Description: Select the default warehouse ID and name to associate with the user's default workspace. This warehouse will be set as the default for operations.
Navigation: Choose the Default Warehouse ID/Name from the dropdown list, which displays available warehouses for selection (e.g., WH001:Warehouse1).
Permission Type
Description: Define the permissions associated with the user for the selected warehouse configuration. Permissions may include View, Update, or Delete actions.
Navigation: Select the Permission Type by checking the appropriate checkboxes (e.g., View, Update, Delete) based on the user's required access level.
Process Configuration
Process configuration in a Warehouse Management System (WMS) refers to the setup and customization of the various operational workflows and procedures within the warehouse. It ensures that the WMS aligns with the specific processes and requirements of the business, guiding how tasks are executed across different functions like receiving, storage, picking, packing, and shipping. Proper process configuration is critical for optimizing the flow of goods, improving efficiency, and ensuring accuracy in every aspect of warehouse operations.
Here is the meaning of the field for the Description along with Navigation for the fields:
Type
Description: Select the type of process configuration to define. This determines the specific process being configured, such as Purchase Order or Internal Transfer.
Navigation: Choose the Type from the dropdown list, which includes predefined options like Purchase Order and Internal Transfer.
Role
Description: Select the role to which the process configuration applies. This defines who will be responsible for or involved in the process (e.g., Client, Employee).
Navigation: Choose the Role from the dropdown list. The available roles are fetched from system parameters (e.g., Client, Employee). Users can select the role manually from the list.
User
Description: Select the specific user to assign to the process. This identifies the user who will be responsible for or perform the process.
Navigation: Choose the User from the dropdown list. The available users are listed (e.g., H-101:Jack). Users can select the user manually from the list.
Save
Description: Click the Save button to save the current process configuration settings. This action will store the configured values for future use.
Navigation: Click the Save button to confirm and save the configuration.
Clear
Description: Click the Clear button to reset all fields in the process configuration form. This will remove any selected or entered values, allowing you to start over.
Navigation: Click the Clear button to clear all selected values in the configuration form.
Cycle Counting
Cycle Counting is a critical process in warehouse management systems (WMS) used to maintain inventory accuracy without the need for full physical counts. This method involves periodically counting a subset of inventory on a rotating schedule, rather than counting all items at once. The Cycle Counting Configuration in a WMS allows you to set up and manage the parameters, frequency, and criteria for cycle counting, ensuring that inventory records are continually updated and discrepancies are minimized.
Here is the meaning of the field for the Description along with Navigation for the fields:
Cycle Code
Description: This field represents the unique code for the cycle counting process. It allows the user to enter a code manually to identify the cycle count.
Navigation: Enter the cycle code manually in the Cycle Code field.
Criteria Type
Description: This field defines the type of criteria used for cycle counting, such as "category." It provides a dropdown list from which the user can select the type.
Navigation: Select the Criteria Type from the dropdown list. The list will be preloaded with available options for criteria types.
Criteria Type Selection
Description: Based on the selection made in the Criteria Type, this field displays further options for the criteria selection. The user will select the appropriate criteria based on the type chosen.
Navigation: Select the Criteria Type Selection from the dropdown list. The available options are dynamically generated based on the Criteria Type selection.
Scheduled Job
Description: This field defines the frequency or interval for the scheduled cycle counting job. It is typically set to display a default value of "Days."
Navigation: The Scheduled Job field will display "Days" by default. The user can enter or modify this value manually.
Recurrence
Description: This field specifies how often the cycle counting process should recur. The user will manually input the number of occurrences.
Navigation: Enter the recurrence number in the Recurrence field. For example, if the count should happen every 1 day, enter "1."
Start Date
Description: The Start Date is the date when the cycle counting process begins. The user can select the date manually using the calendar.
Navigation: Select the Start Date from the calendar dropdown, which will display the date picker for user selection.
End Date
Description: The End Date is the date when the cycle counting process is scheduled to finish. This field works the same way as the Start Date, allowing users to select the end date.
Navigation: Select the End Date from the calendar dropdown using the date picker.
Week Days
Description: This field allows the user to select the weekdays on which cycle counting should occur. Users can check the required days (e.g., Monday, Tuesday).
Navigation: Check the relevant weekdays in the Week Days field based on the required days for cycle counting.
Status
Description: The Status field indicates the current state of the cycle counting configuration. Initially, it is set to "Created," but the user can update it to "Confirmed" when the cycle counting setup is finalized.
Navigation: The Status field will display "Created" by default. The user can select "Confirmed" from the dropdown list to change the status.
Notification Configuration
In a Warehouse Management System (WMS), notification configuration plays a crucial role in ensuring smooth operations, enhancing communication, and improving responsiveness to various events or exceptions within the warehouse. It allows the system to automatically inform relevant stakeholders (such as warehouse staff, managers, or external partners) when certain conditions are met or specific actions need to be taken.
Here is the meaning of the field for the Description along with Navigation for the fields:
Notification Type
Description: Select the type of notification to configure (e.g., Purchase Order, Sales Order). This determines the category of notification that the system will generate.
Navigation: Choose the Notification Type from the dropdown list, which includes options like "Purchase Order" and "Sales Order."
Role
Description: Select the role to which the notification applies (e.g., Client, Employee). This defines who the notification is relevant for.
Navigation: Choose the Role from the dropdown list. The available roles are fetched from the system parameters and may include roles such as Client and Employee.
User
Description: Enter the user to receive the notification, represented in the format like H-101:Jack. This identifies a specific individual who will receive the notification.
Navigation: Select the User from the dropdown list, which will display users from the system. You can select the desired user manually from the list (e.g., H-101:Jack).
Scheduler
In a Warehouse Management System (WMS), a scheduler is a tool or module that automates and manages the timing of various tasks and operations within the warehouse. The scheduler ensures that specific actions, processes, or workflows occur at the right time and in the correct order, improving efficiency and reducing manual intervention.
Schedulers in WMS are especially important in environments where high volumes of orders, inventory movements, or logistics tasks need to be handled in a timely manner. By automating recurring tasks and setting triggers based on specific conditions, the scheduler ensures that warehouse operations run smoothly, even during high-demand periods.
Here is the meaning of the field for the Description along with Navigation for the fields:
Schedule Time
Description: Specify the time at which the scheduled task should occur (e.g., 12:00 AM). This defines the exact time for task execution.
Navigation: Select the Schedule Time using the time picker. Users can manually pick the desired time from the available options or input the time in a 12-hour format (e.g., 12:00 AM).
Task Type
Description: Select the type of task to schedule, such as Space Utilization or Inventory Block. This determines the specific task to be performed at the scheduled time.
Navigation: Choose the Task Type from the static dropdown list, which includes predefined task options like Space Utilization and Inventory Block.
Space Zone
The Space Zone Configuration in the Warehouse Management System (WMS) is used to define and manage the allocation of storage space within a warehouse. This configuration ensures that specific zones and suppliers are assigned correctly, optimizing storage and improving the overall workflow within the warehouse.
Here is the meaning of the field for the Description along with Navigation for the fields:
Supplier
Description: This field defines the supplier associated with the space zone configuration. The available suppliers are listed from the supplier master. The user will select the appropriate supplier from the dropdown.
Navigation: Select the supplier manually from the Supplier dropdown. The list of suppliers will be fetched from the supplier master, and values may include options like "1: Mondelez - INDURI FACTORY" and "1000: Mondelez - MALANPUR FACTORY."
Zone
Description: This field defines the zone associated with the space zone configuration. The available zones are listed from the zone master. The user will select the appropriate zone from the dropdown.
Navigation: Select the zone manually from the Zone dropdown. The list of available zones will be fetched from the zone master, and options may include values like "ZONE1" and "ZONE2."
Status
Status Configuration in a Warehouse Management System (WMS) is a crucial feature that helps manage and track the various stages or states of different operations, processes, and entities within the warehouse. By configuring and customizing the status settings, users can define and control the flow of work throughout the warehouse, ensuring smooth and efficient operations.
Here is the meaning of the field for the Description along with Navigation for the fields:
Inventory Adjustment
Description: The "Inventory Adjustment" field defines the status related to inventory adjustments in the system. It specifies who is responsible for making adjustments to the inventory records, which can be an employee, user, or client.
Navigation: Enter the relevant role for inventory adjustment manually in the Inventory Adjustment text field. The values could be "Employee", "User", or "Client," based on the organization's role assignments.
Purchase Order
Description: The "Purchase Order" field defines the status for managing purchase orders. This status indicates which role (Employee, User, or Client) is responsible for initiating or processing purchase orders within the system.
Navigation: Manually input the role for handling purchase orders in the Purchase Order text field. Available options are "Employee", "User", or "Client."
Internal Transfers
Description: The "Internal Transfers" field manages the status of internal stock or inventory transfers between different locations or departments. The role indicated (Employee, User, or Client) determines who is allowed to execute internal transfers.
Navigation: Enter the responsible role for internal transfers manually in the Internal Transfers text field. Choose from "Employee", "User", or "Client."
Cycle Counting
Description: The "Cycle Counting" field indicates the status for cycle counting activities within the warehouse or inventory management system. This status specifies whether an Employee, User, or Client is responsible for conducting or overseeing cycle counts.
Navigation: Input the appropriate role (Employee, User, or Client) in the Cycle Counting text field to define who is assigned to cycle counting.
Warehouse Transfer Create
Description: The "Warehouse Transfer Create" field manages the status related to creating transfers between warehouses. It defines whether an Employee, User, or Client can create warehouse transfer requests.
Navigation: Manually input the role responsible for creating warehouse transfers in the Warehouse Transfer Create text field. The choices are "Employee", "User", or "Client."
Warehouse Transfer Approve
Description: The "Warehouse Transfer Approve" field defines the role responsible for approving warehouse transfer requests. This status ensures that the person responsible for approving transfers is assigned appropriately (Employee, User, or Client).
Navigation: Enter the role for approving warehouse transfers manually in the Warehouse Transfer Approve text field. Choose between "Employee", "User", or "Client."
Status
Description: The "Status" field represents the overall status of the current configuration, detailing which roles (Employee, User, or Client) are responsible for the status updates within the system. It allows the user to manage and update statuses as per the assigned roles.
Navigation: Input the appropriate role (Employee, User, or Client) in the Status text field. This field can be updated manually based on system changes.
Prefix
Here is the meaning of the field for the Description along with Navigation for the fields
Purchase Order Prefix
Description: This field allows the user to define a prefix for purchase orders. The prefix helps to categorize or identify the purchase order records in the system.
Navigation: Enter the desired prefix (e.g., "PO") in the Purchase Order Prefix text field. The user will input this manually based on their organization's naming convention.
Starting Order Number (for Purchase Order)
Description: This field specifies the starting order number for purchase orders. It helps to determine the sequential numbering of purchase orders.
Navigation: Input the starting order number (e.g., "1001") in the Starting Order Number text field for the Purchase Order. This is entered manually to begin the numbering sequence.
Sales Order Prefix
Description: Defines the prefix for sales orders. The prefix is used to identify sales orders in the system.
Navigation: Enter the appropriate prefix (e.g., "SO") in the Sales Order Prefix text field. The user will input this manually.
Starting Order Number (for Sales Order)
Description: This field sets the initial number for sales orders, determining the starting point for sales order sequencing.
Navigation: Enter the starting order number (e.g., "1001") in the Starting Order Number text field for the Sales Order.
Inventory Prefix
Description: The "Inventory Prefix" field defines a prefix to be used for inventory-related records.
Navigation: Enter the prefix (e.g., "INV") in the Inventory Prefix text field manually.
Starting Order Number (for Inventory)
Description: This field defines the starting order number for inventory transactions, ensuring that inventory records are sequentially numbered.
Navigation: Input the desired starting order number (e.g., "1001") for inventory in the Starting Order Number text field.
Inventory Transaction Prefix
Description: The "Inventory Transaction Prefix" field allows the user to set a prefix for inventory transactions (e.g., stock adjustments, issues, etc.).
Navigation: Enter the prefix (e.g., "INVT") in the Inventory Transaction Prefix text field.
Starting Order Number (for Inventory Transactions)
Description: This field sets the initial number for inventory transaction records.
Navigation: Input the starting order number (e.g., "1001") for inventory transactions in the Starting Order Number text field.
Putaway Prefix
Description: Defines the prefix for putaway operations, which track the storage of goods in the warehouse.
Navigation: Enter the prefix (e.g., "PUT") in the Putaway Prefix text field.
Starting Order Number (for Putaway)
Description: This field sets the starting order number for putaway operations.
Navigation: Enter the starting order number (e.g., "1001") for putaway records in the Starting Order Number text field.
Picking Prefix
Description: This field defines the prefix for picking operations, used to identify picking records in the warehouse management system.
Navigation: Enter the appropriate prefix (e.g., "PIC") in the Picking Prefix text field.
Starting Order Number (for Picking)
Description: Specifies the starting order number for picking operations, enabling sequential numbering for picking activities.
Navigation: Input the starting order number (e.g., "1001") in the Starting Order Number text field for picking.
Sales Return Prefix
Description: Defines the prefix for sales returns.
Navigation: Enter the desired prefix (e.g., "ST") in the Sales Return Prefix text field.
Starting Order Number (for Sales Return)
Description: This field sets the starting order number for sales returns, ensuring sequential record numbering for sales return activities.
Navigation: Input the starting order number (e.g., "1001") in the Starting Order Number text field.
Warehouse Transfer Prefix
Description: The "Warehouse Transfer Prefix" defines the prefix for warehouse transfers.
Navigation: Enter the prefix (e.g., "WT") in the Warehouse Transfer Prefix text field manually.
Starting Order Number (for Warehouse Transfer)
Description: Specifies the starting order number for warehouse transfers to ensure sequential tracking of transfer records.
Navigation: Input the desired starting order number (e.g., "1001") in the Starting Order Number text field.
Purchase Return Prefix
Description: This field defines the prefix for purchase return transactions.
Navigation: Enter the prefix (e.g., "PR") in the Purchase Return Prefix text field manually.
Starting Order Number (for Purchase Return)
Description: This field sets the starting order number for purchase returns.
Navigation: Enter the starting order number (e.g., "1001") in the Starting Order Number text field.
Inventory Transaction Details Prefix
Description: The "Inventory Transaction Details Prefix" is used to categorize detailed transaction records for inventory.
Navigation: Enter the prefix (e.g., "INVTDE") in the Inventory Transaction Details Prefix text field manually.
Starting Order Number (for Inventory Transaction Details)
Description: Specifies the starting order number for detailed inventory transactions.
Navigation: Input the starting order number (e.g., "1001") for inventory transaction details in the Starting Order Number text field.
Inventory Adjustment Prefix
Description: Defines the prefix for inventory adjustment records, used for tracking changes made to the inventory.
Navigation: Enter the prefix (e.g., "INA") in the Inventory Adjustment Prefix text field.
Starting Order Number (for Inventory Adjustment)
Description: This field sets the starting order number for inventory adjustments.
Navigation: Enter the desired starting order number (e.g., "1001") in the Starting Order Number text field.
Inventory Issues Prefix
Description: The "Inventory Issues Prefix" field defines the prefix for inventory issue records.
Navigation: Enter the prefix (e.g., "INVI") in the Inventory Issues Prefix text field.
Starting Order Number (for Inventory Issues)
Description: Specifies the starting order number for inventory issues.
Navigation: Input the starting order number (e.g., "1001") for inventory issues in the Starting Order Number text field.
Replenishment Order Prefix
Description: The "Replenishment Order Prefix" defines the prefix for replenishment orders in the system.
Navigation: Enter the prefix (e.g., "RO") in the Replenishment Order Prefix text field.
Starting Order Number (for Replenishment Order)
Description: Specifies the starting order number for replenishment orders.
Navigation: Input the starting order number (e.g., "1001") in the Starting Order Number text field.
Warehouse Transfer Return Prefix
Description: Defines the prefix for warehouse transfer return records.
Navigation: Enter the prefix (e.g., "WTR") in the Warehouse Transfer Return Prefix text field.
Starting Order Number (for Warehouse Transfer Return)
Description: This field sets the starting order number for warehouse transfer returns.
Navigation: Input the starting order number (e.g., "1001") in the Starting Order Number text field.
Invoice Prefix
Description: The "Invoice Prefix" field allows the user to set a prefix for invoice records.
Navigation: Enter the desired prefix (e.g., "INV") in the Invoice Prefix text field.
Starting Order Number (for Invoice)
Description: Specifies the starting order number for invoices.
Navigation: Input the starting order number (e.g., "1001") for invoice records in the Starting Order Number text field.
Internal Transfer Prefix
Description: The "Internal Transfer Prefix" defines the prefix for internal transfers within the organization.
Navigation: Enter the prefix (e.g., "IT") in the Internal Transfer Prefix text field.
Starting Order Number (for Internal Transfer)
Description: This field sets the starting order number for internal transfer records.
Navigation: Input the starting order number (e.g., "1001") for internal transfers in the Starting Order Number text field.
Cycle Counting Prefix
Description: The "Cycle Counting Prefix" defines the prefix for cycle counting operations.
Navigation: Enter the prefix (e.g., "CC") in the Cycle Counting Prefix text field.
Starting Order Number (for Cycle Counting)
Description: Specifies the starting order number for cycle counting records.
Navigation: Input the starting order number (e.g., "1001") for cycle counting in the Starting Order Number text field.
Cross Docking Prefix
Description: The "Cross Docking Prefix" defines the prefix for cross docking operations.
Navigation: Enter the prefix (e.g., "CD") in the Cross Docking Prefix text field.
Starting Order Number (for Cross Docking)
Description: This field sets the starting order number for cross docking records.
Navigation: Input the starting order number (e.g., "1001") for cross docking in the Starting Order Number text field.
Inventory Issue Picking Prefix
Description: The "Inventory Issue Picking Prefix" field is used for inventory issue picking operations.
Navigation: Enter the prefix (e.g., "INVISPIC") in the Inventory Issue Picking Prefix text field.
Starting Order Number (for Inventory Issue Picking)
Description: Specifies the starting order number for inventory issue picking operations.
Navigation: Input the starting order number (e.g., "1001") for inventory issue picking in the Starting Order Number text field.
Financial Year
The Financial Configuration section in the Warehouse Management System (WMS) allows users to set up the financial periods during which various processes, reports, and transactions will be tracked. This configuration ensures that financial data is properly aligned with the organization's fiscal years, helping maintain accurate records and reports throughout the specified period.
Through this configuration, users can define the start and end dates for the financial period, and specify the period range. This is important for planning, budgeting, and reporting activities within the WMS.
Here is the meaning of the field for the Description along with Navigation for the fields:
Period
Description: This field defines the financial period for the configuration. It specifies the range of years or periods for which the financial data will be applicable.
Navigation: Input the period manually in the Period field, using a format like "2024-2026" to define the start and end years.
Financial From Date
Description: This field defines the starting date of the financial period. It indicates when the financial data for this configuration begins.
Navigation: Select the From Date using the calendar picker in the Financial From Date field. The format for the date should be "MM-DD-YYYY" (e.g., 10-01-2024).
Financial To Date
Description: This field defines the ending date of the financial period. It indicates when the financial data for this configuration ends.
Navigation: Select the To Date using the calendar picker in the Financial To Date field. The format for the date should be "MM-DD-YYYY" (e.g., 20-10-2026).